• Skip to primary navigation
  • Skip to main content
  • Skip to primary sidebar
  • Start here
  • Baking 101
  • Recipes
  • Shop
  • Cart

The Bake School logo

menu icon
go to homepage
  • Start here
  • Baking 101
  • Recipes
  • Shop
  • Contact
  • Cart
    • Facebook
    • Instagram
    • Pinterest
    • Twitter
  • subscribe
    search icon
    Homepage link
    • Start here
    • Baking 101
    • Recipes
    • Shop
    • Contact
    • Cart
    • Facebook
    • Instagram
    • Pinterest
    • Twitter
  • ×

    Home » Baking techniques

    Published on: January 9, 2014 by Janice; Updated on: October 8, 2021 7 Comments

    How to stencil the top of a cake


    how to stencil the top of a cake | kitchen heals soul
     

    Stencilling numbers on a birthday cake, instead of piping, couldn't be easier, and it's a really nice way to avoid trying to write on a cake with melted chocolate.
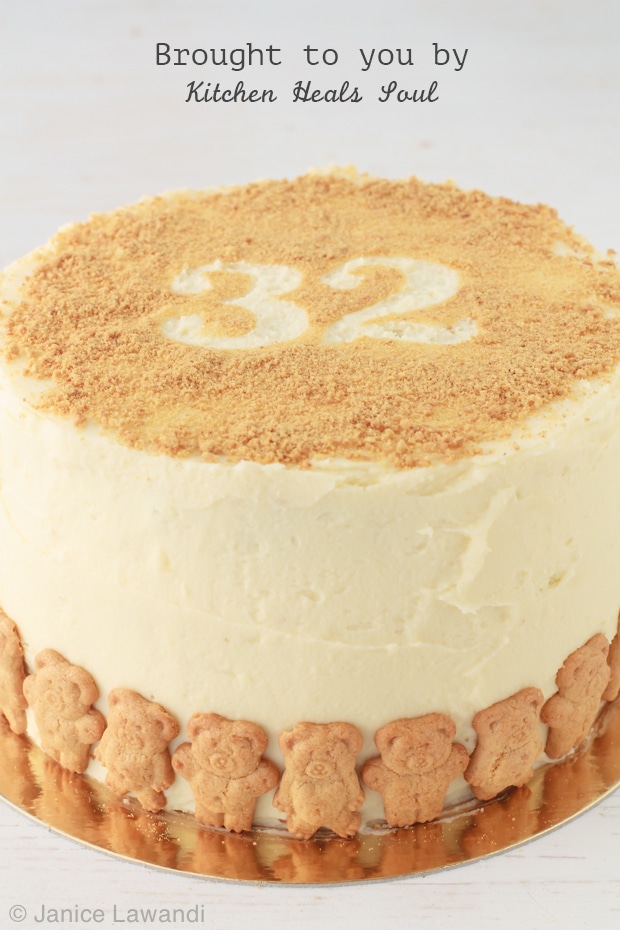
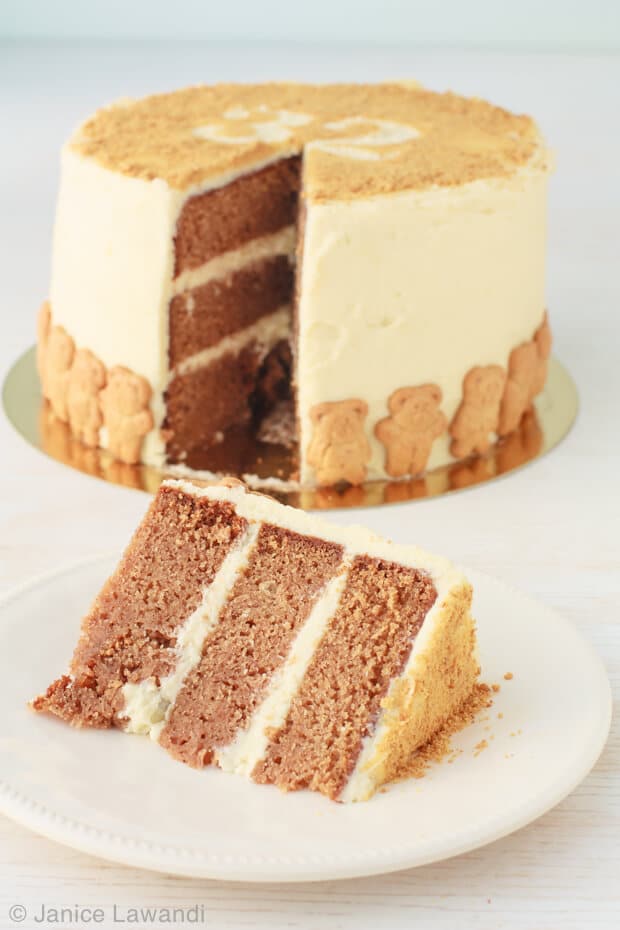
    Piping is hard. Stencilling is easy.


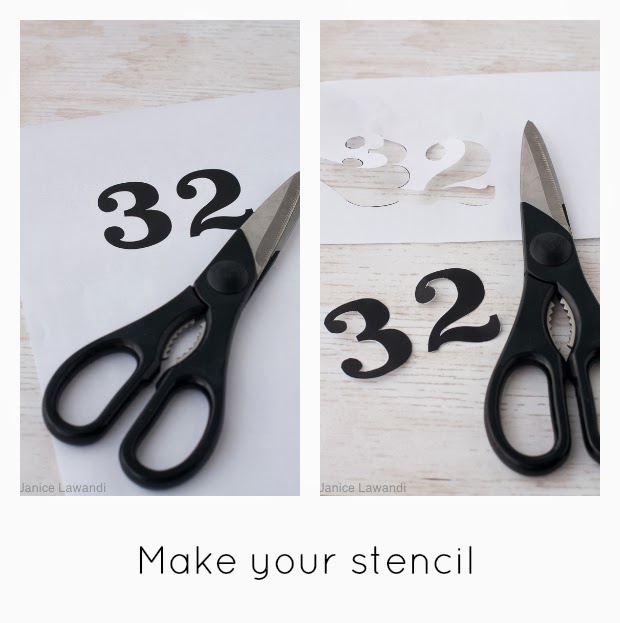
    First things first: you need a stencil. I opted to use a word processor, choosing a pretty font, typing up the numbers I needed on my computer, and printing them on regular white paper. Remember to make them big enough, but not too big to fit the top of your cake.

    making a stencil | kitchen heals soul
     
     
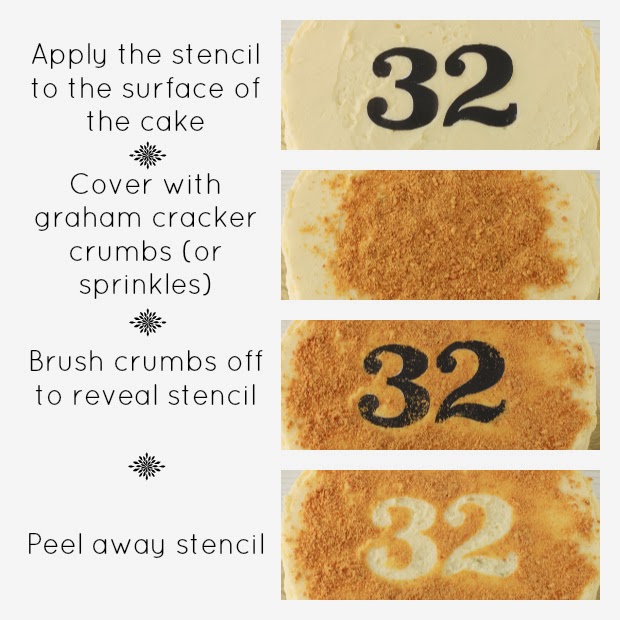
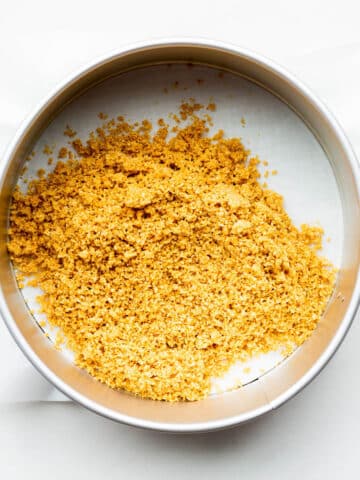
    Once you have a stencil made, it's relatively easy. It's just a matter of applying the stencil to the surface of the cake, covering it up with lots and lots of cookie crumbs or sprinkles, brushing them off to reveal the stencil, while also pressing all those crumbs or sprinkles on the surface around the stencil ever so gently so they stick. Finally, you simply have to peel off the stencil to reveal the numbers.
     
    how to stencil a cake | kitchen heals soul

    Overall, I think this is a pretty easy way to decorate a cake and a fun way to celebrate a birthday.

    If you are looking for a smoother look to the numbers, let the cake chill for about 5 minutes in the fridge/freezer before beginning the stencilling process. Chilling hardens the surface of the frosting a little so that the stencil will peel off more cleanly without pulling up some of the frosting. I did this tutorial without any refrigeration, and it still worked out pretty well, all things considered.

    Now, go forth and stencil some cakes!

    « Spice cake with cream cheese frosting
    The complete guide to baking soda in baking »
    • Facebook
    • Instagram
    • Pinterest
    • Twitter

    Baking resources

  • Baking conversion charts
  • Baking ingredients and pantry staples
  • Baking substitutions
  • Common baking conversions
  • Choosing baking pans
  • How to measure ingredients for baking
  • Mixing methods
  • Reader Interactions

    Comments

    1. Rimli says

      January 10, 2014 at 9:52 am

      I always use butter paper or plastic sheet for my stencils. It makes my life less messy 🙂

      Reply
      • Janice Lawandi says

        January 10, 2014 at 10:20 pm

        Awesome! I went straight from printer to cake, but that's a good point 🙂

        Reply
    2. Mallory Frayn says

      January 10, 2014 at 5:58 pm

      This seems quite doable, even for an incompetent cake decorator such as myself!

      Reply
      • Janice Lawandi says

        January 10, 2014 at 10:21 pm

        Definitely doable 😉

        Reply
    3. Anonymous says

      February 18, 2014 at 1:50 am

      This is really helpful! 🙂 Do you recall the name of the font you used?

      Reply
      • Janice Lawandi says

        February 18, 2014 at 9:02 pm

        Thanks!
        The font I used is called "superclarendon": http://www.myfonts.com/fonts/typodermic/superclarendon/

        Reply
      • Anonymous says

        March 16, 2014 at 2:38 pm

        Thanks! I'm collecting great fonts for decorating, and that one reminds me of the way the numbers were printed on the old "Sorry" game cards. 🙂

        Reply

    Leave a Reply Cancel reply

    Your email address will not be published. Required fields are marked *

    Recipe Rating


    This site uses Akismet to reduce spam. Learn how your comment data is processed.

    Primary Sidebar

    This is a picture of Janice Lawandi

    Hi, I'm Janice! I am a baking-obsessed recipe developer with a PhD in Chemistry who writes about baking and the science of baking.

    More about me →

    Marmalade 101

    a palette of orange marmalades with varying thickness and set, some runnier others thicker, to show impact of cooking temperature on marmalade set
    Understand the marmalade setting point and your marmalade making will be more successful! Use this to make lime marmalade!

    Baking for Easter

    • How to make hot cross buns for Easter weekend
    • Carrot muffins
    • Eggless carrot cake
    • Carrot focaccia

    Baking conversions

    How to poach pears

    Poached pears on an enamelware plate.
    This simple poached pears recipe is easy and you can use the fruit for salads, appetizers, and desserts!

    Footer

    ↑ back to top

    About

    • Meet Janice
    • FAQ
    • Privacy Policy
    • Terms and conditions
    • Press

    Newsletter

    • Sign Up! for emails and updates

    Contact

    • Contact
    • Services
    • Portfolio

    As an Amazon Associate I earn from qualifying purchases.

    COPYRIGHT © 2022 · THE BAKE SCHOOL