
A lattice pie crust is a traditional and stunning way to create a decorative top on a double-crust pie without too much stress. Find out how to make a lattice pie crust, including tricks for cutting even dough strips and how to weave them.
Jump to:
What You Need To Make a Lattice Top Pie
- One unbaked fruit-filled pie crust with edges that are untrimmed
- A second portion of dough that has been rolled out on a floured surface (or on parchment paper) to roughly 10x15 inches-I like this all-butter pie crust made in the food processor
- A long ruler or a measuring tape, at least 10 inches long
- A pizza wheel, pastry wheel, lattice cutter, or a pairing knife
- Kitchen scissors
Please ensure you have a dedicated measuring tape or ruler in your kitchen that you use only for food to avoid cross-contamination.
If making pie crust from scratch scares you, be sure to check out my pie crust masterclass!
Cutting Strips Of Pie Dough
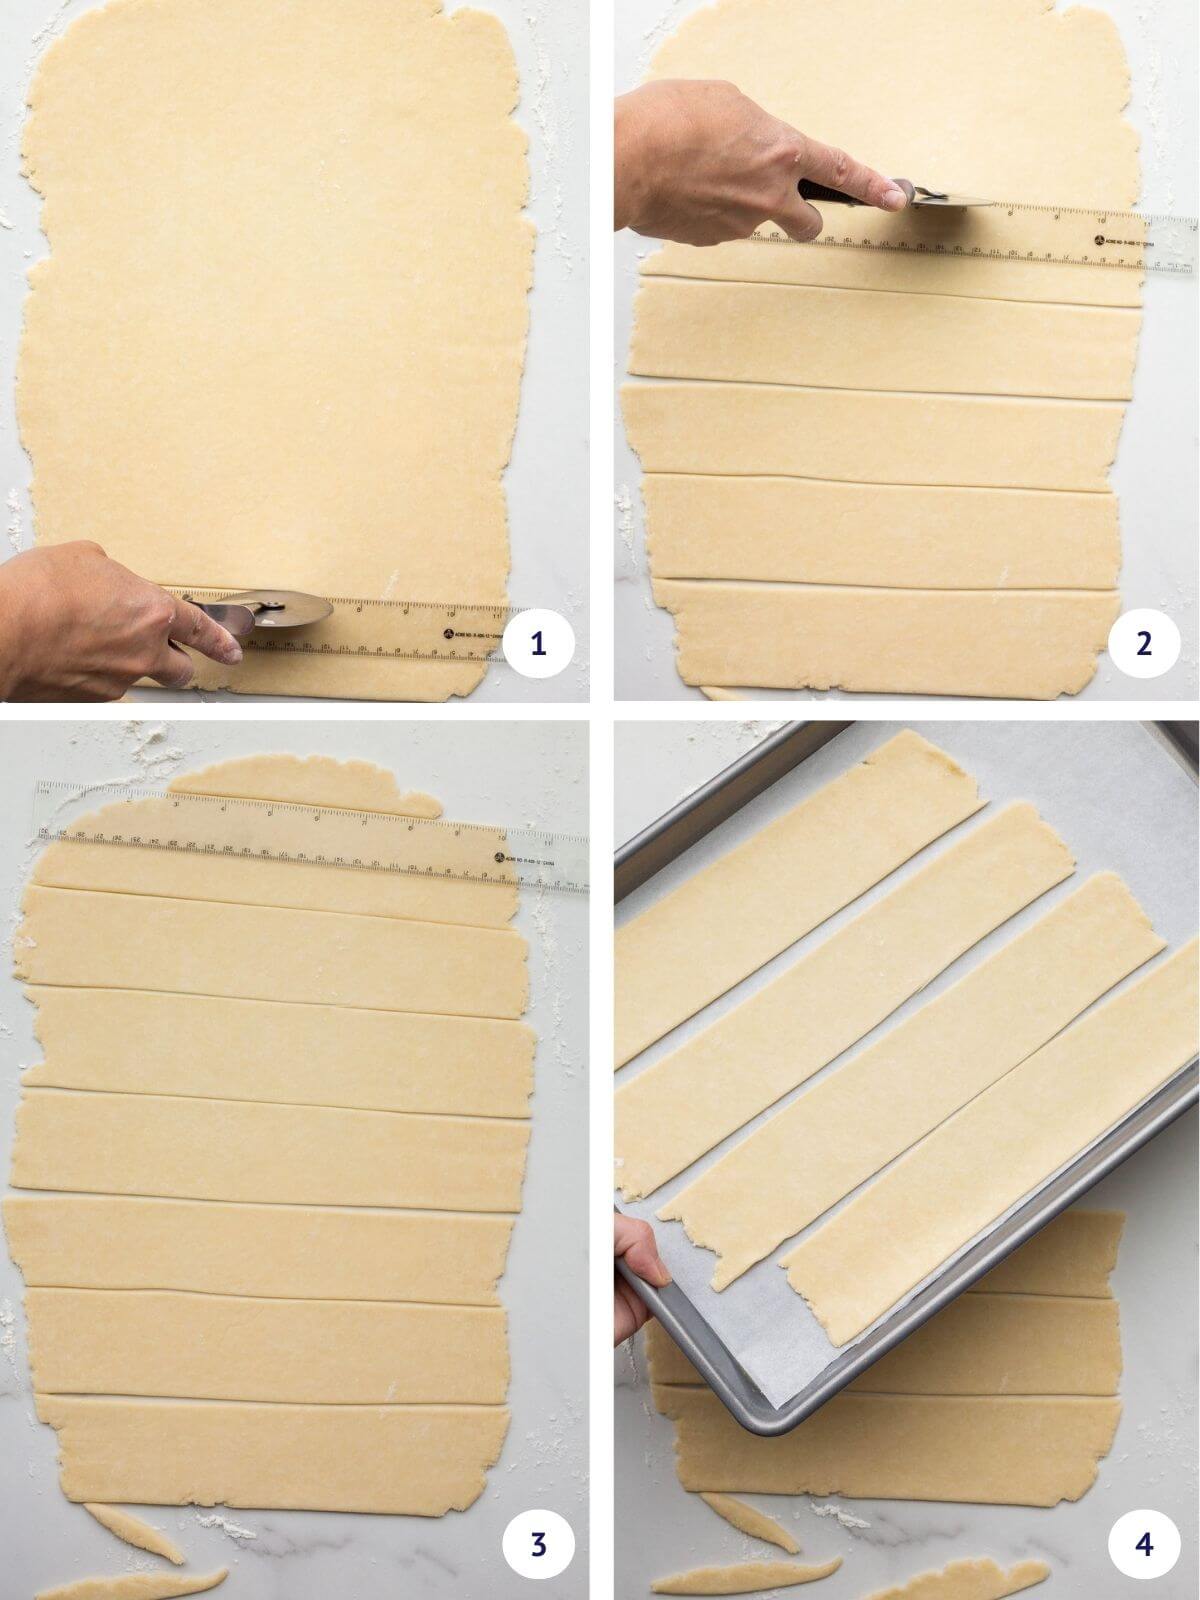
Cutting even strips of dough can be tricky. I like to use a ruler and a pizza wheel to make the job easier! These two tools combined work well together and help you cut straight, even strips.
- For a fat lattice, you need to cut 7 strips of dough that are 1.5-2 inches wide. Given that we need 7 strips to weave the lattice, I recommend rolling the sheet of dough to a rectangle of 10 inches x 15 inches, roughly. These dimensions will give you enough excess to trim the edges so they are neat. Check out this blueberry pie recipe to see a fat lattice.
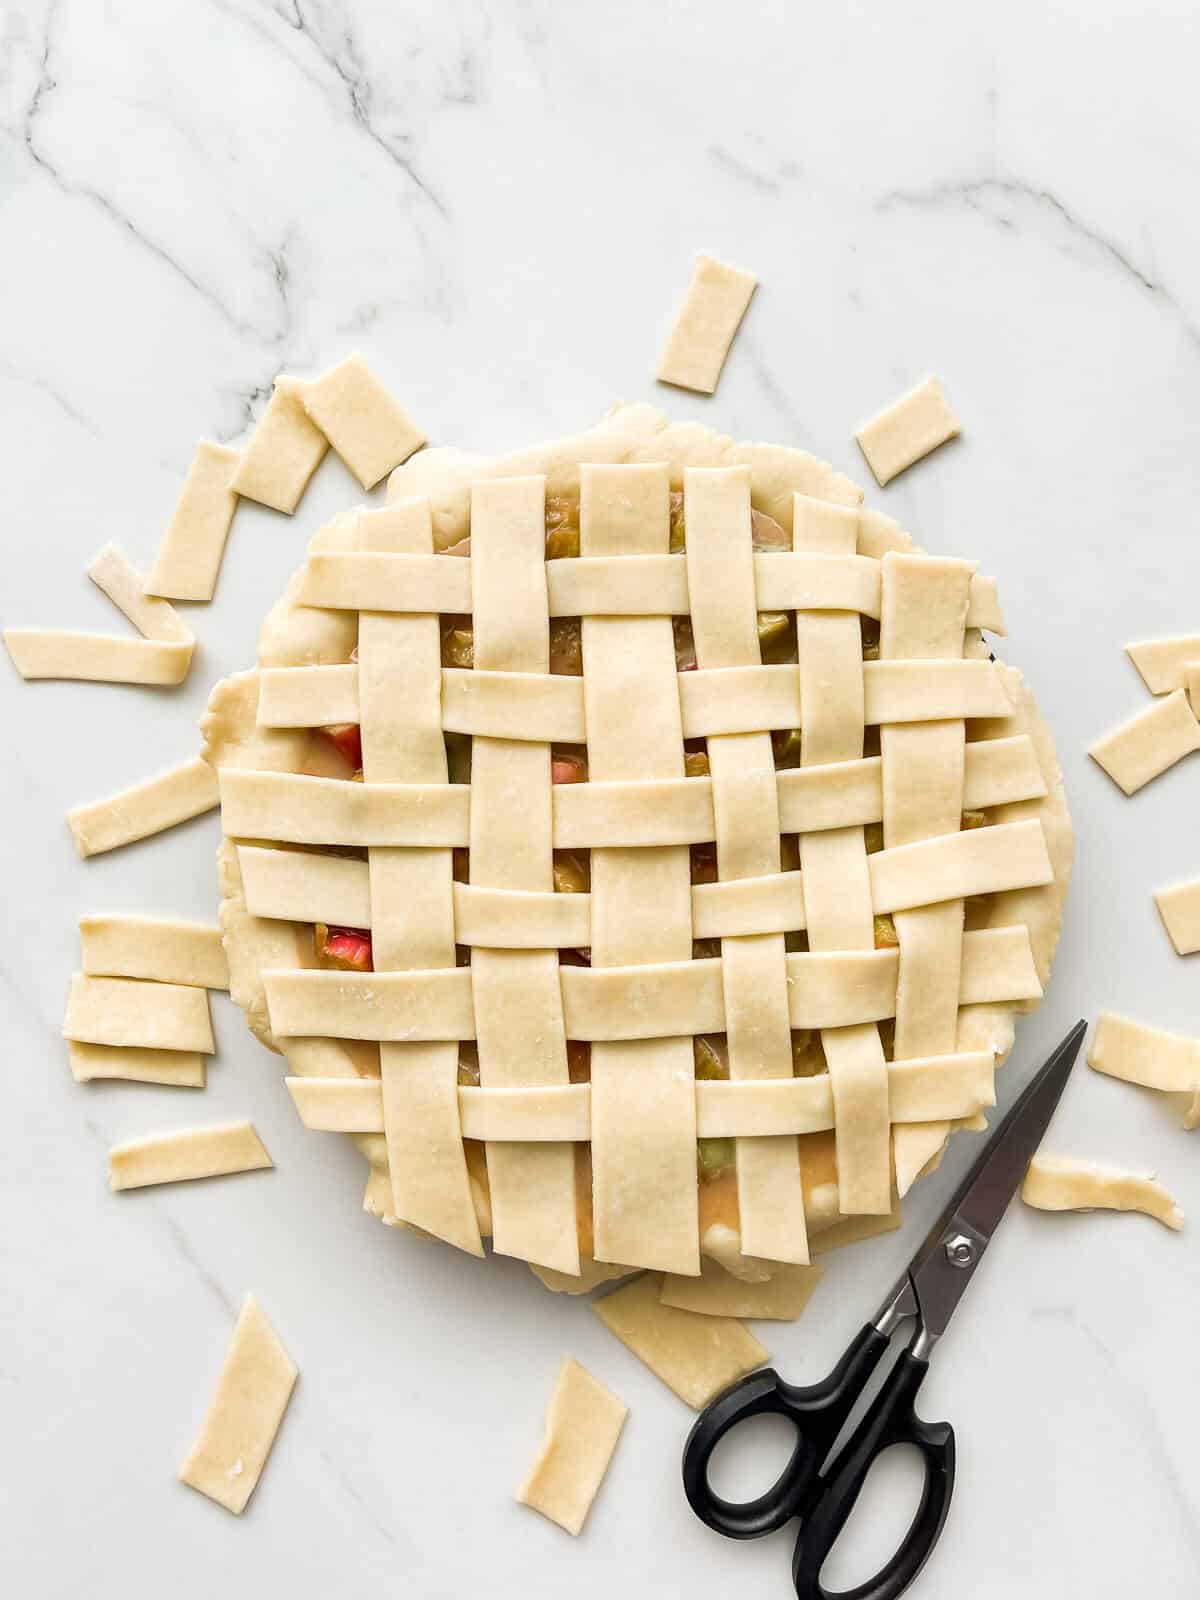
- For a thin lattice, you need to cut 12 strips of dough that are 1 inch wide or less. Check out this rhubarb pie to see a finer lattice.
Finer lattices take longer to weave. Keep this in mind when you are deciding what you want to do.
Fun fact: you can vary the width of the strips of dough to weave a lattice of thick and thin strips for a fun effect. You can even braid very thin strips and use the braid as a strip in the lattice!
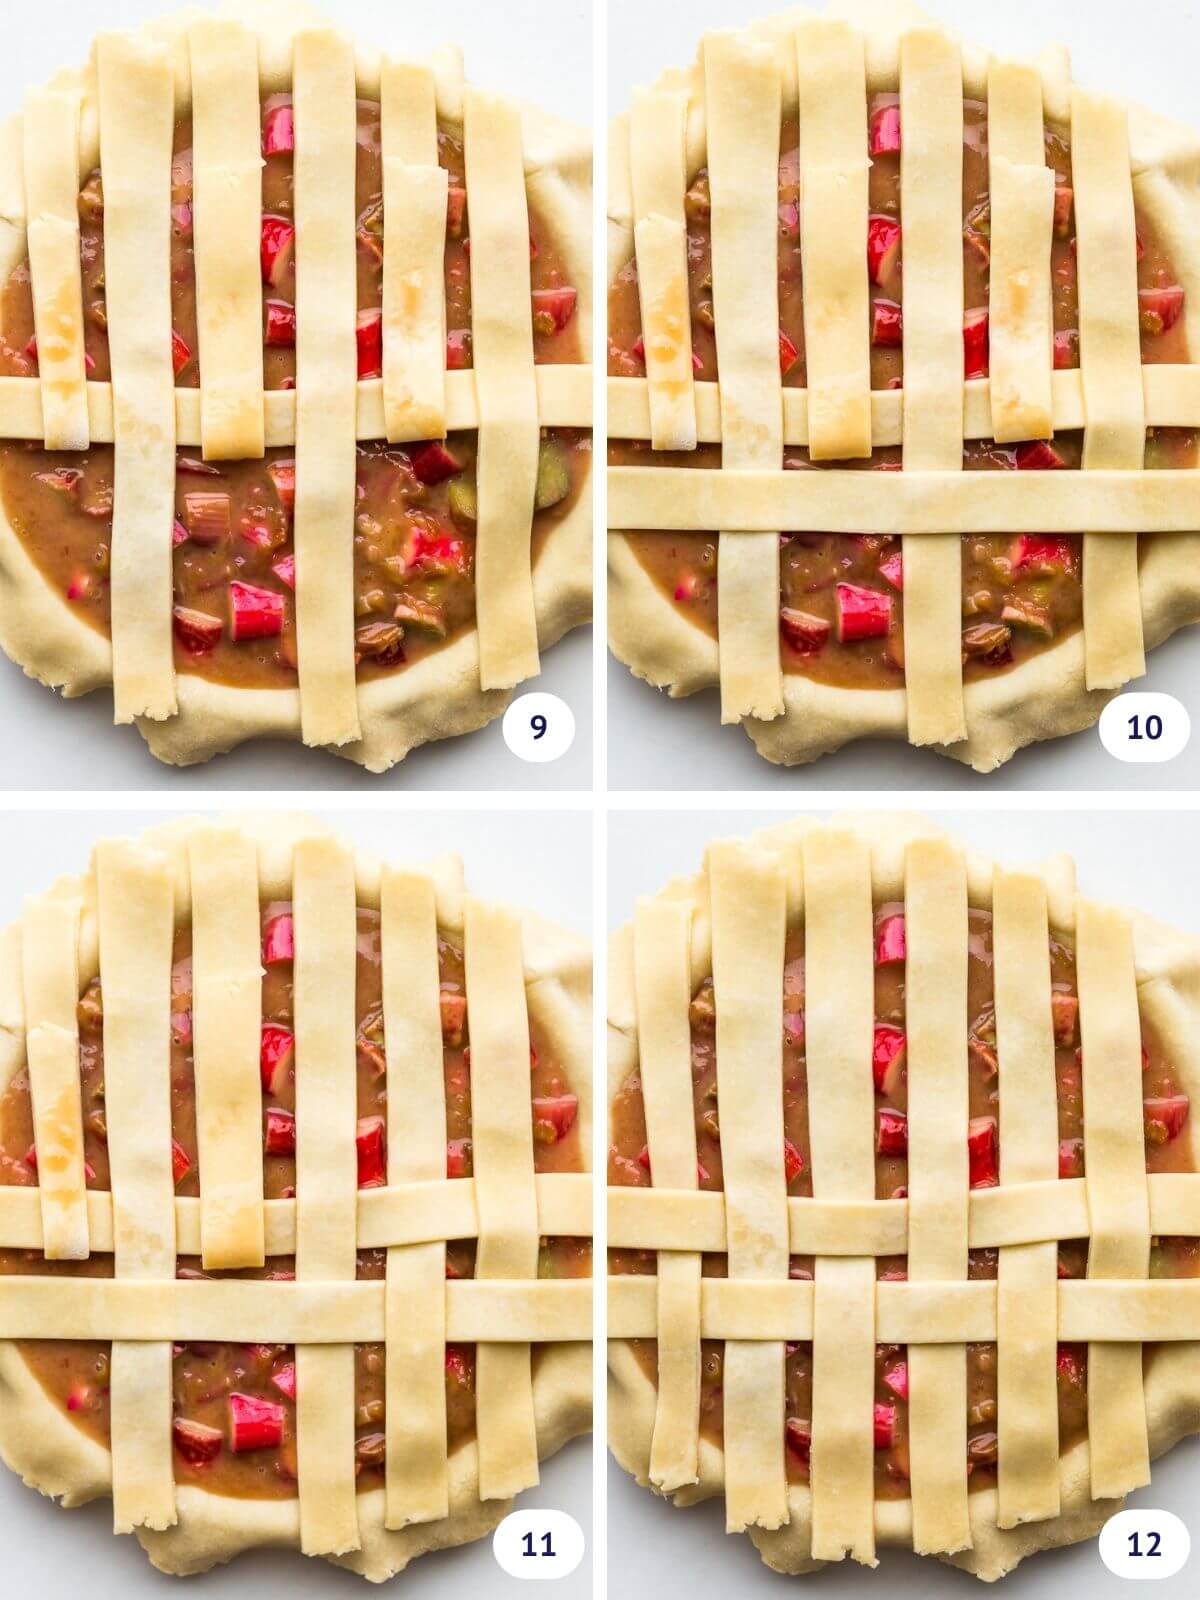
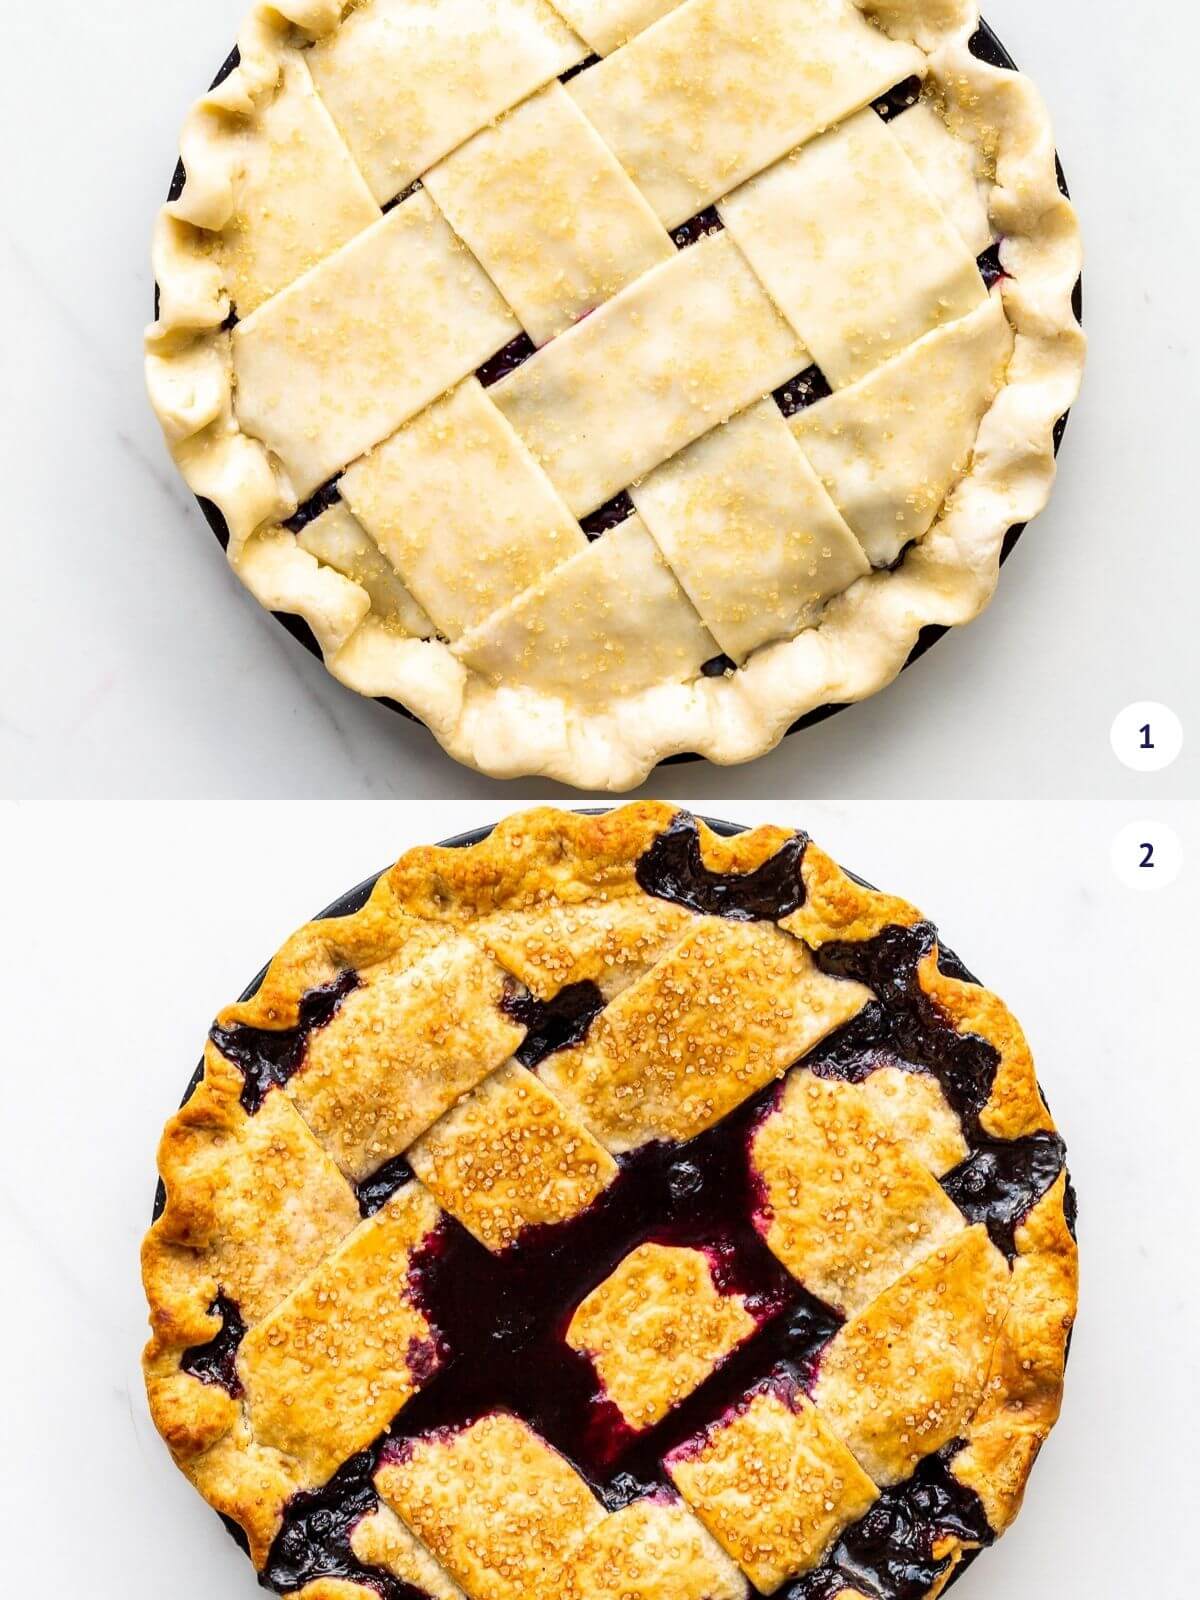
How To Weave a Fat Lattice Pie Crust Top
To create a fat lattice, you will need 7 wide strips of dough that are roughly 1.5-2 inches wide and at least 10 inches long.
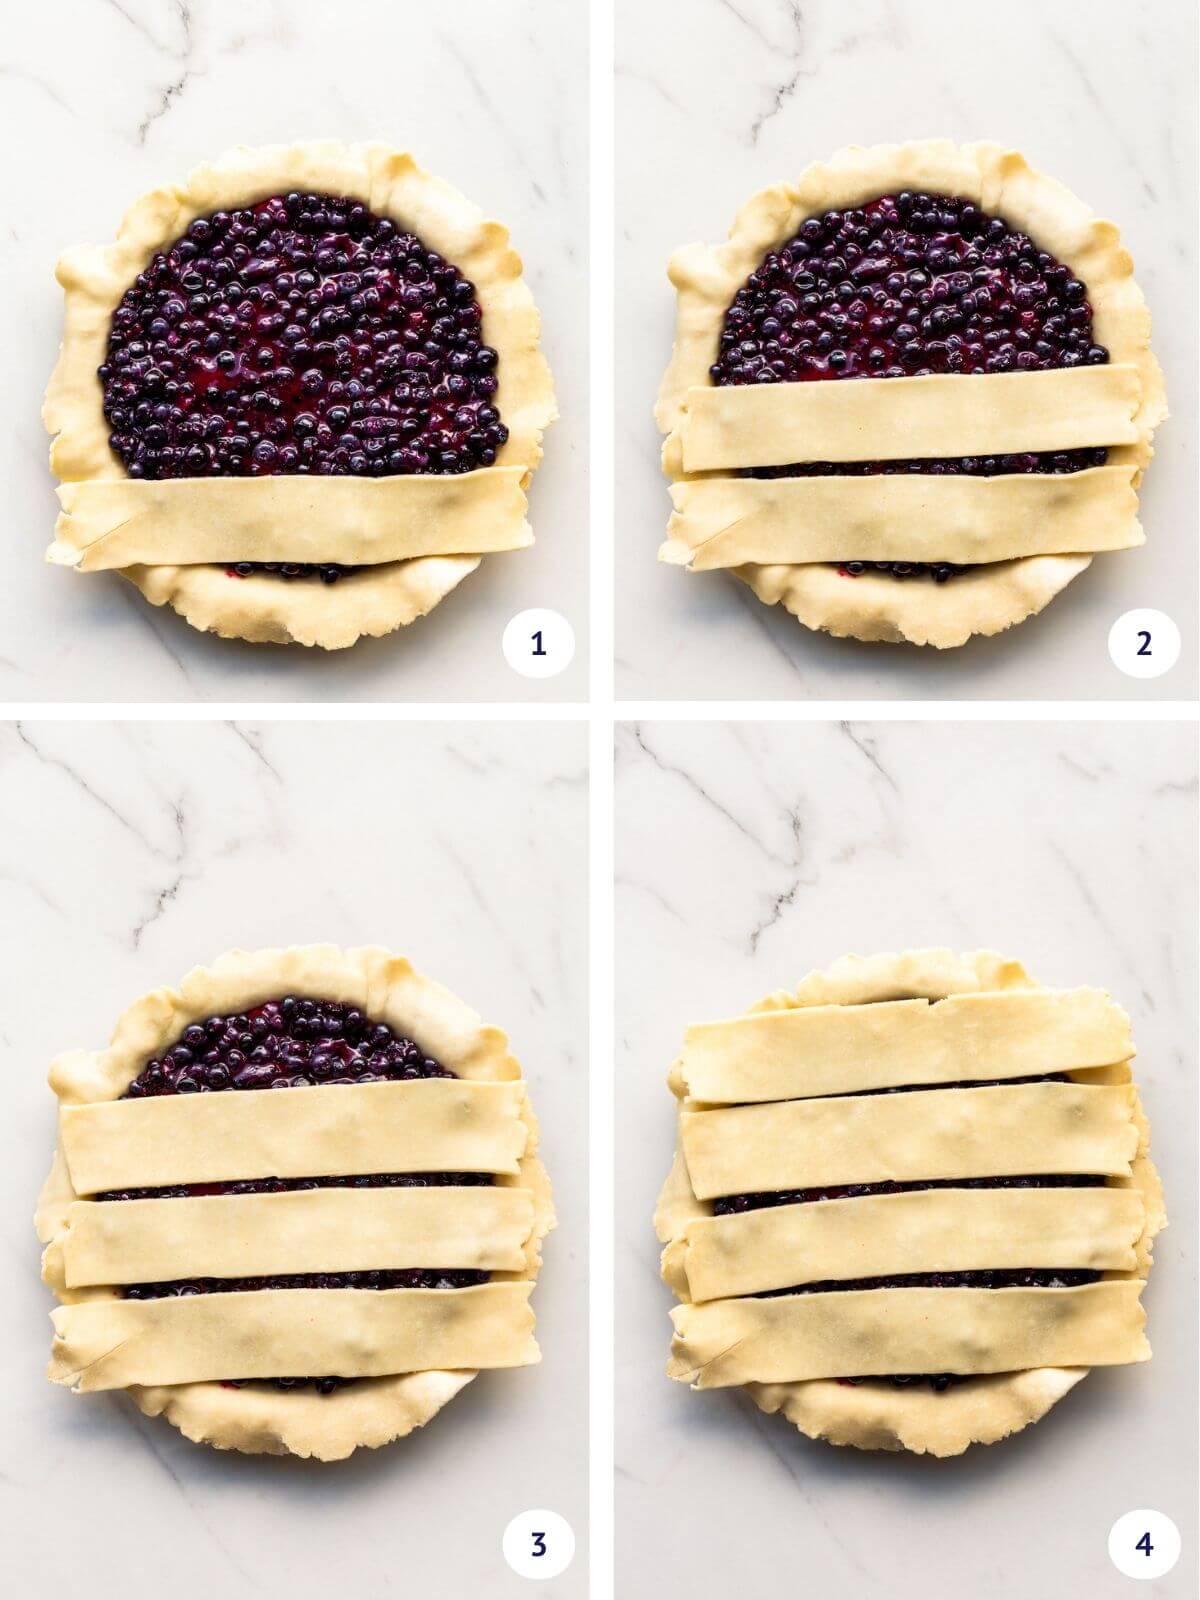
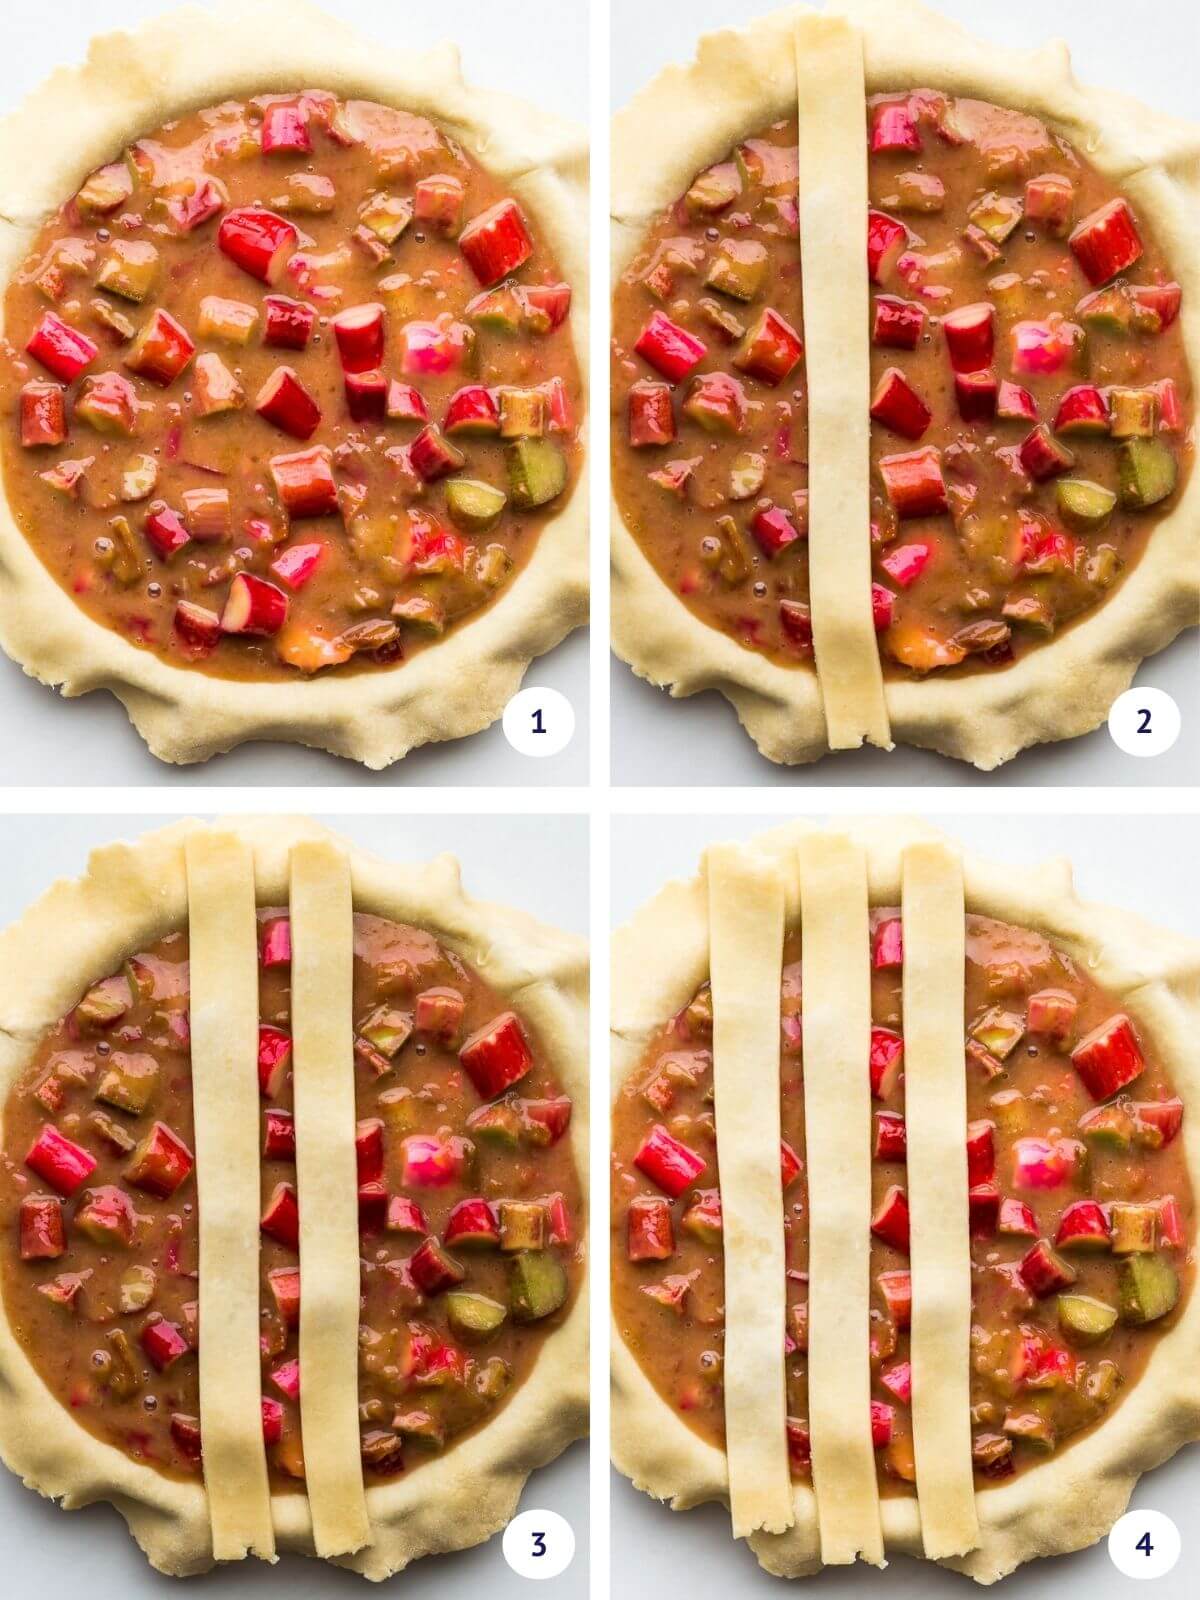
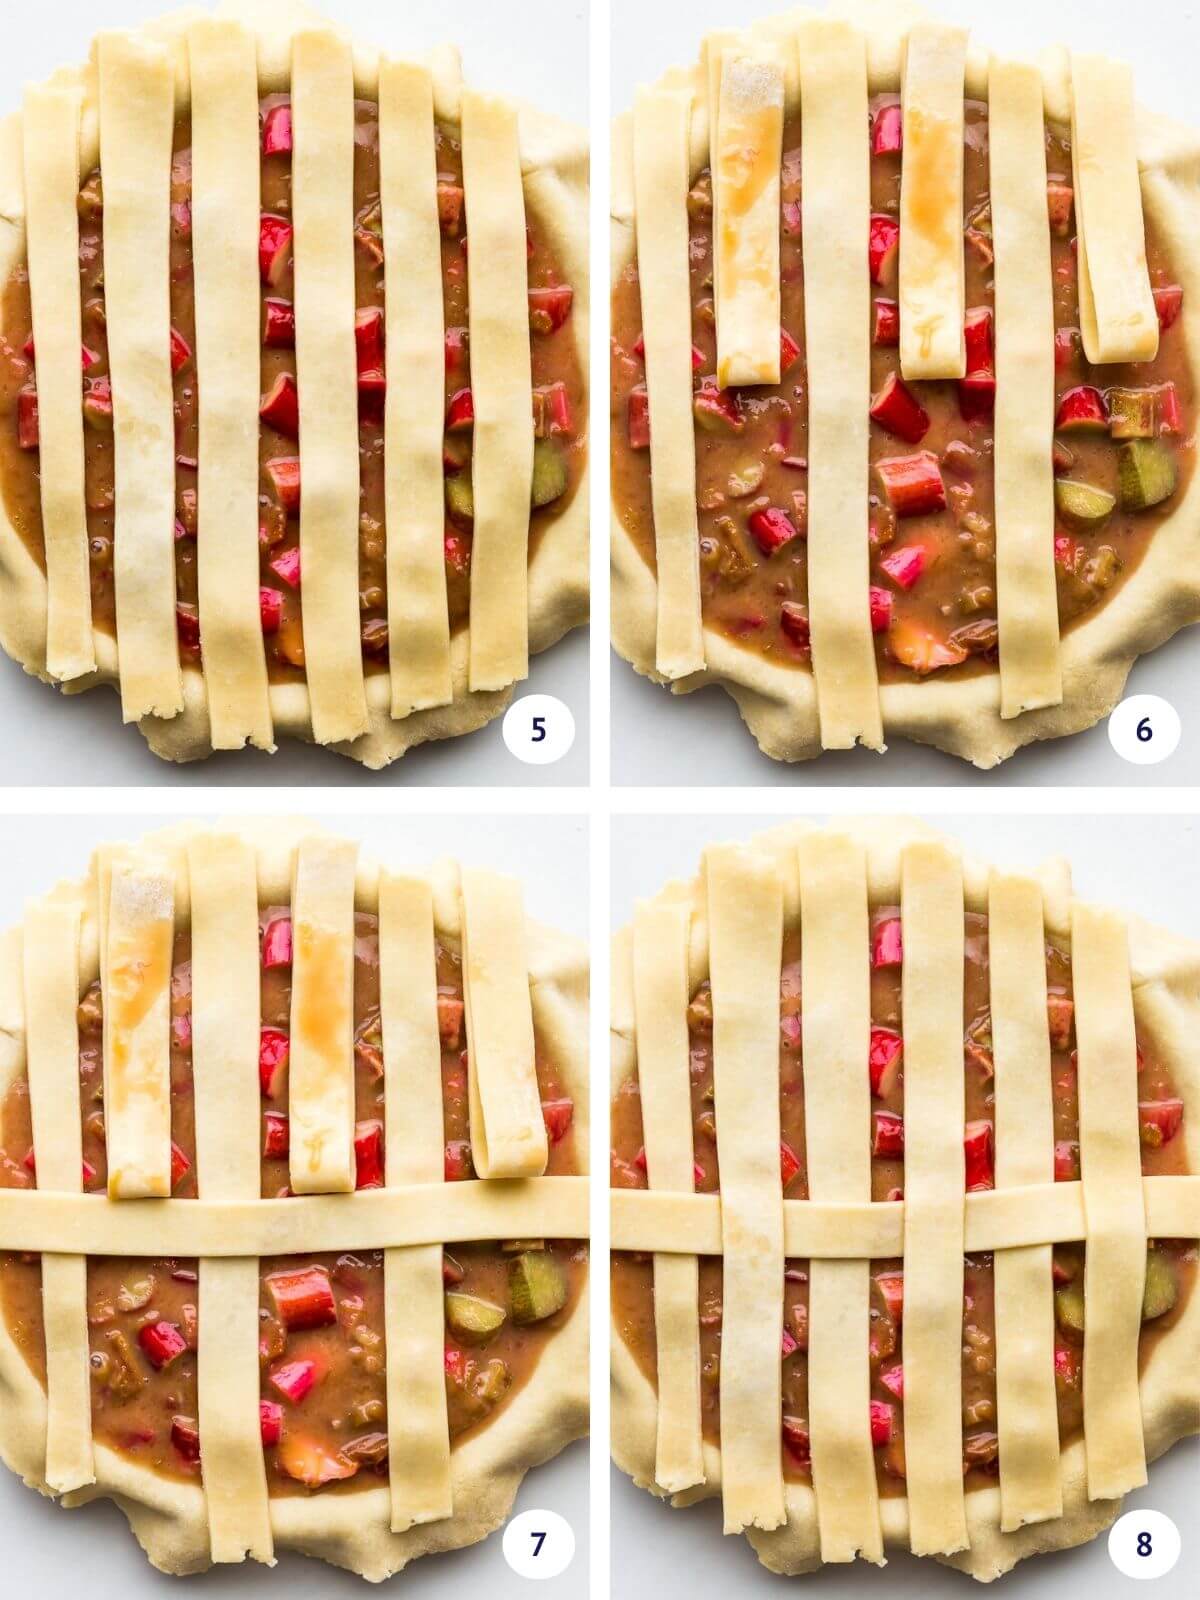
- Steps 1-4: arrange 4 strips of pie dough horizontally and parallel to each other across the top of the filled pie.
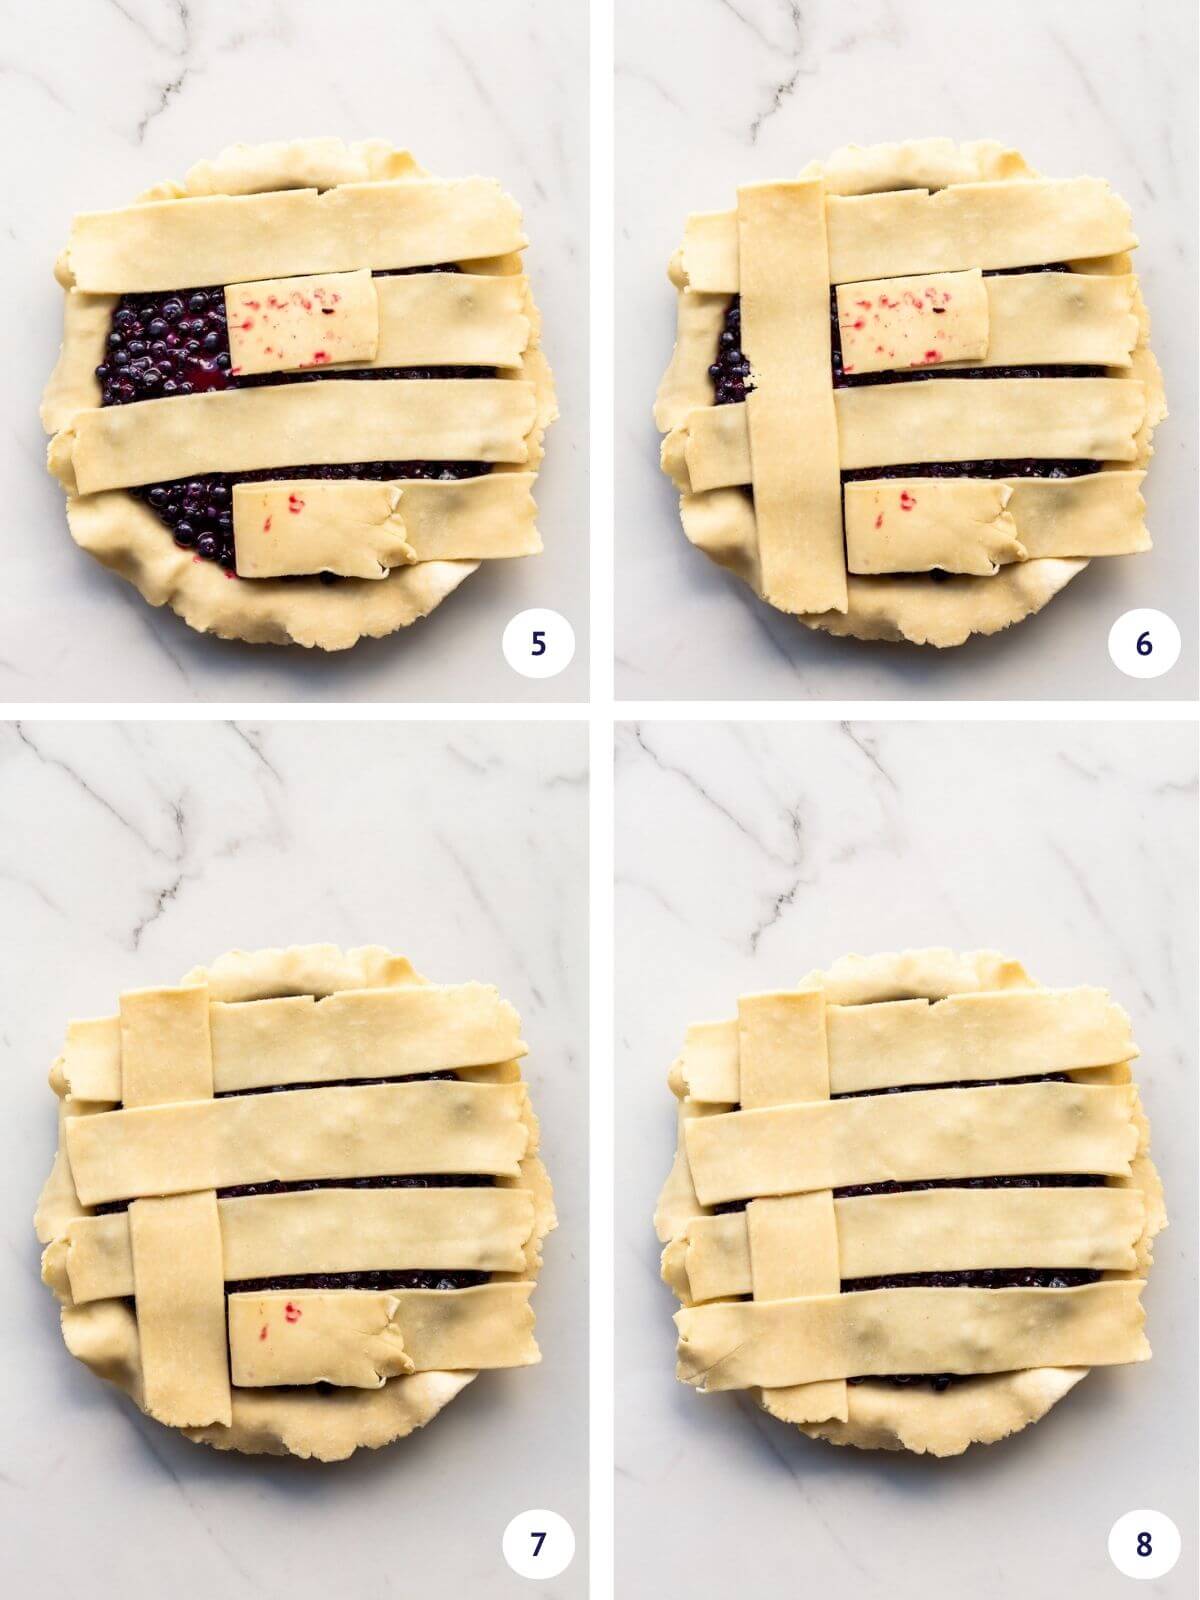
- Step 5: Fold back the second and fourth strips (basically every second strip) toward the middle.
- Step 6: Place a strip of dough vertically crosswise over the two remaining strips.
- Steps 7-8: Unfold the two folded strips over the vertical strip to form the first lattice weave.
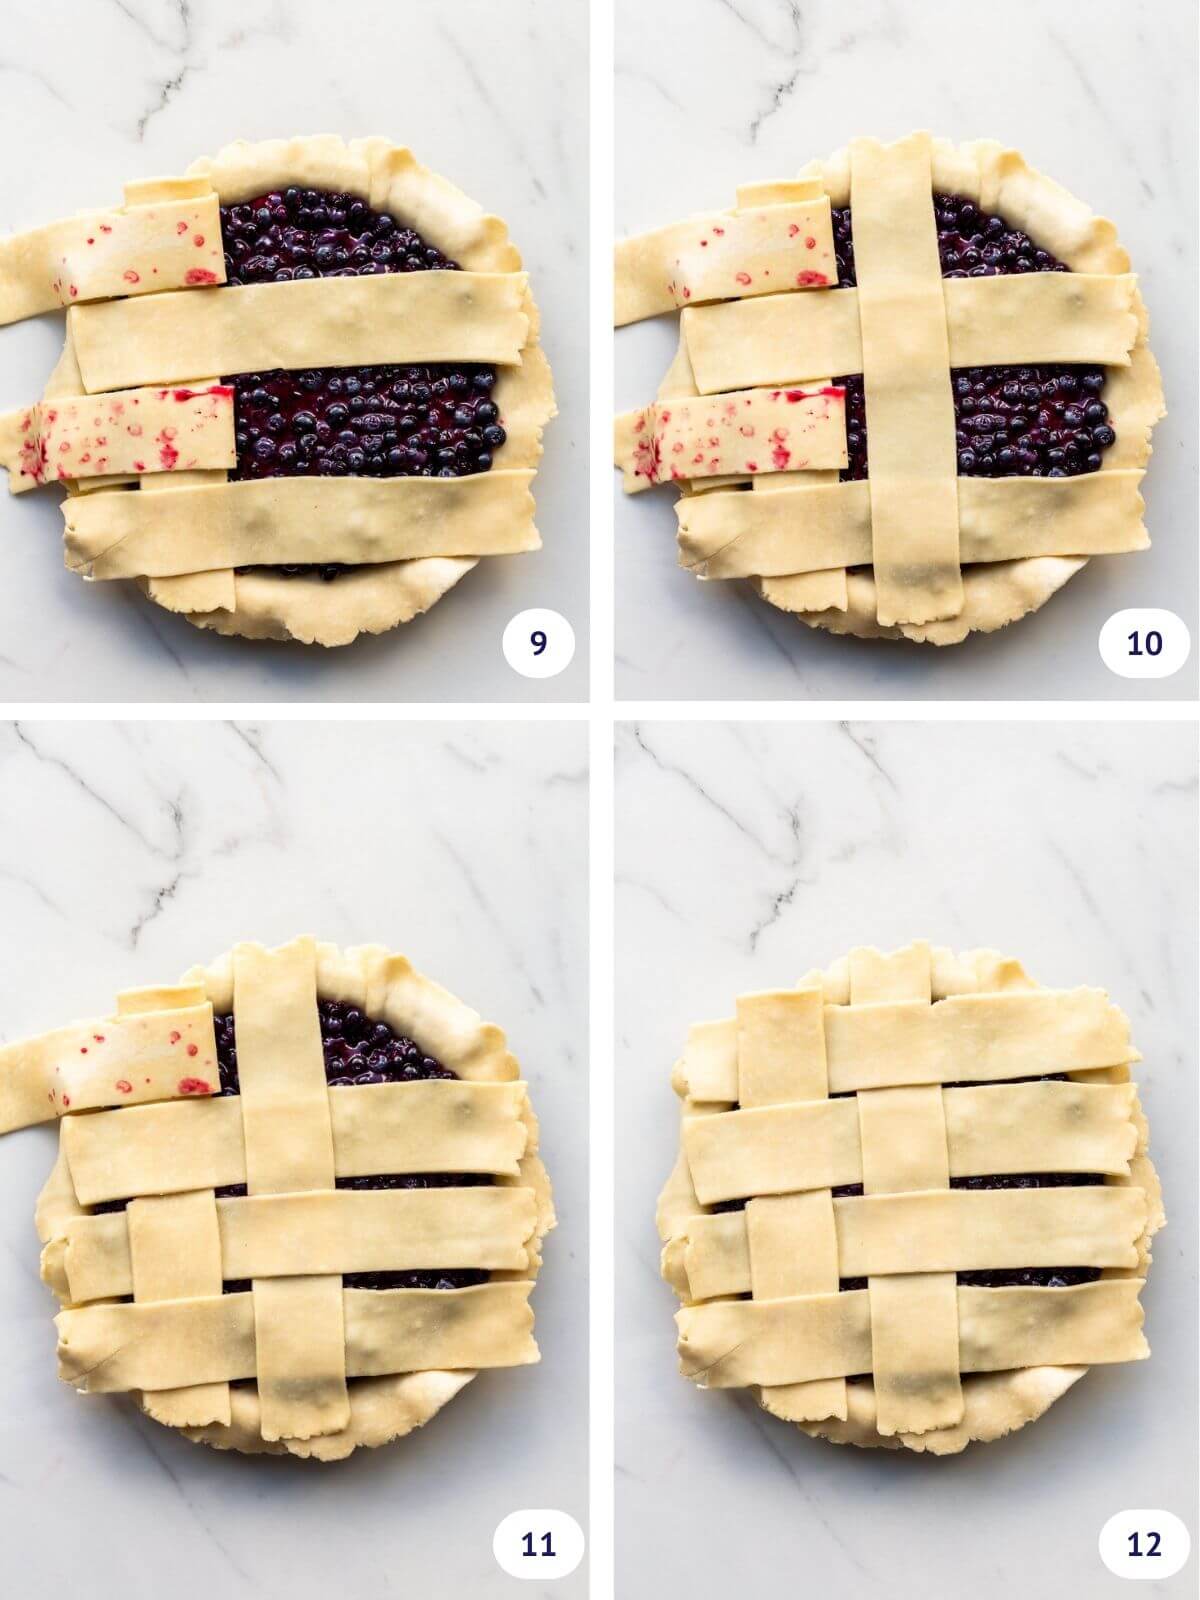
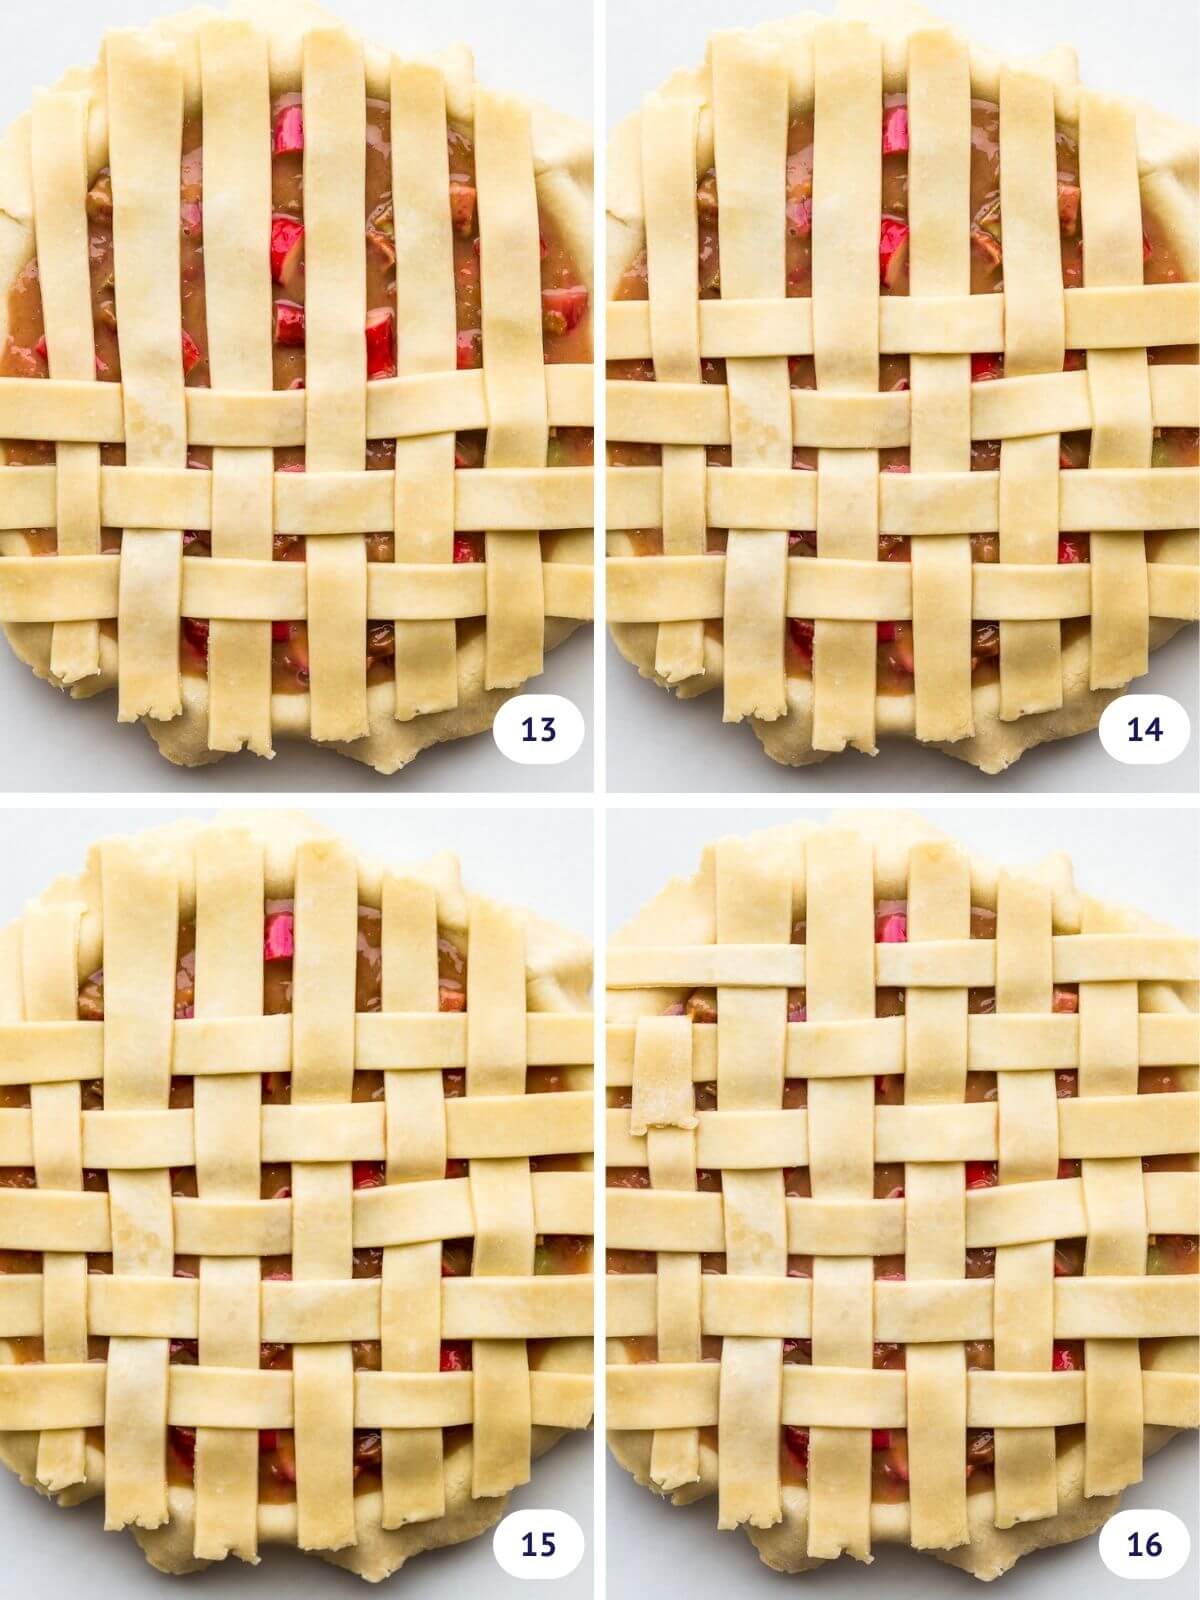
- Step 9: Fold back the first and third strips toward the middle this time.
- Step 10: Place a strip of dough vertically crosswise over the two remaining strips.
- Steps 11-12: Unfold the two folded strips over the vertical strip to form the second lattice weave.
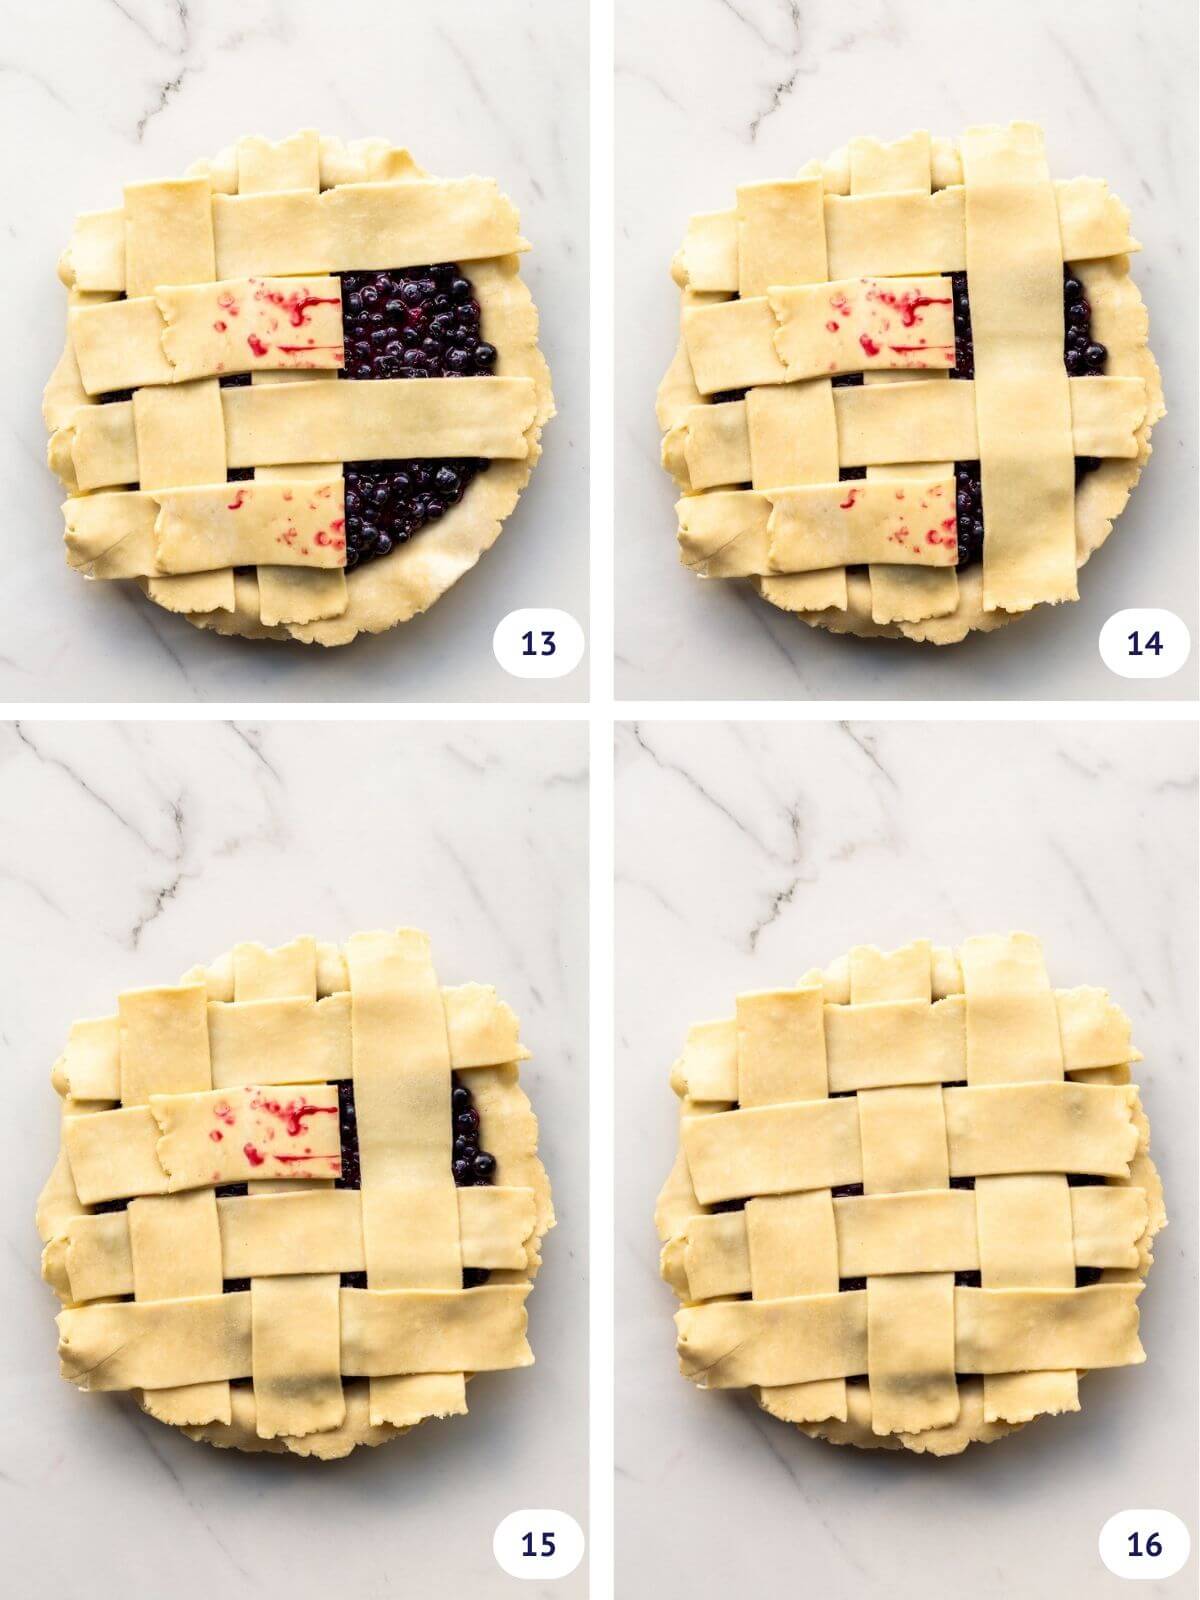
- Step 13: Fold back the second and fourth strips (basically every second strip) toward the middle.
- Step 14: Place the last strip of dough vertically crosswise over the two remaining strips.
- Steps 15-16: Unfold the two folded strips over the vertical strip to form the third and last lattice weave.
How To Weave a Thin Lattice Pie Crust
You will need twelve 1-inchx10-inch strips of pie dough for this technique.
- Steps 1-4: Arrange 6 strips of pie dough vertically and parallel to each other across the top of the filled pie.
- Step 5: Fold back the second, fourth, and sixth strips (basically every second strip) toward the middle.
- Step 6: Place a strip of dough horizontally crosswise over the three remaining strips.
- Steps 7-8: Unfold the three folded strips over the horizontal strip to form the first lattice weave
- Step 9: Fold back the first, third, and fifth strips toward the middle this time.
- Step 10: Place a strip of dough horizontally crosswise over the three remaining strips.
- Steps 11-12: Unfold the three folded strips over the horizontal strip to form the second lattice weave.
- Step 13-16: Repeat this weaving pattern with the remaining 4 strips of dough. Remember that for each additional strip, you need to alternate which dough strips of the lattice are folded and unfolded as described

Once your lattice is done, you need to trim the lattice strips around the edges and then fold the bottom crust over the ends of the strips. Trimming the excess lattice strips is essential to make sure the edge isn't overly thick.
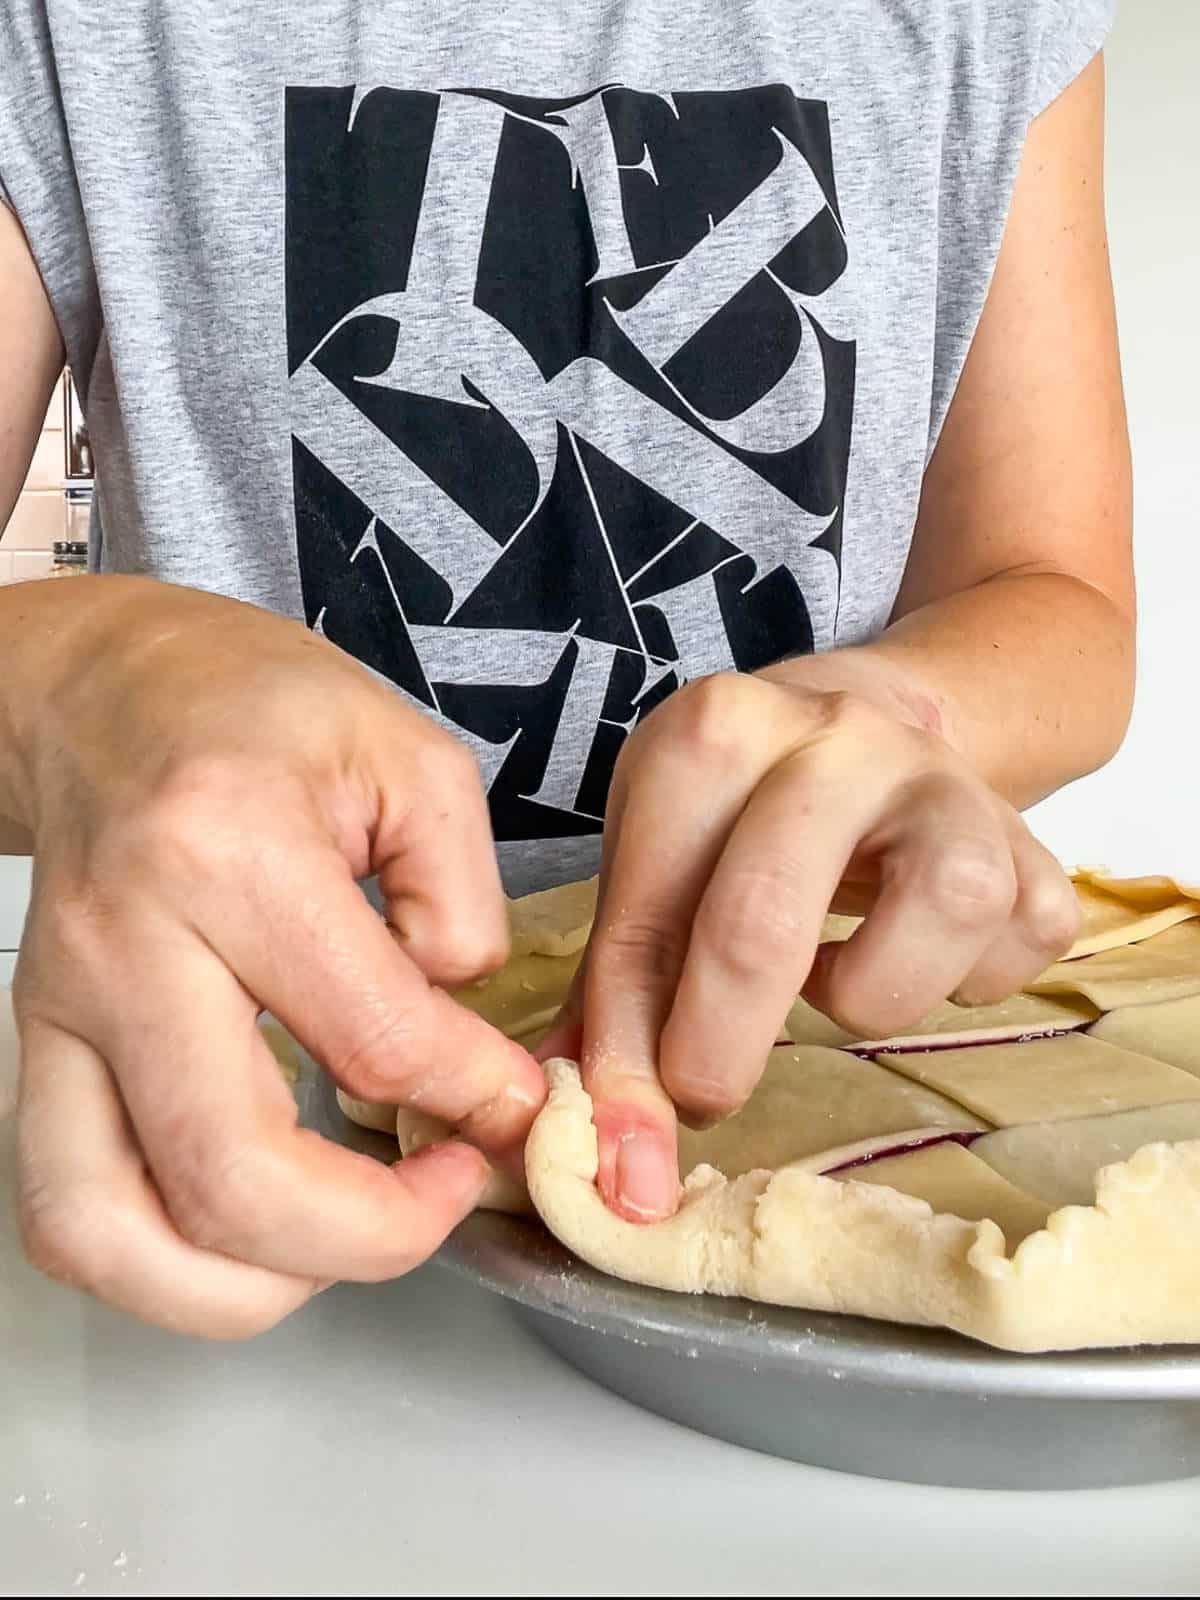
Crimp around the circumference of the pie for a finished look.
Ways of modifying the lattice pie technique
Once you've mastered the lattice pie crust technique, you can get creative:

- Diamond lattice: instead of arranging pie dough strips horizontally and vertically, perpendicular to each other, you can arrange the strips on a diagonal, at an angle, to create a slanted lattice
- Braiding: you can braid 3 skinny strips of dough (less than ½-inch wide) to create a 10-inch braid that you can weave into the lattice. Treat the braid as you would a single strip of dough.
Lattice pie crust alternatives
If you aren't in the mood to weave a lattice, you can still jazz up your next pie with these decorative pie crust techniques:
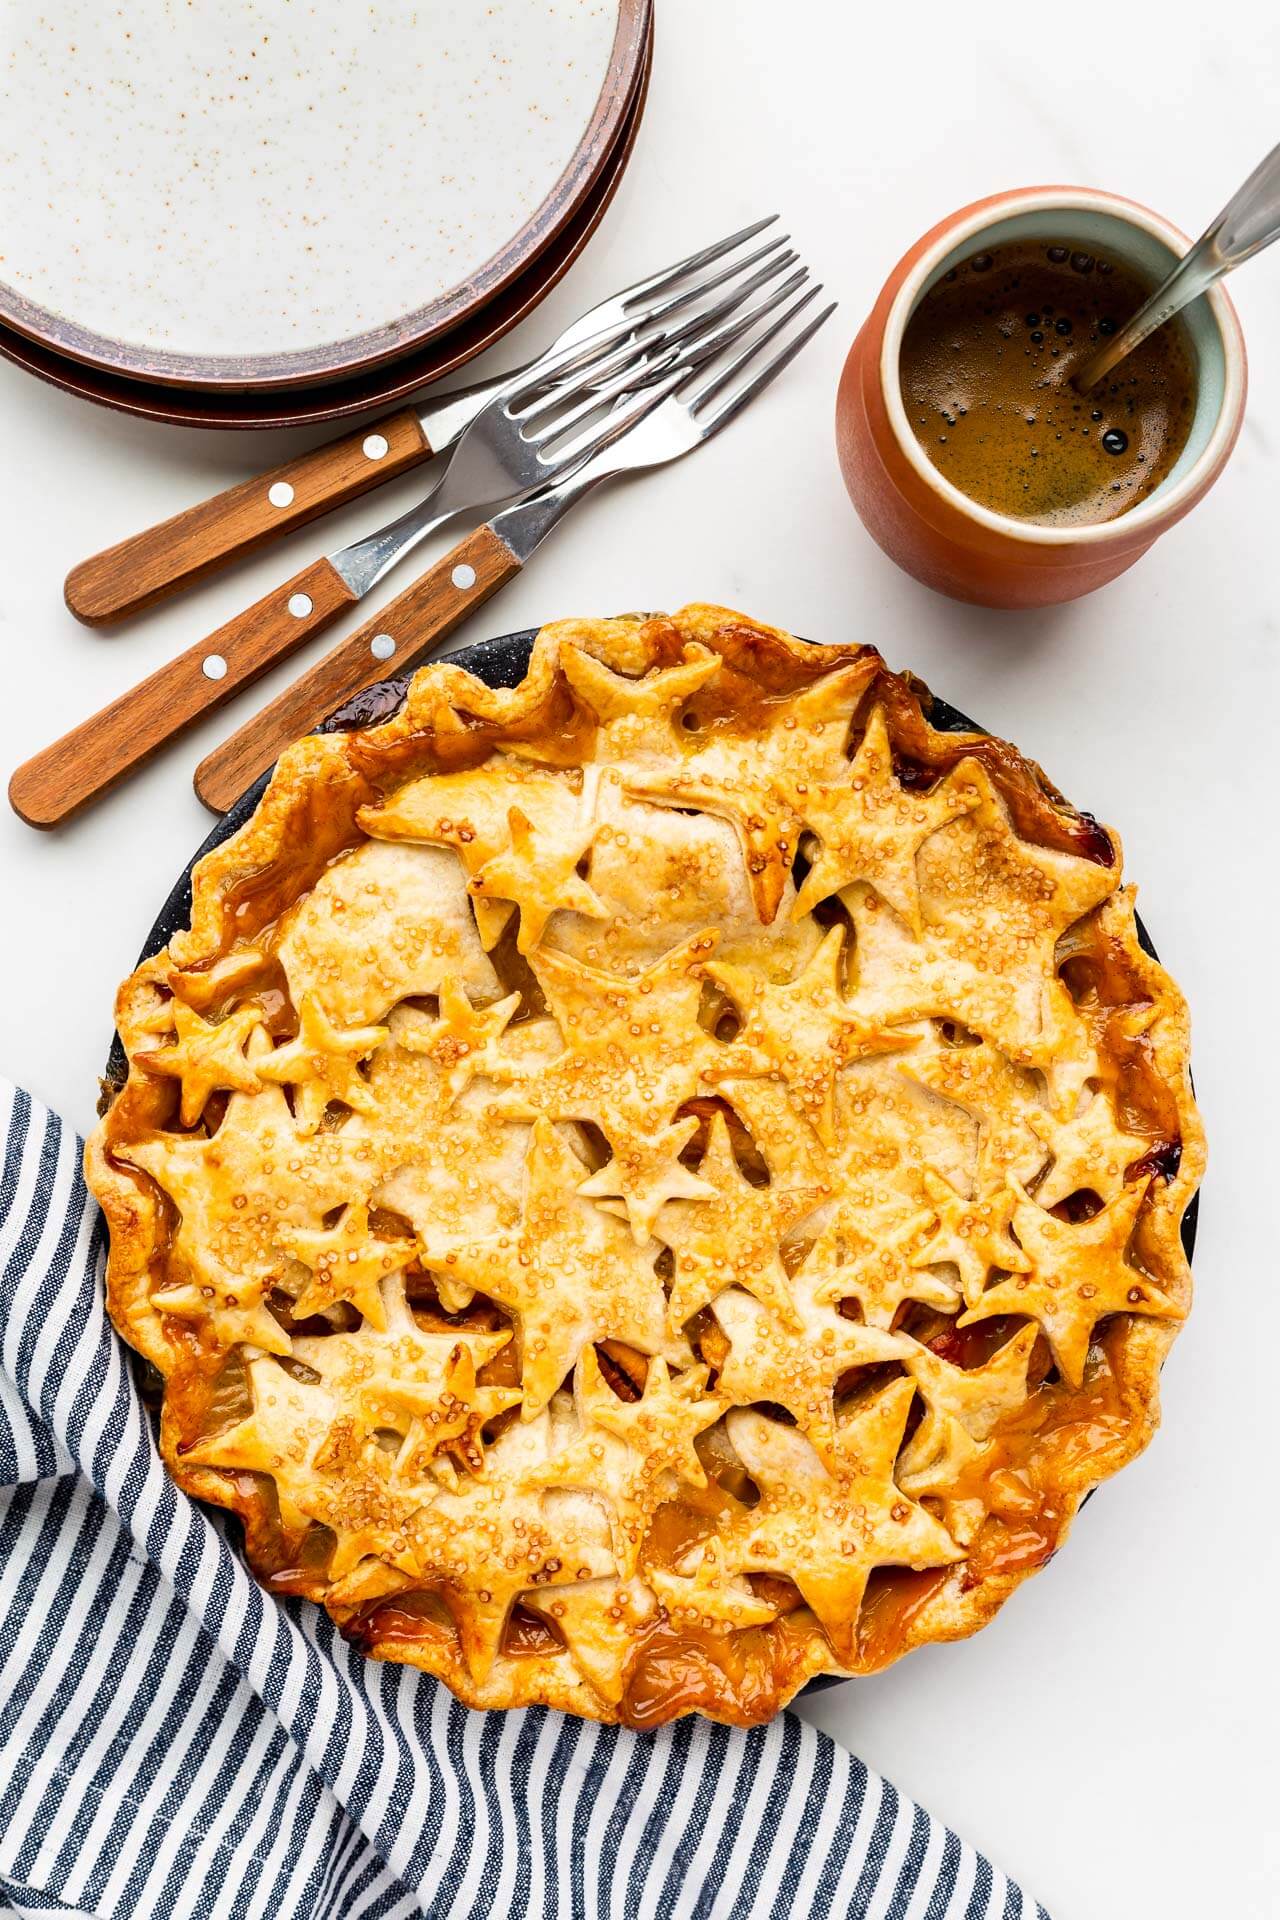
- cut out decorative shapes as in this peach mango pie where the top crust is created from layers of cutout stars
- create shaped vents using a pie crust cutter or cookie cutters to stamp out a pattern, like for this maple apple pie
- twirl twisted pie strips like the top of this bacon and egg pie
- make a crumble topping instead like for this whiskey peach pie and classic Dutch apple pies
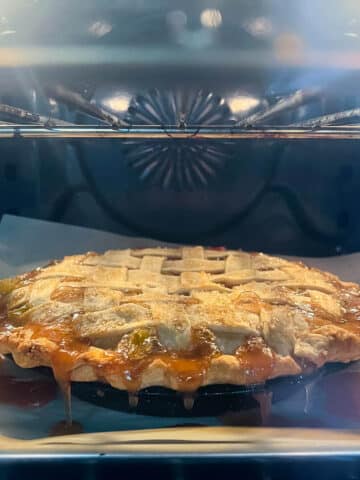
Tips and tricks for baking fruit pies
Here are a few tricks you can use to make sure you bake the perfect fruit pie with a golden brown crust and a set filling every time:
- Bake your fruit pies on the bottom oven rack;
- Start baking pies at a higher temperature, like 425 °F to set and bake the bottom before lowering the temperature to 400 °F to continue cooking the filling;
- Bake your fruit pies on a sheet pan lined with parchment to make cleanup easier because a properly baked pie with a thick fruit filling will likely boil over;
- Bake fruit pies for over an hour and ensure the filling is bubbling in the middle to ensure the center is heated through. This is especially important for pie fillings with juicy fruit like summer berries and rhubarb.
Lattice pie crust technique FAQs
Use a long ruler to help you cut a sheet of pastry into straight and even strips. You can cut them with a pairing knife, but I prefer to use a pizza wheel or a pastry wheel. If you make a lot of lattice-topped pies, you can invest in a lattice pastry cutter that is made up of multiple pastry wheels held together with an adjustable accordion.
If you decide to create your lattice pie crust top on your kitchen counter, it is quite tricky to transfer it onto a filled pie. I recommend gently folding it in half to make it easier to move, or you can try wrapping it around a rolling pin to move it to the pie as a roll and then unroll it across the top of your pie. Because the transfer can be tricky and difficult, I prefer to weave the lattice crust directly on top of the filled pie to avoid having to transfer it.
If you don't like the idea of weaving strips of dough but still want a similar look, consider using cookie cutters to cut out evenly spaced squares to mimic the lattice pattern or just to create a random, fun pattern. You can also invest in a top-crust cutter that will help you cut out a detailed pattern in a sheet of dough more quickly!
For lattice pies, I prefer to work with an untrimmed, unbaked pie shell. This allows the baker to create the lattice on top and then trim and fold the pastry over the lattice to lock it in place. You can also par-bake or blind-bake the bottom crust before filling and decorating the top with the 2nd crust, but this means that you cannot fold the edges of the pastry over the lattice. The lattice will float over the filling and bottom crust and may shrink back a little as the pastry dries out. There's nothing wrong with either method, but I prefer to work with an unbaked bottom crust.
If your double-crust pies are burning, it's likely your oven is too hot or you are overbaking them. Is it possible you are baking your pies on the upper oven rack, too close to the top heating element of the oven? I always recommend baking pies on the bottom rack to ensure the bottom crust is close to the heating element, which helps ensure that the bottom crust will bake properly and brown evenly.


Leave a Reply