

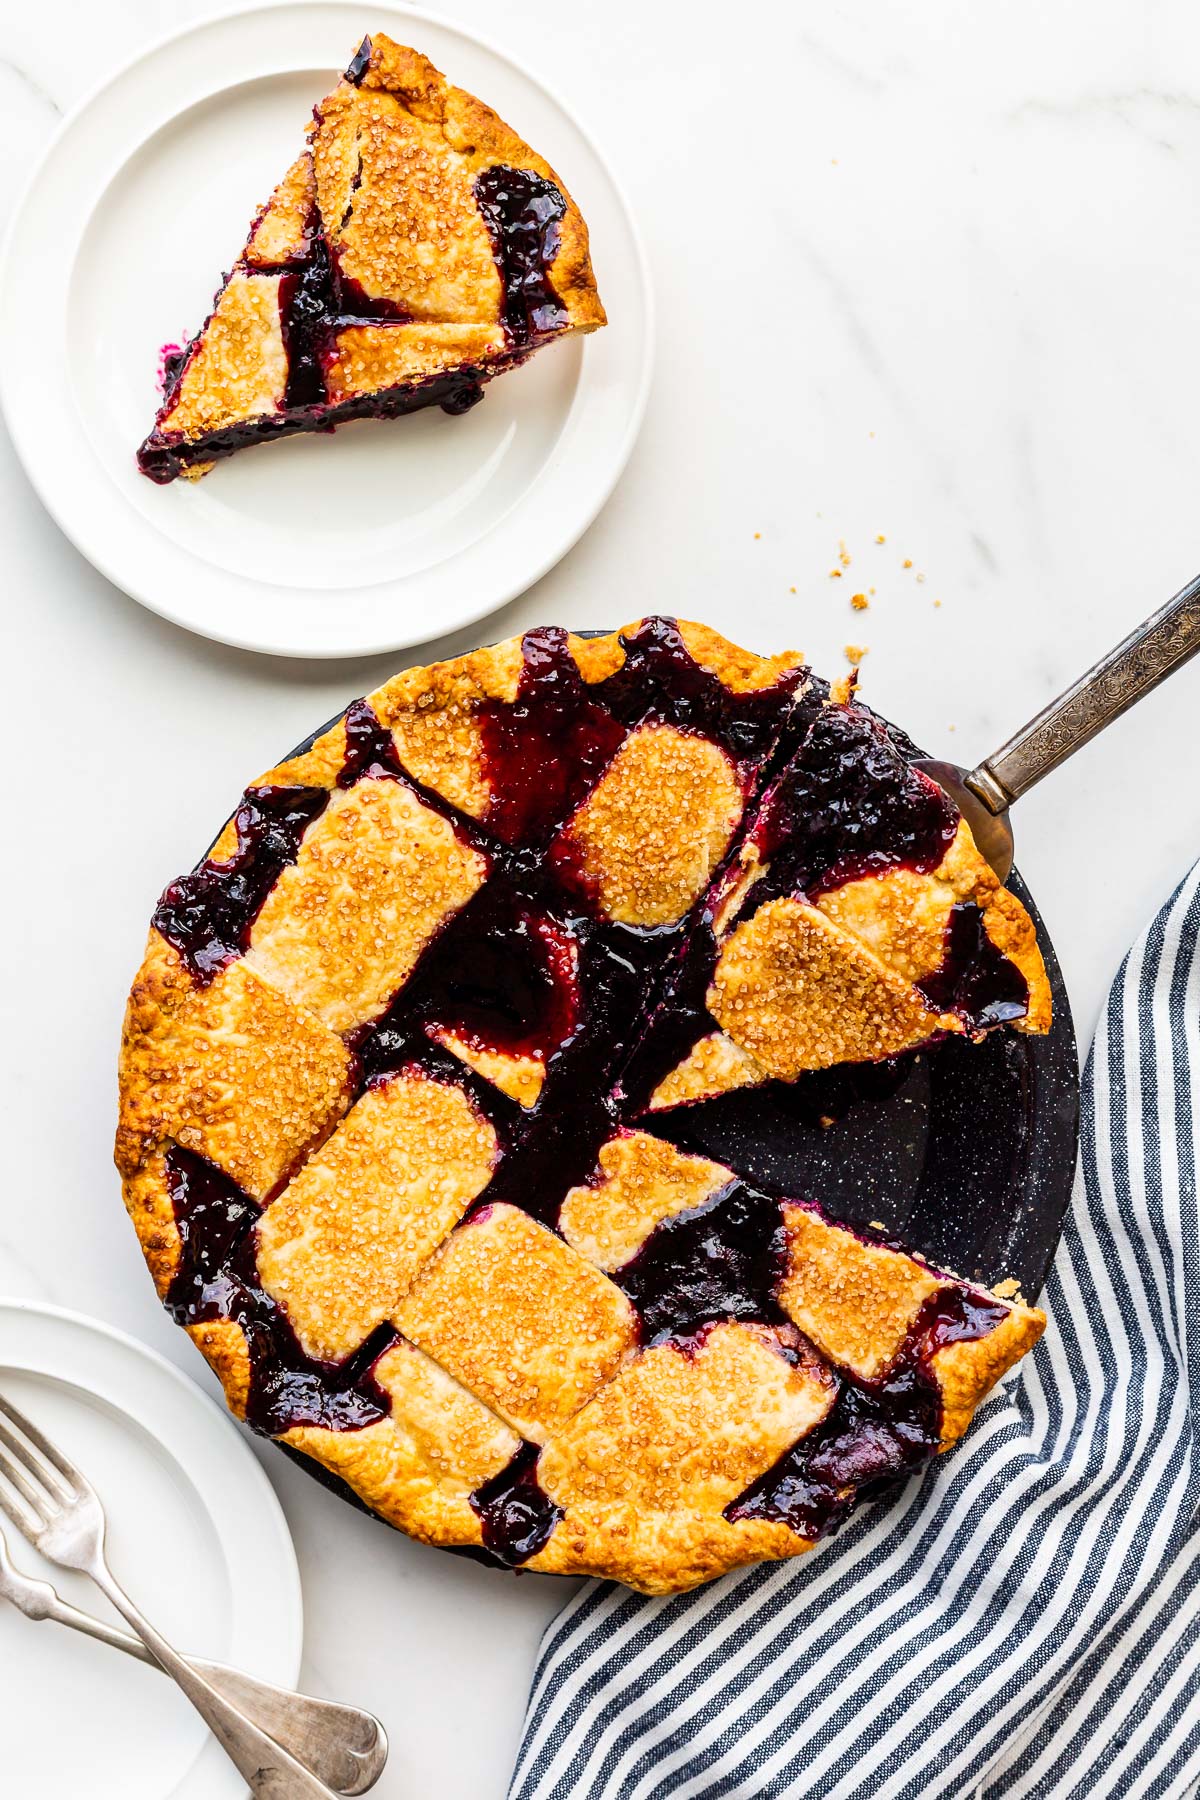
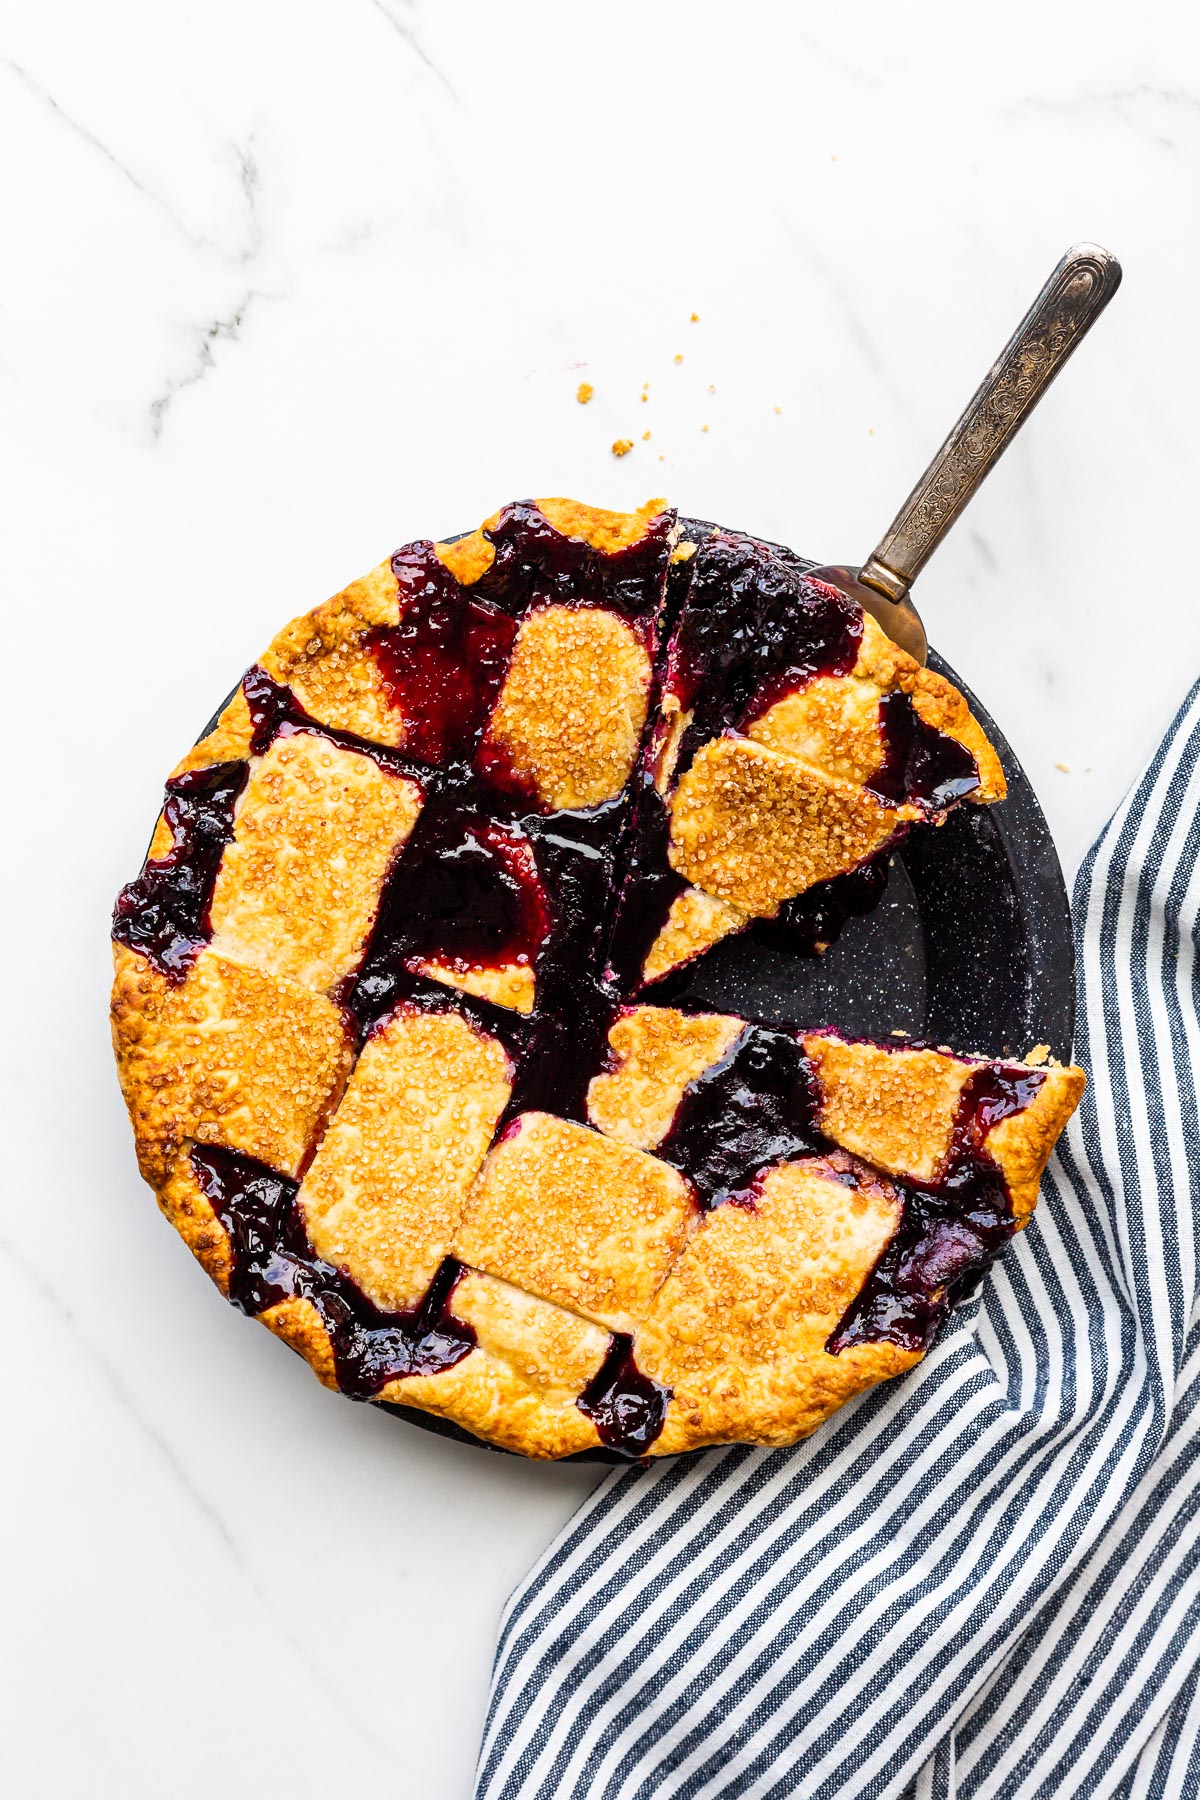
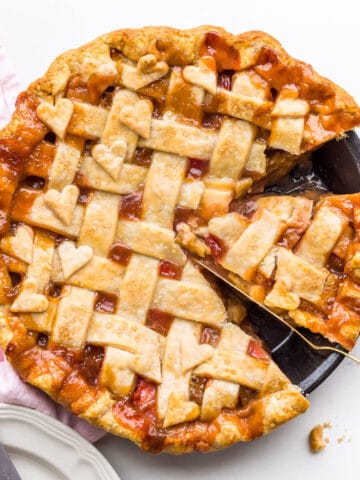
Learn how to make the best blueberry pie from fresh blueberries with this recipe. This blueberry pie has a lattice top crust and sets up perfectly with a blueberry pie filling that is neither soupy nor dry! Keep reading to find all the secrets, step-by-step photos, and tips and tricks.
Blueberry pie is truly wonderful. It's right up there with my favourite whiskey peach crumble pie. It's definitely a more involved recipe than something like blueberry jam, but you can do it! Start with a solid recipe for an all-butter crust. The dough is easy to prepare (you can even make the pie crust in the food processor!) and easy to roll out and work with, without it cracking or breaking.
Jump to:
Ingredients To Make The Best Blueberry Pie
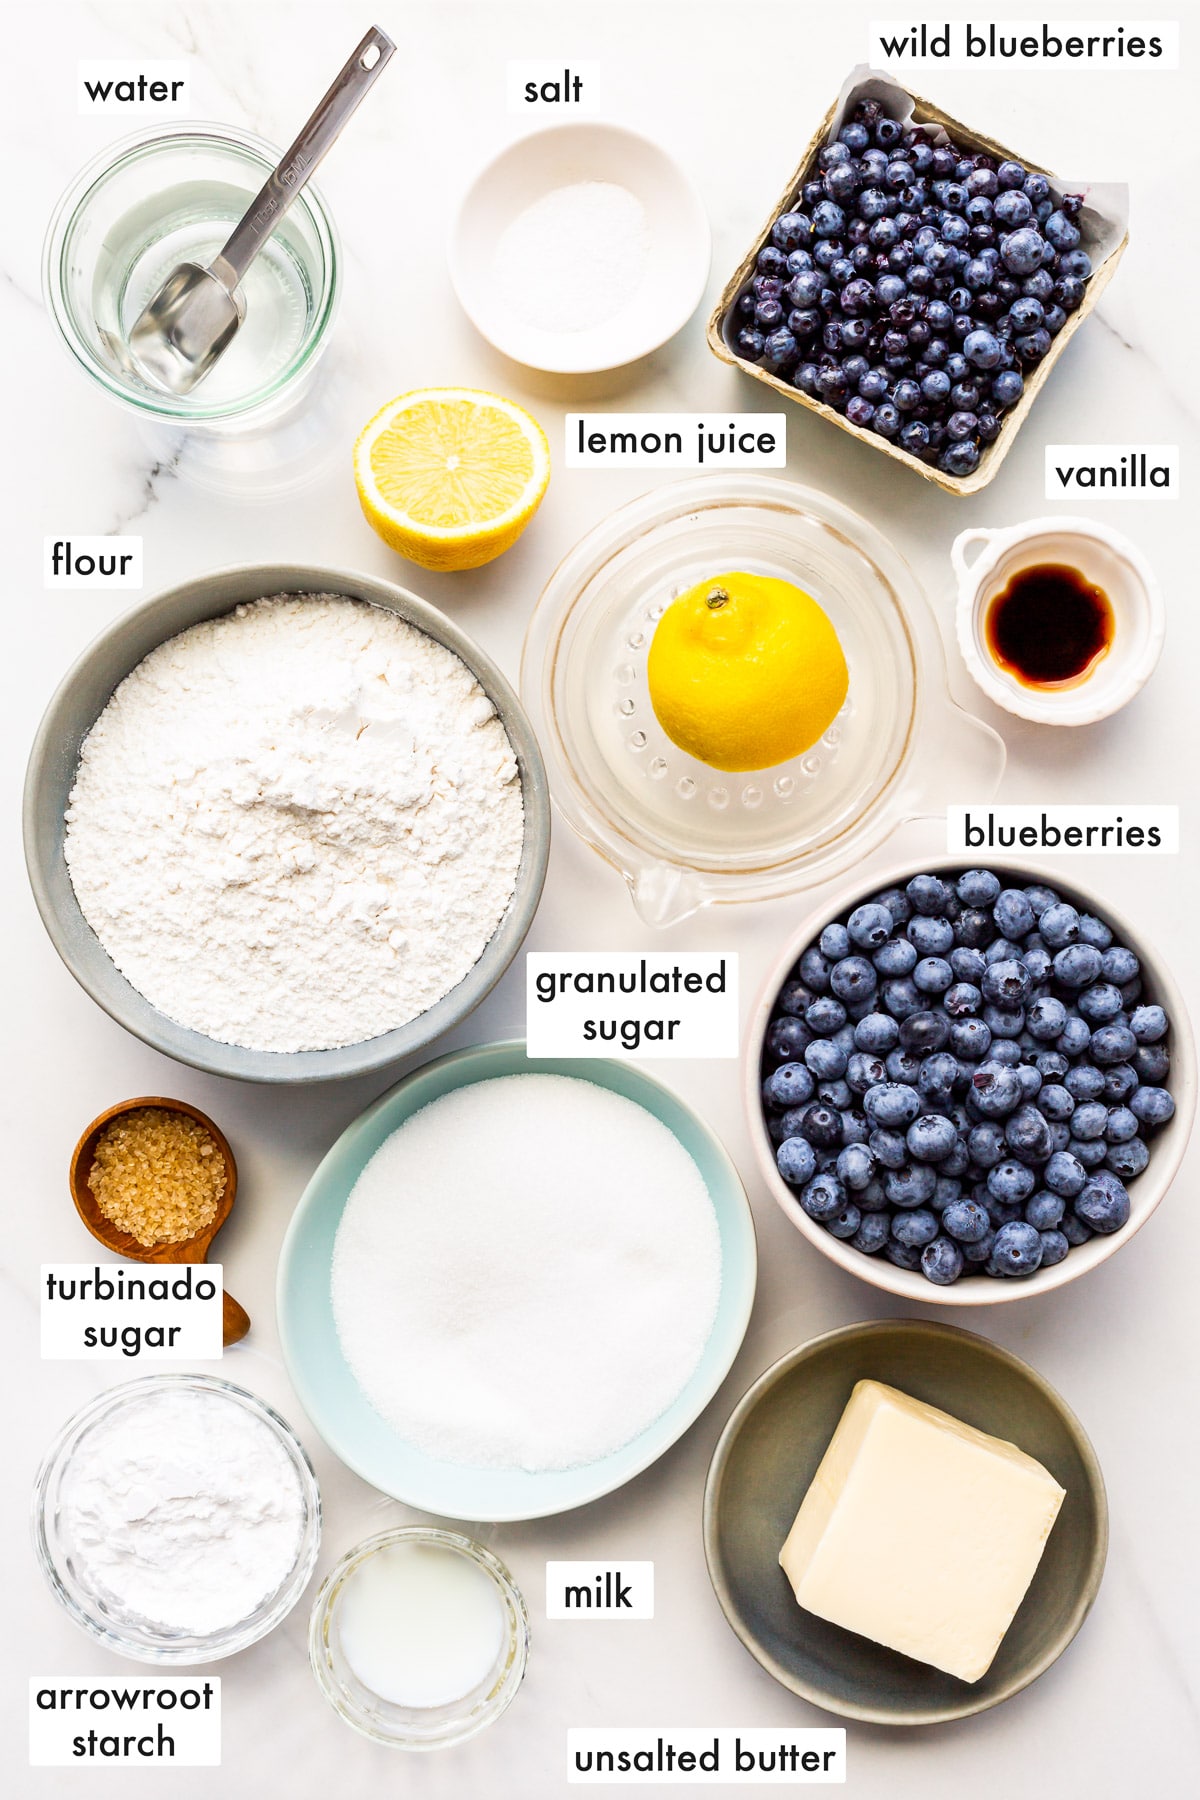
There are two components to any blueberry pie: the blueberry filling and the crust. I've broken them into two ingredient sections to make it easier. If you want to make a blueberry pie from scratch, you will need the following ingredients.
- To Make The All-Butter Double-Crust Pie Dough
- all-purpose flour is the base ingredient for the crust: flour gives it structure and helps the crust hold its shape as the pie bakes
- granulated sugar is added to the crust (just a little) to sweeten it slightly but to also help with browning
- salt is really important to balance out the sweet flavour in the filling and also to balance out the sour notes. Please don't skip it. I like to use Diamond Crystal fine kosher salt, but table salt will work, though the pie dough will be saltier and you may want to halve the salt in that case.
- butter, preferably unsalted butter because you add salt to the dough, but if you have salted, it will work. Just adjust the salt in the recipe accordingly, otherwise, your pie crust may be too salty
- cold water is needed to develop some of the gluten in the flour and also to hydrate the dough.
- To Make The Blueberry Pie Filling
- fresh blueberries, preferably a mixture of regular blueberries and wild blueberries for better flavour
- granulated sugar to sweeten the blueberries, which sometimes can be quite tart depending on if you are baking with local berries that vary in flavour more than factory-farmed berries
- lemon juice to help balance out the sweetness of the filling
- a thickener, like arrowroot flour (also called arrowroot starch) preferably or tapioca flour (also called tapioca starch)
- vanilla bean paste or vanilla extract to add some depth of flavour to the blueberry filling
- milk or an egg wash if you prefer to give the top crust more shine and also to help the sugar topping adhere to the top crust
- turbinado sugar, which adds a crunchy texture and sweet flavour to the top crust
Please read the recipe card for full information on ingredients and quantities.
Substitutions
- Sugar: I use granulated sugar (or special fine sugar) in this recipe because it is white sugar with a neutral flavour that won't interfere with the delicate flavour of the berries. You could also opt for maple sugar or light brown sugar, but the flavour will be more pronounced.
- Fresh blueberries: If you are using frozen berries, I'd take one of two approaches:
- cook the entire filling on the stove to release and thicken the blueberry juices before filling the unbaked pie
- skip the pre-cook step and make the filling with frozen blueberries immediately before filling the unbaked pie with the frozen blueberry berry filling-the pie will take longer to bake but the crust can handle it. Bake until the blueberry filling is bubbling in the center and escaping from the vents in the lattice top. If it doesn't bubble all the way through, you may end up with a soupy pie. Keep reading for more on that below.
- Arrowroot starch: You can replace the weight of arrowroot starch with the same weight of tapioca or cornstarch. I don't recommend flour as it's a weaker thickener and also will yield a more mirky filling that is cloudy. Arrowroot, tapioca, and cornstarch will give the filling a glossy, shiny appearance.
- Vanilla: you can use vanilla extract in the filling, or even vanilla bean paste!
Variations
- Blueberry-rhubarb: replace a portion of the weight of blueberries with the same weight of chopped rhubarb
- Blueberry-apple: replace a portion of the weight of blueberries with the same weight of sliced apples. For this variation, you will need to use less thickener. Probably ⅔ or even half the weight of arrowroot starch as apples don't require as much thickening power as blueberries.
- Blueberry crumble pie: make half the pie dough for a single-crust pie, then make a crumble to sprinkle over the pie before baking. You can use the topping recipe in this peach crumble pie.
Instructions To Make Perfect Blueberry Pie
The order of the steps is a bit tricky because to make blueberry pie, there's some chilling time involved for both the crust and the partially cooked filling. To maximize your time, you need to multitask, switching back and forth between working on the filling and the crust.
For the sake of clarity, I've divided the steps into sections (making the pie crust in the food processor, making the blueberry pie filling, weaving the lattice crust, and baking the pie), but you will have to go back and forth between the steps on your own time and according to your schedule.
How To Make Pie Crust In a Food Processor
If making pie crust from scratch scares you, be sure to check out my pie crust masterclass, which includes video tutorials for making pie crust in the stand mixer, food processor, and by hand!

- Step 1: Combine all the dry ingredients in the bowl of the food processor (image 1). Then add the butter (image 2) and use the pulse function to form an uneven, coarse crumble. You will notice some slightly bigger pieces of butter (like chickpea or large bean size) and smaller pieces (image 3).
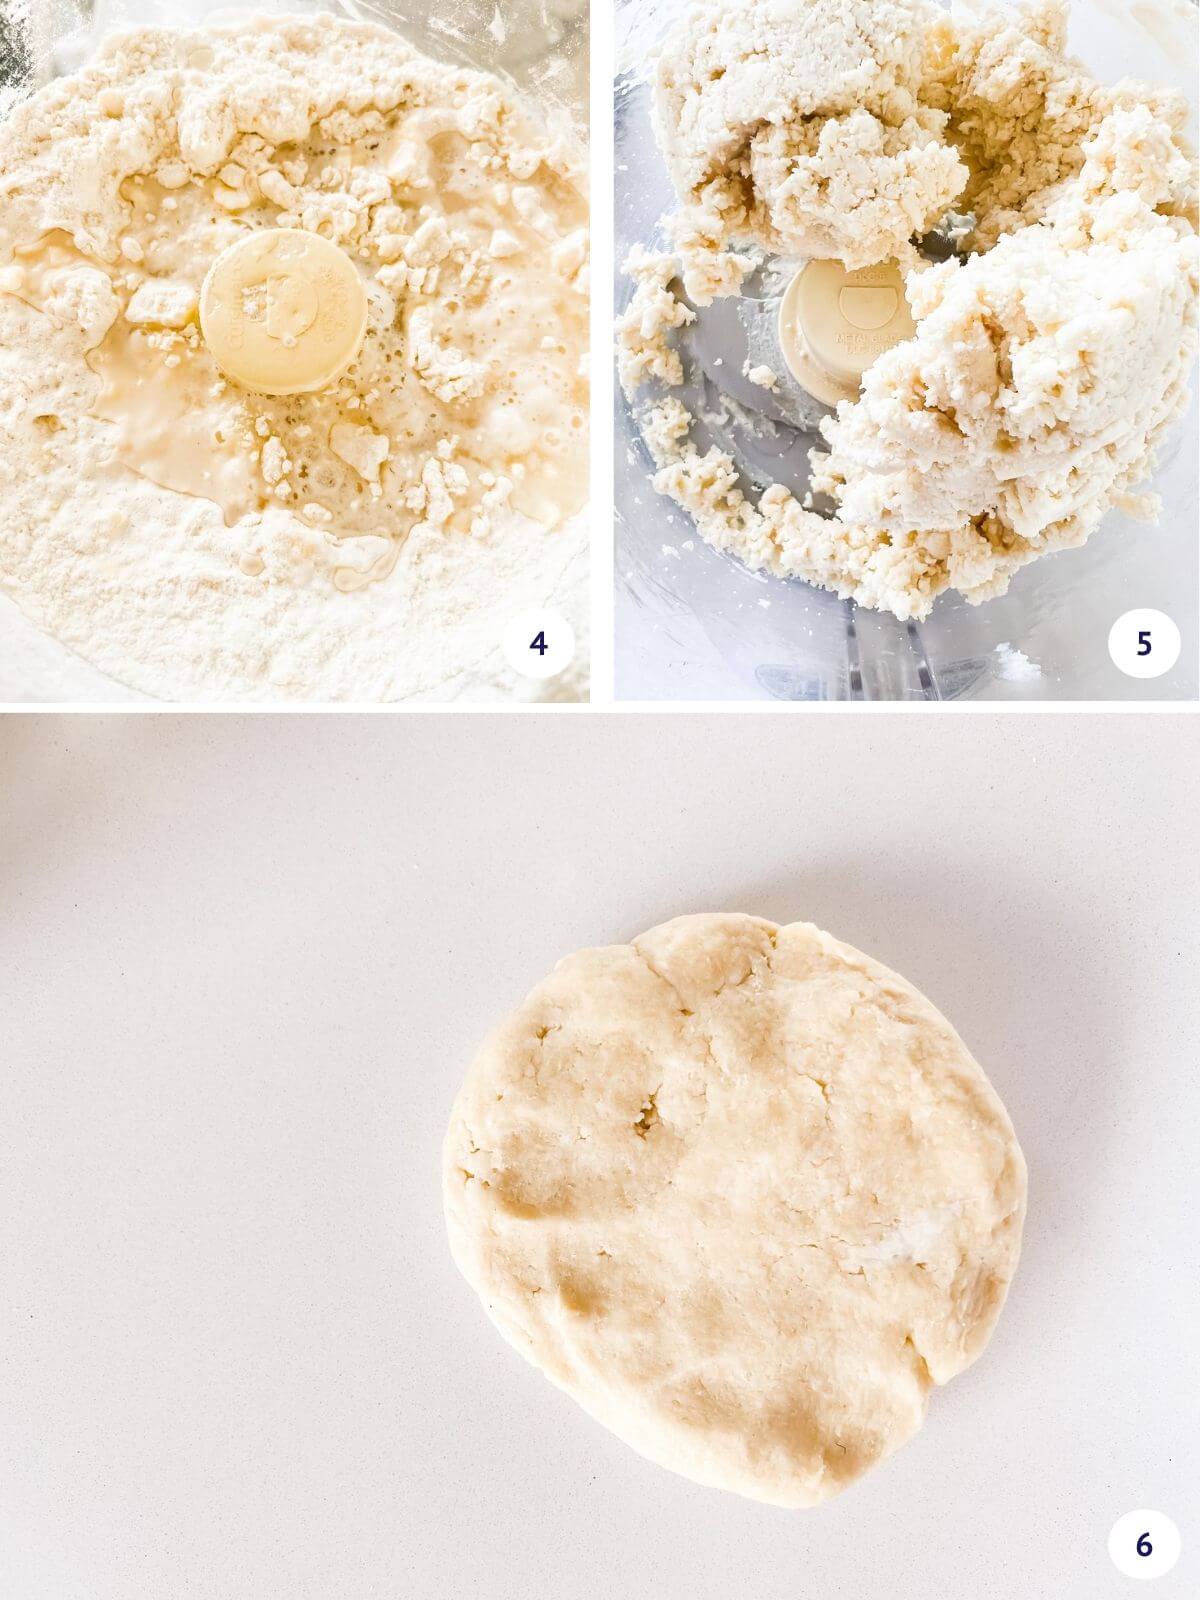
- Step 2: Add the cold water to the food processor (image 4) and use the pulse function again to incorporate the water into the dough. The dough should clump together and the flour should look moistened, with very few dry bits left. You can run it a little longer (30 seconds) to force the dough into a cohesive mass (image 5).
- Step 3: Remove the dough from the appliance and divide and shape the dough into two equal disks (image 6). Wrap each in plastic wrap to chill it in the refrigerator until firm, about 1 hour.
Pie crust that holds its shape: For pies like this one with crimped edges and cut-out shapes on top or latticework, I highly recommend that you make the pie dough in the food processor because you want the butter to be cut into much smaller pieces than for a traditional flaky crust. The finer pieces of butter still make a light crust, but also a crust that holds its shape as it bakes. The butter doesn't ooze out of the dough as the pie bakes and the strips and crimps are almost exactly as they were before the pie hit the oven.
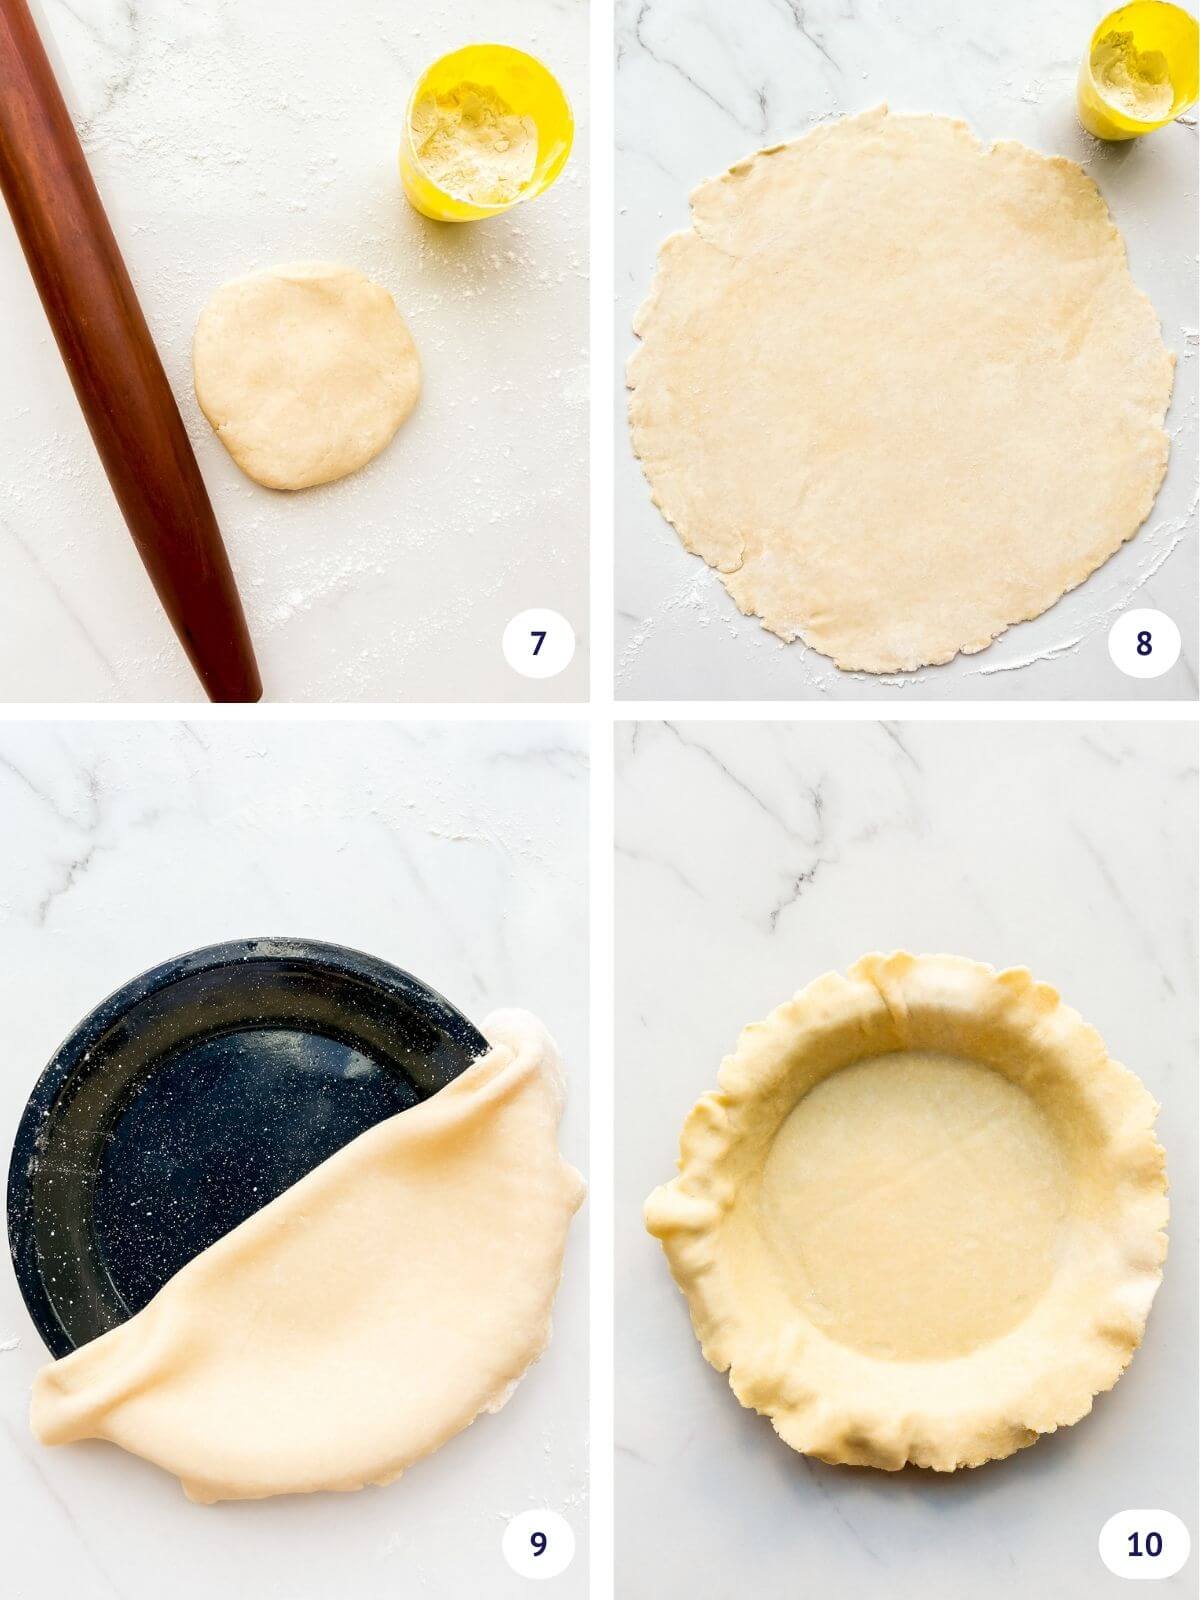
- Step 4: With a rolling pin on a floured surface (image 7), roll out one disk of chilled dough into a thin, even round sheet, with approximately a 14-inch diameter for a standard 9-inch pie plate (image 8). Use enough flour and also keep moving the dough every so often to make sure it doesn't stick to the surface.
- Step 5: Fold the dough in half to easily transfer the sheet of dough to the pan (image 9). Then unfold the dough and make sure to gently nudge the dough into the crease of the pan so the pan is evenly covered with no air pockets (image 10). Don't stretch the dough!
Store the bottom crust in the refrigerator while you work on the filling and top crust.
How To Make Blueberry Pie Filling
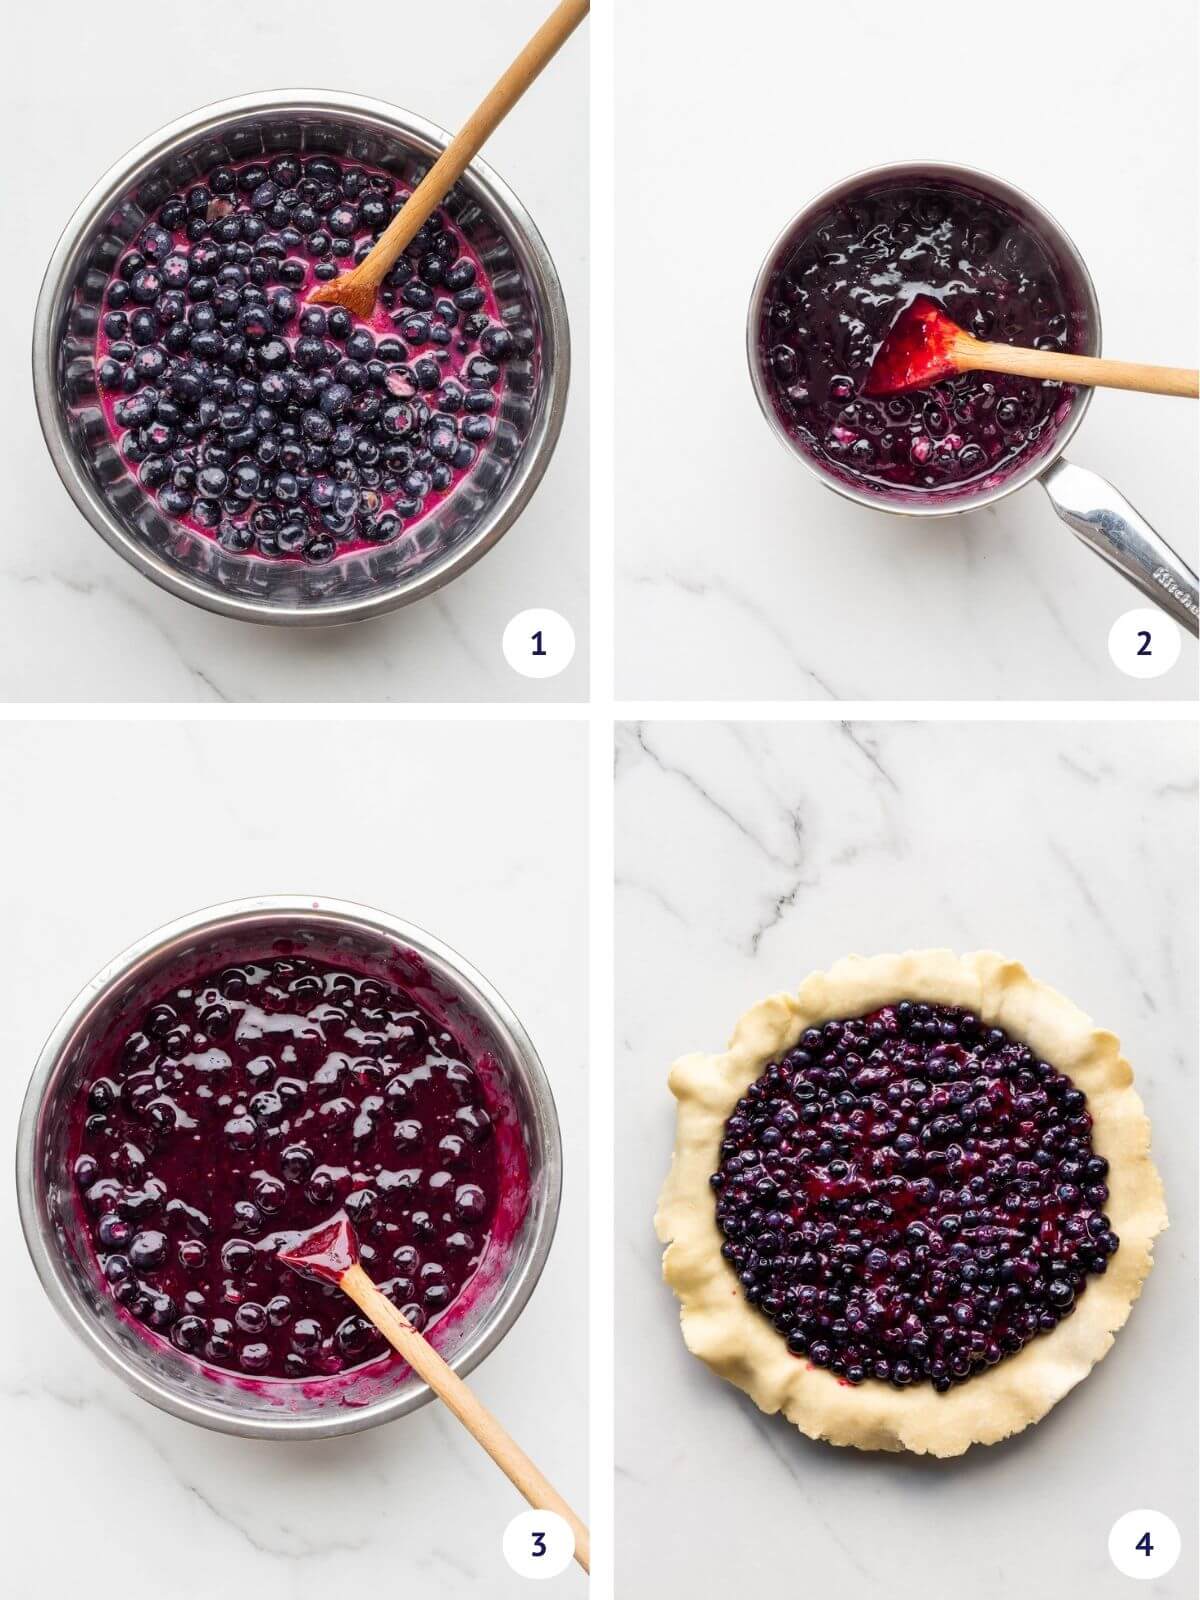
- Step 1: Combine all the blueberry pie filling ingredients in a bowl and left to macerate for 20 minutes, stirring every 5 minutes, mashing a few berries each time to release some of the berry juices (image 1).
- Step 2: Transfer half the raw filling to a medium saucepan to cook on the stove on medium-high heat until bubbly, glossy, and as thick as jam (image 2).
- Step 3: Add the cooked portion of the filling back to the bowl with the rest, along with the vanilla. Then cool it down to room temperature (image 3).
- Step 4: Pour the filling into the bottom pie crust (image 4).
Cutting and Weaving The Lattice Pie Crust
Cutting and weaving a lattice pie crust top can be tricky. I like to use a ruler and a pizza wheel to make the job easier! These two tools combined work well together and help you cut straight, even strips.
For a fat lattice, you need to cut 1.5-2 inch-wide strips of dough. Given that we need 7 strips to weave the lattice, I recommend roughly rolling the sheet of dough to a rectangle of 10 inches x 15 inches. These dimensions will give you enough excess to trim the edges so they are neat.
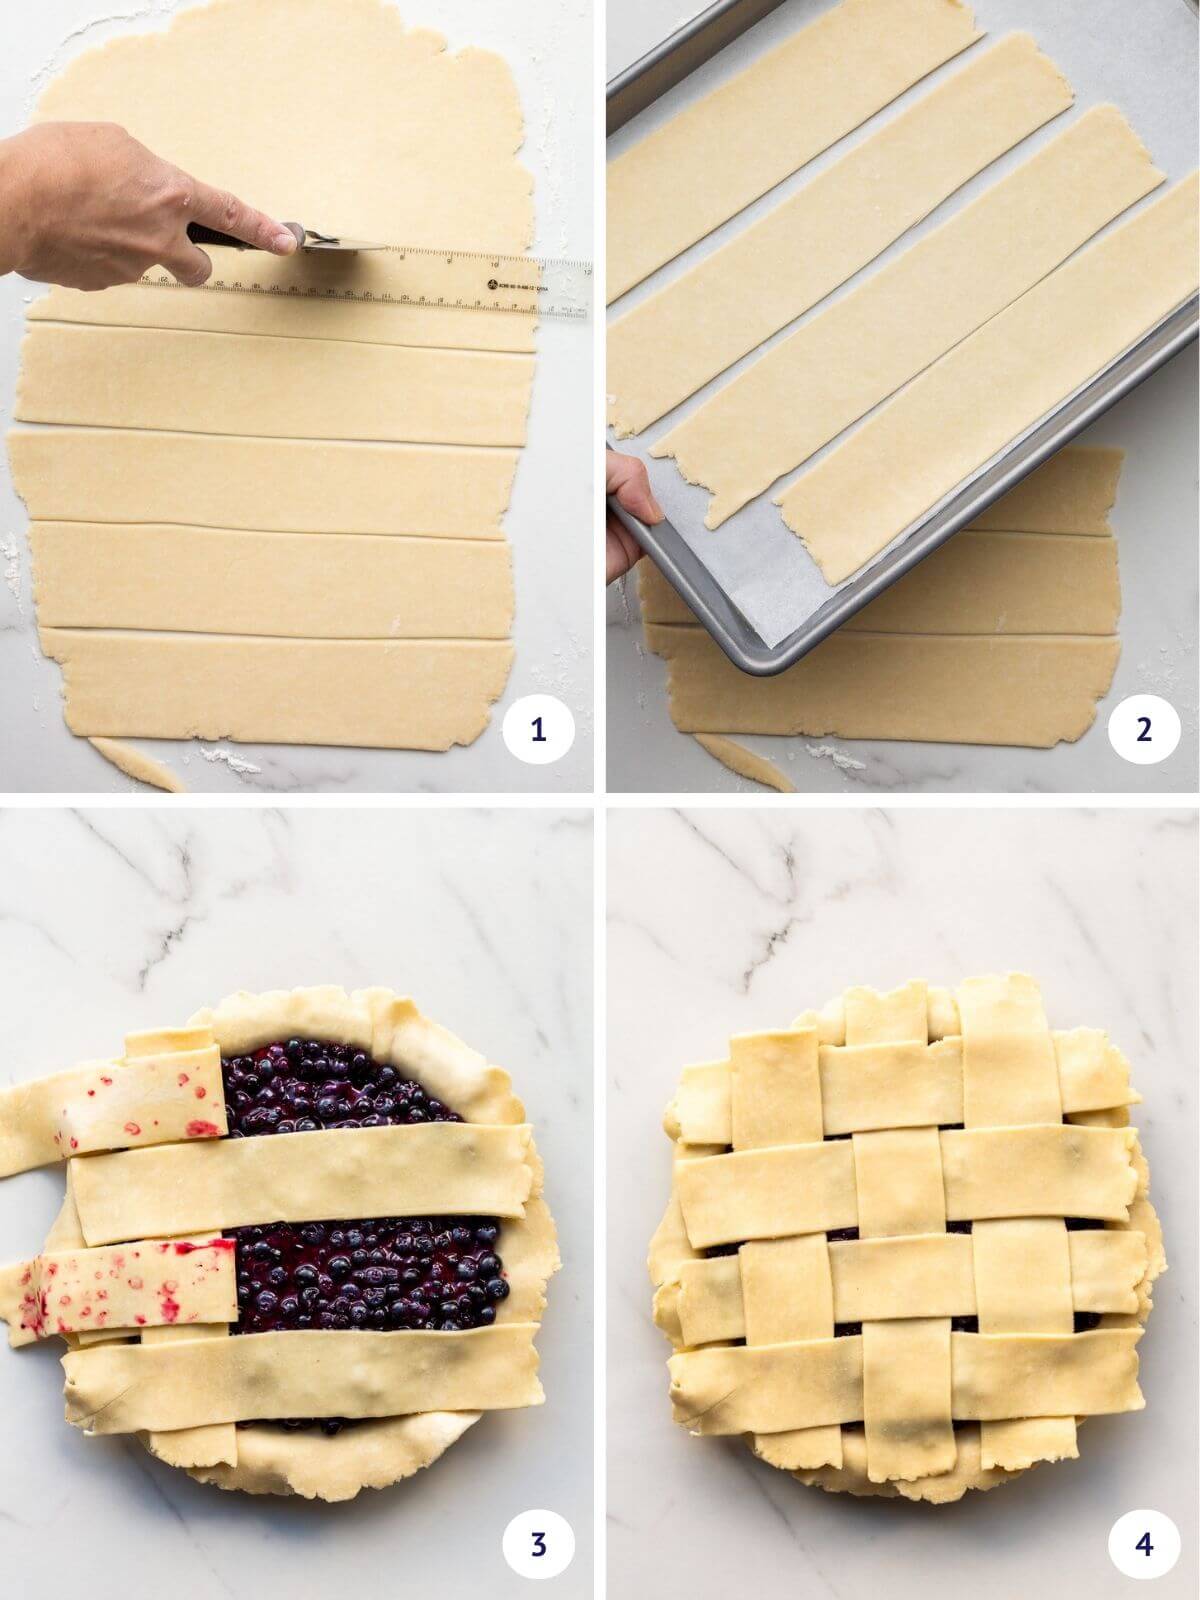
- Step 1: Roll out the second disk of dough into a 10x15-inch sheet and cut it into 7 even strips (image 1).
- Step 2: Transfer the strips of dough to a parchment-lined baking sheet to chill them until you are ready to create the lattice (image 2)
- Step 3: Start weaving a 4x3 lattice on top of the filled, unbaked blueberry pie (image 3). Please read about how to make a lattice pie crust if you don't know how.
- Step 4: Once the lattice is done, you will likely have overhanging ends of the strips that may need to be trimmed (image 4).

Step 5: Use kitchen scissors to trim some of the excess dough so that the edge isn't too thick if you choose to fold it over.
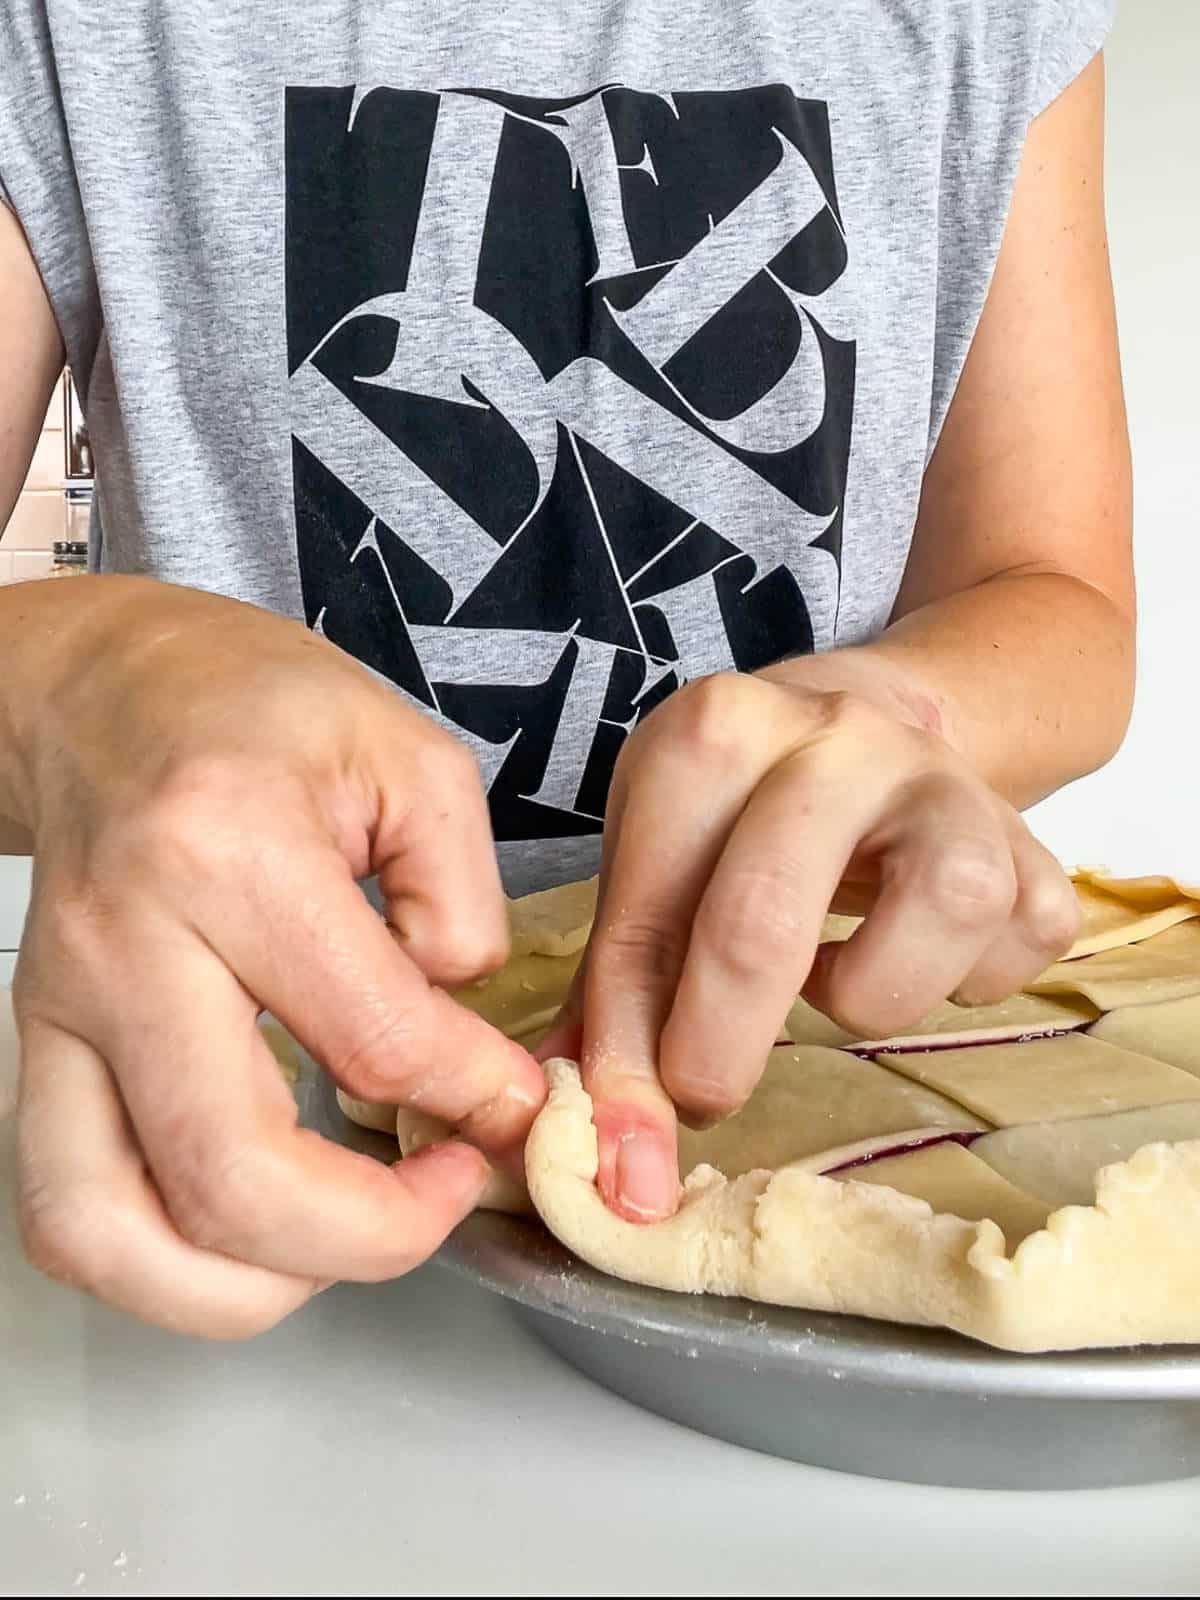
Step 6: Use your fingertips to fold the bottom crust edge over the trimmed lattice edges, then crimp them in place.
You can watch this video that demonstrates weaving a lattice pie crust with 12 strips of dough. The weaving technique is the same for both.
Tips And Tricks For Baking Fruit Pies
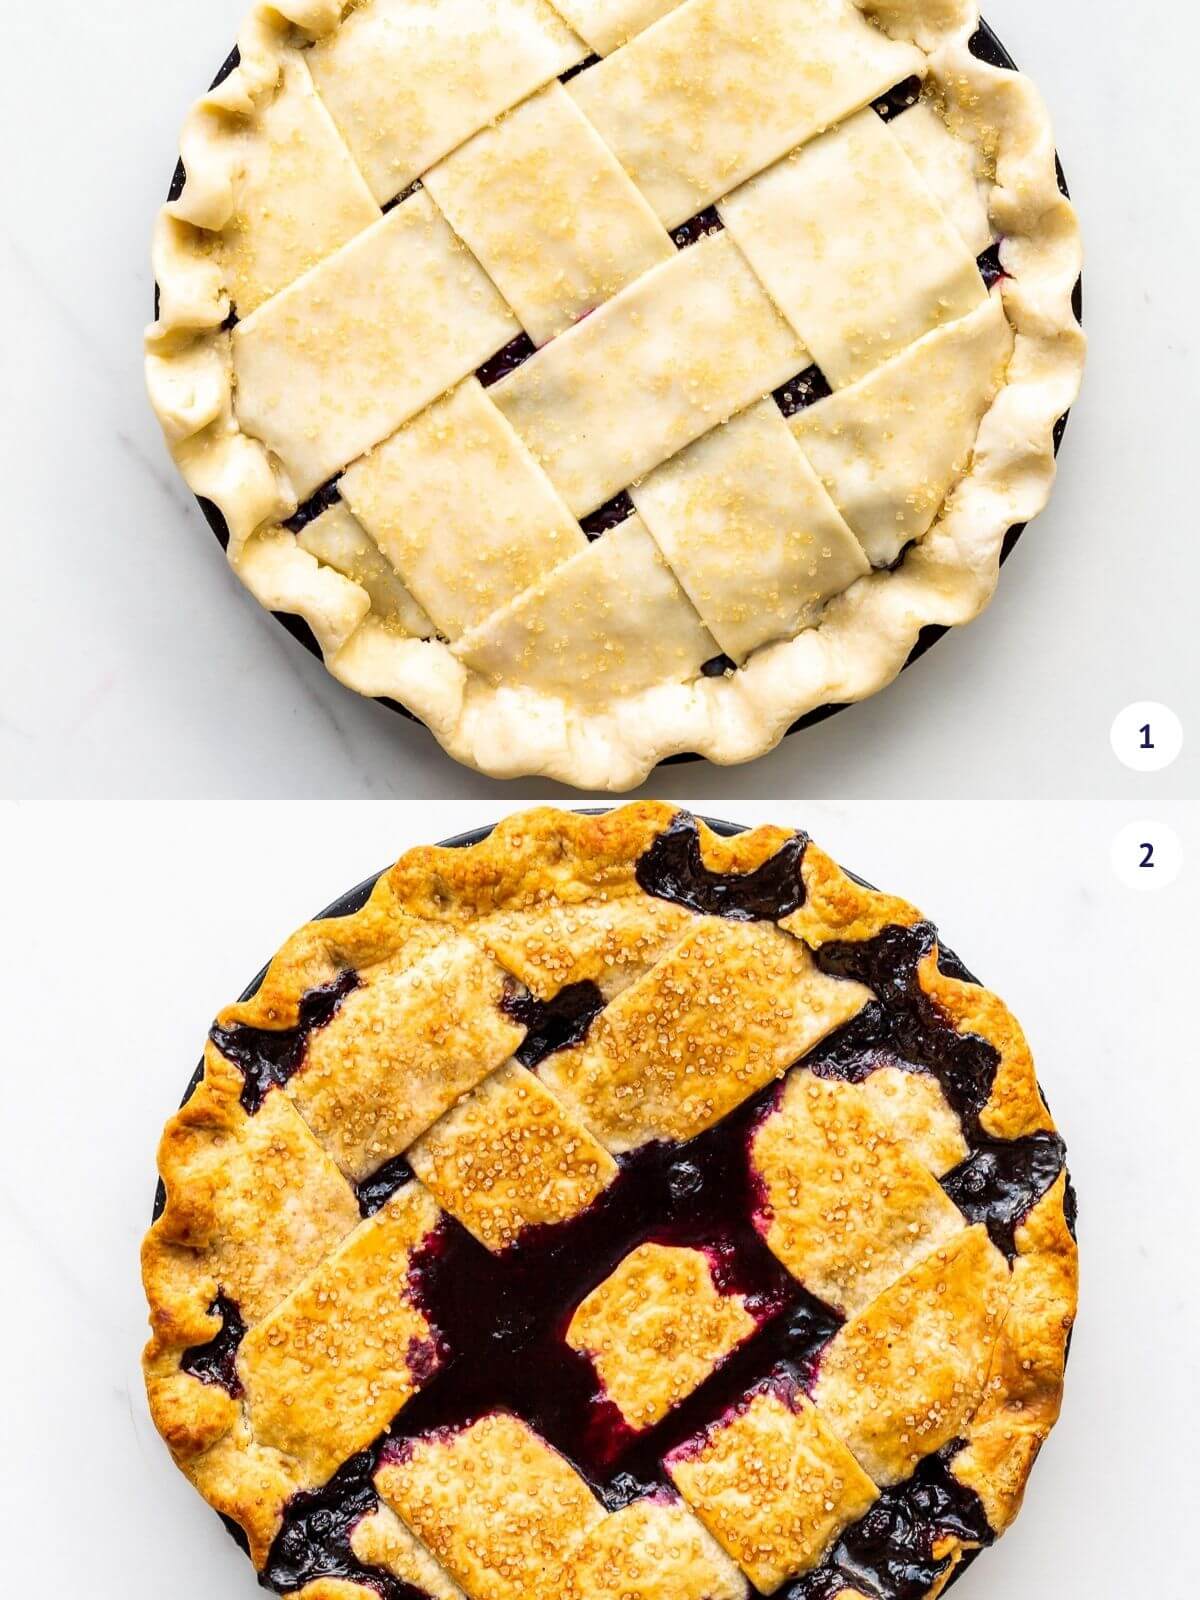
Before baking, brush the top of your pie with milk or an egg wash and sprinkle with granulated sugar or coarse turbinado sugar, which doesn't dissolve or melt in the oven.
Here are a few tricks you can use to make sure you bake the perfect fruit pie with a golden brown crust and a set filling every time:
- Bake your fruit pies on the bottom oven rack;
- Start baking pies at a higher temperature, like 425 °F to set and bake the bottom before lowering the temperature to 400 °F to continue cooking the filling;
- Bake your fruit pies on a sheet pan lined with parchment to make cleanup easier because a properly baked pie with a thick fruit filling will likely boil over;
- Bake fruit pies for over an hour and make sure that the filling is bubbling in the middle so the center is heated through.
Special Tools And Equipment
Pie doesn't require that much equipment if you make the dough by hand. Still, this list of pie tools will make baking pies a lot easier for you. Here's what you need:
- food processor-you can make the dough by hand using a bowl and your fingers, but I like the ease of making pie dough in a food processor
- pie plate-I prefer a metal pie plate because it's a better heat conductor, whereas glass is insulating
- rolling pin-I am most comfortable with a French rolling pin made out of wood. It has tapered ends and I find it easy to handle
- pastry brush-I prefer natural bristle pastry brushes, though silicone works too
- pizza cutter, also called a pizza wheel to cut out strips. You could also invest in an adjustable lattice pastry cutter, which is like five pizza wheels in one so that you can cut more strips at a time, faster and more evenly
- large, rimmed sheet pan, like a half-sheet pan lined with parchment to catch the drips as the pie bakes in the oven. Trust me when I say you don't want to skip this, unless you like cleaning the floor and racks of your oven
- metal bench scraper to help with cleanup: it's great for scraping stuck-on bits of dough from your countertops and helps you scrape flour and bits neatly into the palm of your hand!
Tip: bake your fruit pies in metal pie plates, not glass. Metal is a better heat conductor, which means the crust will heat up faster and brown better. Glass is insulating and so takes longer to heat up but also holds heat longer. This is not what we are going for in this case. Save the glass for casseroles and such.
What To Serve With Pie
Serve this perfect blueberry pie à la mode with scoops of the best homemade ice cream! Vanilla works great, but you're going to love it with:
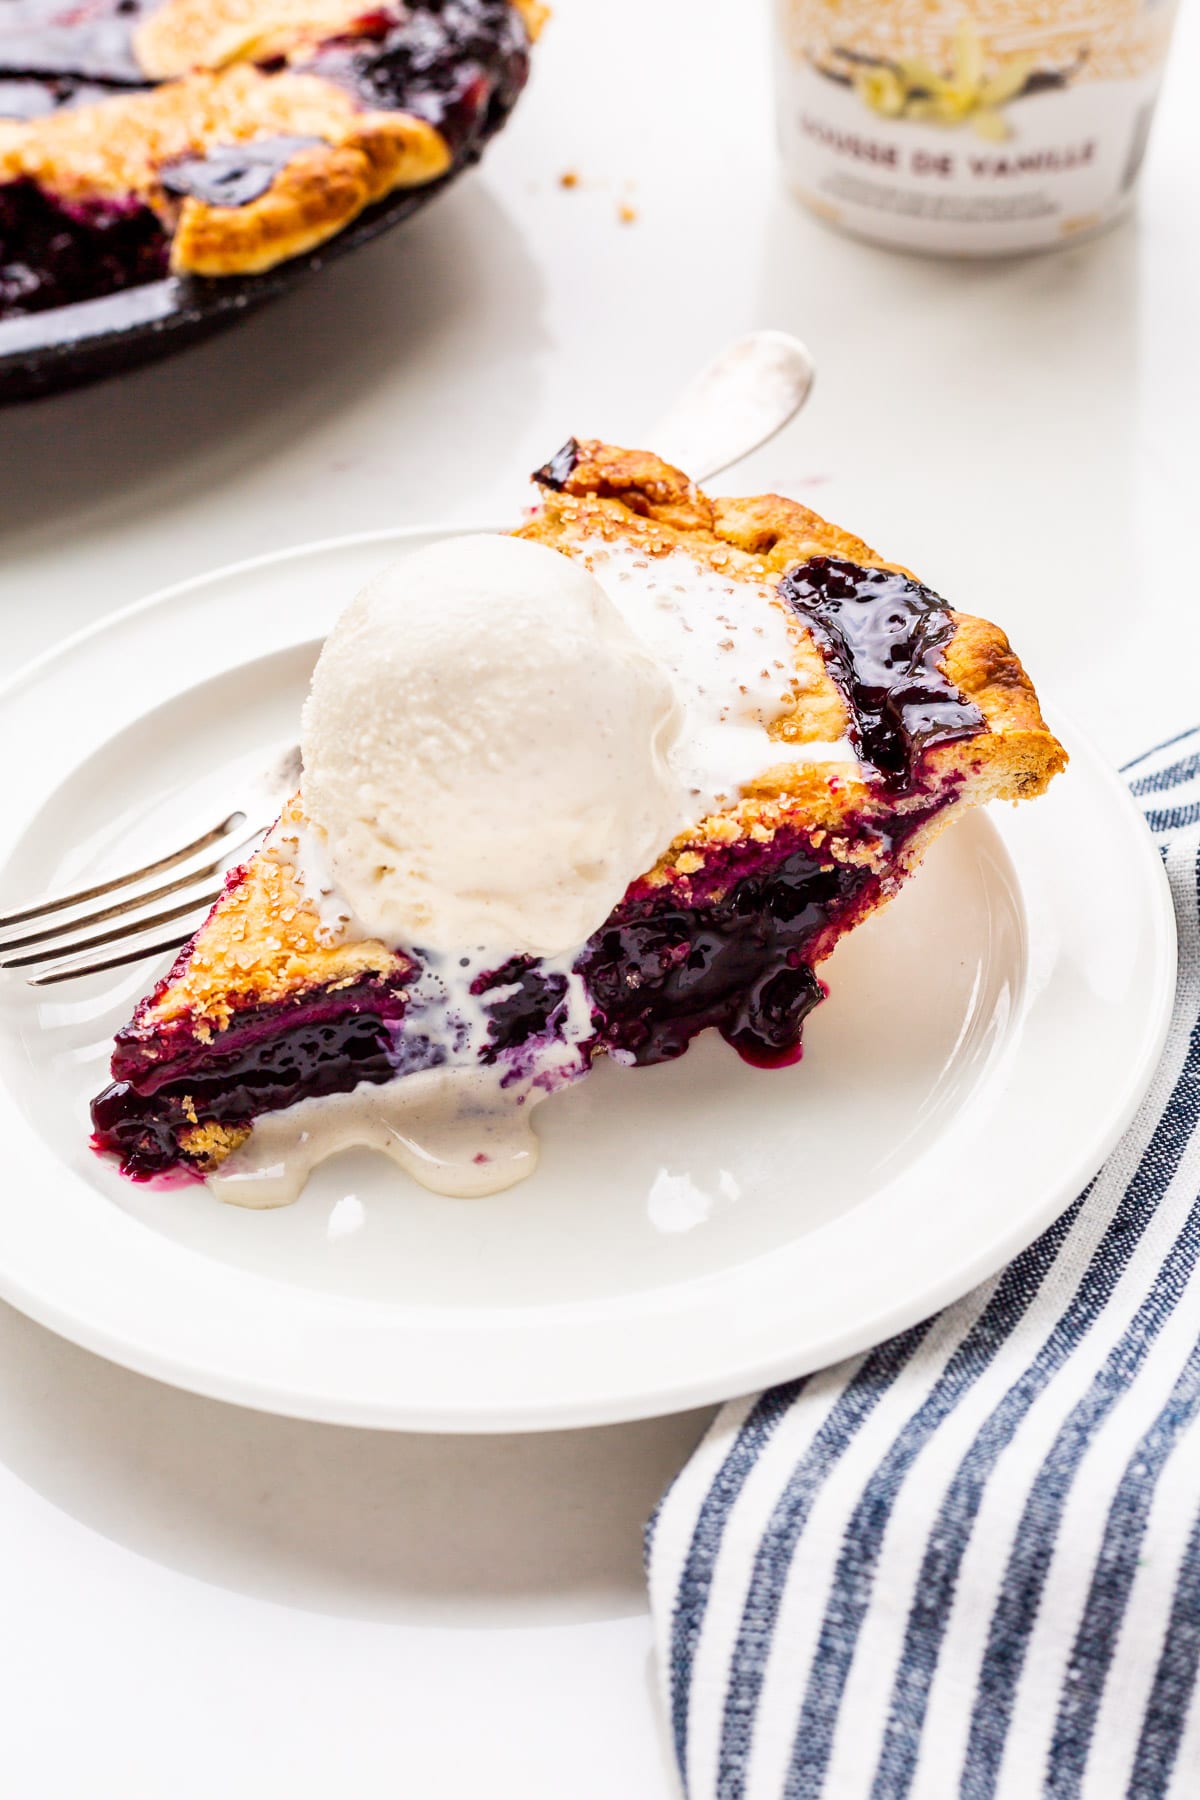
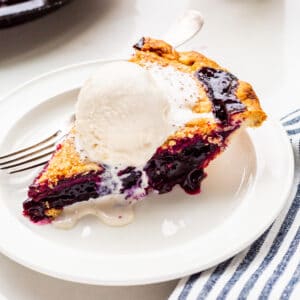
Top tip: make your pie the day before to give the blueberry filling ample time to set so that you can slice the pie cleanly without any risk of the filling running out!

See the tiny drops of blueberry sauce trickling in the photo: Perfect! The pie is not so set that it is weirdly gelatinous, but not so runny that it is un-serveable. Just right! The blueberries are juicy but the filling is gelled properly. It's not dry but it's not soup either. This pie slices beautifully and cleanly so you can serve it to guests without any stress that the filling will seep out and run all over the plates.
Blueberry Pie Recipe FAQs
You can prebake the bottom crust of a blueberry pie to guarantee it will be baked through, but you don't have to prebake the bottom crust if you bake your fruit pies on the lower oven rack position in a hot enough (above 350 °F) for long enough in a metal pie plate which heats up faster!
Remember that flour is the least powerful thickener. This goes for pastry cream, but also fruit pie fillings. Flour-thickened fruit pies will not set as well as pie fillings thickened with cornstarch, or better yet tapioca or arrowroot flour, especially if you are working with berries that have a lot of water. For a blueberry pie, use tapioca starch or arrowroot starch, which are more powerful thickeners.
For 900 grams of blueberries, if using starch as a thickener (corn, tapioca, or arrowroot starch), I use 60 grams of starch per 900 grams of berries, which is approximately ½ cup of starch. This is the same ratio that I also use for rhubarb pie. For a looser filling, you could try to go as low as 40 grams (⅓ cup) but the results will vary as some berries have more water and so this might not be enough thickener to properly gel the pie filling. If you are using flour as a thickener, you will need at least 60 grams (½ cup) of flour to set the filling, but likely more than that.
The most important rule for baking pies is to bake them on the lowest bottom oven rack, this ensures that the bottom crust is closest to the heating element at the bottom of the oven and so is receiving the most directed heat from the heat source.
Also, bake your pies for over an hour at or above 400 °F to ensure the bottom is golden brown. I start most berry pies at 425 °F, then drop the temperature to 400 °F to finish the baking.
There are pie recipes that suggest you bake your pies at 350 ºF, but I do not recommend that. Bake your pies at a higher temperature, 400 ºF or even 425 ºF, especially at the beginning of the bake. This will help set the crust and brown it. Then you can lower the temperature to continue to bake the crust and also so that the filling comes to a boil. Starting at a higher temperature and finishing at a lower temperature is the secret to an evenly browned crust on top and bottom.
Some recipes suggest you bake a double-crust blueberry pie for less than an hour. That's not long enough, regardless of the temperature, especially with traditional thickeners that must be heated to a higher temperature to gel. Start them at 425 °F for 30 minutes to set the crust, then lower the temperature to 400 °F so that the filling bubbles in the middle (this takes 35 to 45 minutes more).
We all have romantic dreams of serving a freshly baked warm pie with vanilla ice cream, but the reality is that if you serve this pie within a couple of hours of baking it, it's likely the filling will not be set. Just like jam, you've gotta let the pie cool down for hours, better yet overnight, to ensure that the filling has thickened properly and set. Otherwise, you may have blueberry pie soup.
You can use visual cues to tell if your blueberry pie is done baking: the crust will be golden brown all over and the filling will be bubbling, like hot lava. The filling will be so hot and thick that it will likely begin to flow out the top lattice crust.
If you prefer to use a thermometer, the temperature of the filling will be above
If your blueberry pie filling is soupy and/or runs when you cut into the pie, it could be for a few reasons: you didn't use the right thickener or enough of it, you didn't bake the pie for long enough (until the centre begins to bubble), you didn't let the pie cool down for long enough (wait several hours to serve it, or even better, serve it the next day).
More Pie Recipes To Try

If you tried this blueberry pie recipe (or any other recipe on my website), please leave a ⭐ star rating and let me know how it went in the comments below. I love hearing from you!
📖 Recipe
The Best Blueberry Pie With Lattice Crust
Ingredients
Blueberry pie filling thickened with arrowroot starch
- 900 grams fresh blueberries I used 250 grams wild blueberries and 650 grams regular blueberries
- 250 grams granulated sugar
- 60 grams arrowroot starch also called arrowroot flour
- 30 mL lemon juice
- 1.25 mL Diamond Crystal fine kosher salt
- 15 mL pure vanilla extract
Easy all-butter pie dough made in food processor
- 312 grams bleached all-purpose flour
- 1 tablespoon granulated sugar
- 1 teaspoon Diamond Crystal fine kosher salt
- 173 grams unsalted butter cut into cubes, very cold, plus extra to butter the pie plate
- 100 mL water
Pie assembly
- 15 mL whole milk (3.25 % fat)
- 15 mL Turbinado sugar
Instructions
Blueberry pie filling
- In a large bowl with a wooden spoon, mix the blueberries with the sugar, arrowroot starch, lemon juice, and salt. Stir the mixture really well, mashing some of the fruit with the spoon to release some of their juices.
- Let the filling rest for 20 minutes, stirring every few minutes to help release more of the fruit juice. You can start the crust while this is resting.
- Transfer half the filling to a mediuam saucepan. Bring the mixture up to a boil on medium heat and cook until glossy and thick, letting the berries burst.
- Remove the pan from the heat and transfer the mixture back to the bowl with the rest of the fruit. Add the vanilla. Stir well, then chill in the fridge until you are ready to use it.
Easy all-butter pie dough in the food processor
- In the bowl of a food processor fitted with the metal blade, combine the flour, sugar, and salt. Add the cold butter and pulse to form a coarse crumble.
- Add the water and pulse it in, then let the food processor run just until the dough comes together. I use my Cuisinart Food Processor from Amazon for this recipe.
- Divide the dough in two and transfer both pieces to your work surface. Shape one piece into a disk. Shape the other into a rectangle. Wrap both in plastic wrap and chill for 1 hour.
Pie assembly and baking
- After 45 minutes of chilling. Retrieve the rectangle of dough. Roll it to a 10x15 rectangle on a floured surface. Transfer to a big cookie sheet and chill again.
- Roll the disk to a 14 inch (35.5 cm) circle. Transfer to 9-inch (23 cm) metal pie plate and fit it in place. Pour the chilled filling into the pie and smooth it so it's even. Place in the fridge.
- Retrieve the big 10x15-inch (25.4x38 cm) rectangle of dough. Cut it into seven 2-inch (5 cm) strips.
- Take the pie out of the fridge and place 4 strips side by side vertically.
- Now weave in the other 3 strips horizontally to form a lattice (check out the video). Trim, tuck, and crimp the edges.
- Chill the pie in the fridge for 30 minutes until the dough is cold and hard. While the pie chills, preheat the oven to 425 °F (225 °C) with an oven rack set to the lowest position.
- When the pie has chilled enough and when the oven is preheated to 425 ºF (225 °C), take the pie out of the fridge and set it on a parchment-lined sheet pan. Brush the surface of the lattice with milk and sprinkle with turbinado. Meanwhile, place a large cookie sheet on the bottom rack of the oven.
- Bake the pie on the before-last or bottom rack for 30 minutes at 425 °F (220 °C) to set the crust. Lower the oven temperature to 400 °F (200 °C) and continue baking until the edges and top of the pie crust are golden brown. The filling should be bubbling through the lattice and very hot in the middle as well as the edges of filling. This takes about 45 minutes more of baking.
- Let the pie cool to room temperature, preferably overnight so that the pie sets properly before serving. Serve à la mode with vanilla ice cream.
Video
Notes
- Make the pie crust in the food processor to ensure that the butter is broken down into smaller, even pieces. This type of crust might be slightly less flaky but it will hold its shape much better in the oven, without oozing butter or puffing too much to hold the crimped edge better
- Use arrowroot starch and precook a portion of the filling to ensure the pie sets properly
- This recipe calls for Diamond Crystal fine Kosher salt. If using regular table salt, add half the amount or the recipe may be too salty!
- Use a metal pie plate not glass because metal is a better heat conductor and will help the crust bake properly and brown evenly.
- Bake your pie the day before to give the blueberry filling ample time to set so that you can slice the pie cleanly without any risk of the filling running out!
- Bake your pie for at least one hour, starting at 425 °F for the first 30 minutes to ensure the filling thickens and comes to a boil and the crust browns.
Explore More With AI
Nutrition
Nutrition information is automatically calculated and should only be used as an approximation.


The Mom Chef says
I love blueberries. I love pie. I love blueberry pie. This looks awesome.
Squeaky Gourmet says
mmmmhhhh butter---err I mean pie!!
Claudia says
Oh does this look scrumptious. Minnesota has had a bumper crop of blueberries.I've barely baked with them - just keep popping them in my mouth! This is inspiring! Many thanks for the visit. Your blog is just gorgeous.
Tati says
Congratulations on your blog!I loved everything I saw here!God bless!
Pacheco Patty says
I've never made a blueberry pie, I think it looks beautiful and I will have to try it:-)
baking.serendipity says
Yum! Blueberry pie would have to be up there on my list of best pies 🙂
Evan @swEEts says
Mountain Man made a blueberry pie for the fourth of July and ours did the same thing at first with the oozing blueberries.. didn't stop us from eating it 🙂 If you're interested in trying his recipe for crust please come back by and check it out!
Lynn says
That is one good looking pie. The blueberry filling looks amazing! I always use all butter crusts, I like the crispness of them. Pie crusts that are too flaky bug me. But thats just me.