
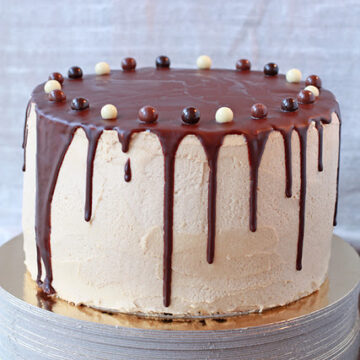
This recipe for chocolate cake with coffee buttercream makes an 8-inch chocolate cake with 3 layers of moist chocolate cake, stacked and frosted with coffee buttercream, and finished with a dark chocolate drip.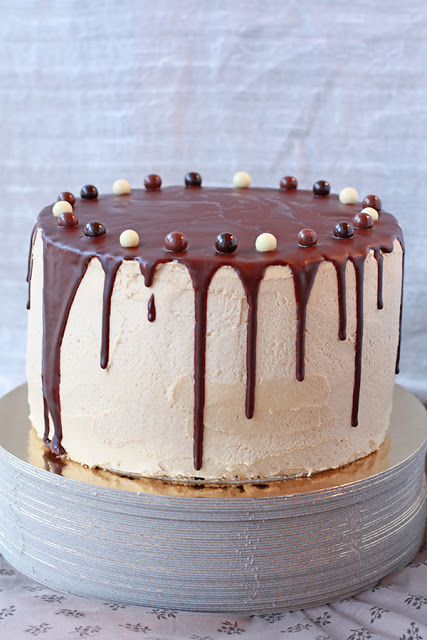
Each layer cake is an opportunity to test a new recipe and to learn a new technique. This cake is a showstopper with a coffee frosting and dark chocolate drip trickling down from the top. The recipe is from Baked Explorations: Classic American Desserts Reinvented. What I love about this recipe is that the layer cakes are very light and moist. The chocolate glaze certainly reinforces that chocolate flavour. The coffee buttercream tastes remarkably similar to a Coffee Crisp bar (well, minus the crispiness). This recipe is not hard but requires a little extra time that is well worth it.
Jump to:
Cooked frosting: Ermine
The coffee buttercream is made from a cooked frosting, also called ermine frosting. Cooked frosting starts with milk, sugar, and flour that you cook on the stove until it is a very thick, gooey paste consistency. You then beat the paste in a stand mixer until it has cooled to room temperature before adding the butter. Like with most buttercream frostings that involve cooking or heat, you have to make sure that the cooked base is cooled before adding the butter.
The key to making this type of frosting and to making a frosting that is properly emulsified is to make sure both the cooked base and the butter are at similar temperatures when you combine them, just like when you are making an Italian meringue buttercream:
- if the cooked paste is too hot, it will melt the butter and your buttercream will be very shiny and greasy with an oily mouthfeel because the butter has broken down and the fat has separated.
- if the butter is too cold, your buttercream may end up lumpy, not smooth because the butter may not incorporate properly and smoothly into the paste, and you will end up with chunks of butter speckled throughout the buttercream. The frosting will be lumpy, not smooth.
- don't add a large volume of liquid to flavour it: like with all frostings, whether simple American buttercreams made with powdered sugar or more complex buttercreams like ermine or Italian meringue, do not add a large volume of liquid to add flavour to the base. If you do, you risk breaking the emulsion and when that happens, it's hard to go back.
Baking tips and tricks to tackle this recipe
I learned a few things while making layer cakes. Here are some of my tips for cake-making success:
- Equip yourself with some useful tools: You will want this tool to help you transfer the delicate cake layers from pan to rack, etc. Trust me, it makes things a lot easier!
- Use your freezer: The cake layers are very delicate, so to make cake assembly easier, I wrapped them in cling wrap and put them in the freezer just before I made the buttercream. This way, the cake layers firm up in the freezer and can easily be stacked and iced without them falling apart on you
- Cooked frostings are tricky: this is the same method used for the tea-infused frosting for the Earl Grey cake
- The buttercream is thickened with flour. You must boil the milk/ flour/sugar mixture sufficiently so that it is very thick, otherwise, you will end up with a soupy buttercream.
- After it has thickened, make sure to beat the milk/flour mixture until it has completely cooled or you will melt the butter when you add it.
- Coffee extract vs espresso: I couldn't find coffee extract, so I made a careful baking substitution with very, very strong espresso and used that instead. It was strong to the point of being undrinkable but just right for flavouring a buttercream.
- Too much glaze is not always a good thing: I only used half the chocolate glaze that the original recipe called for. The beauty of this cake is that Surprisingly, I don't think more was needed. In the recipe below, I've written up the half-batch portion for you, but if you want more, double the ingredients listed!
How to store this cake
Given this chocolate layer cake is made with buttercream frosting, it's best to store it in the fridge. If you've cut into the cake, just cover the cut edges with pieces of parchment to prevent them from drying out. Place the cake in the fridge until the frosting is firm and cold, then cover the whole thing with aluminum foil. You can store this cake for up to a week, or freeze slices for later.
For a detailed explanation, read about how to store cake.
📖 Recipe
Chocolate Cake with Coffee Buttercream
Ingredients
Chocolate cake
- 85 grams Cacao Barry extra brute cocoa powder plus more for dusting pans
- 170 mL sour cream (14% fat)
- 310 mL hot water
- 295 grams bleached all-purpose flour
- 10 mL baking powder
- 5 mL baking soda
- 2.5 mL Diamond Crystal fine kosher salt
- 170 grams unsalted butter room temperature
- 115 grams vegetable shortening
- 350 grams granulated sugar
- 200 grams dark brown sugar
- 3 large egg(s) room temperature
- 15 mL pure vanilla extract
Coffee buttercream
- 340 grams granulated sugar
- 40 grams bleached all-purpose flour
- 375 mL whole milk (3.25 % fat)
- 80 mL whipping cream (35 % fat)
- 345 grams unsalted butter room temperature
- 5 mL pure vanilla extract
- 30 mL espresso room temperature
Chocolate ganache
- 114 grams dark chocolate (70 % cocoa content)
- 85 grams unsalted butter room temperature, cut into pieces
- 7.5 mL light corn syrup
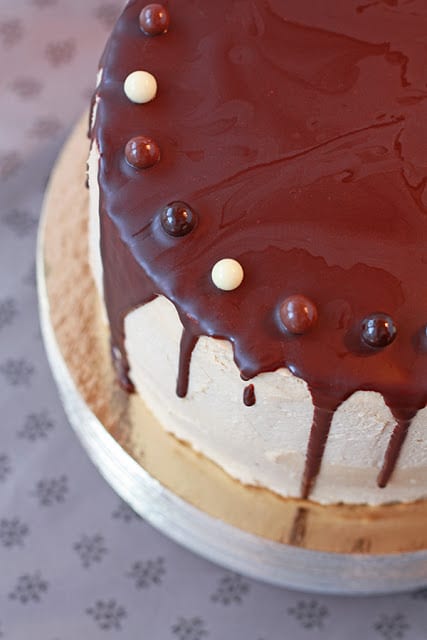
- 25 Godiva chocolate pearls I used a mixture of white, milk, and dark
Instructions
To make the chocolate cake
- Preheat the oven to 325°F. Grease three 8-inch round cake pans, line each of them with parchment, grease the parchment and dust the pans and parchment with cocoa powder. Set them aside.
- In a medium bowl, mix the cocoa powder, sour cream and hot water. Set aside for later.
- In another medium bowl, whisk together the flour, baking powder, baking soda, and salt.
- In the bowl of an electric mixer fitted with the paddle attachment, beat the butter and shortening on medium speed until it is light and fluffy.
- Add the sugars to the bowl of the mixer and beat on medium speed until light and fluffy, about 5 minutes. Scrape down the bowl as needed.
- Add the eggs one at a time, beating well between each addition. Add the vanilla, and beat well.
- With the mixer on low, add the whisked dry ingredients alternately with the cocoa mixture, scraping the sides of the bowl as needed.
- Give the mixture a last stir by hand before dividing among the three prepared pans.
- Bake the cake layers for 30 to 40 minutes, or until a cake tester inserted into the center of the cake comes out clean. The cake will pull away from the sides of the pan when the cake is done.
- Let the cake cool in the pans for 30 minutes before flipping them onto a wire rack to cool completely. Wrap them in plastic wrap to store them.
To make the coffee buttercream
- Place the wrapped cake layers in the freezer while you prepare the buttercream.
- In a medium saucepan, whisk together the sugar and flour. Whisk in the milk and cream, and cook over medium heat, whisking often until the mixture boils and thickens. This takes a good 15 minutes.
- Transfer the thickened mixture to the bowl of an electric mixer fitted with the paddle attachment. Beat on high speed until the mixture is completely cooled, about 10 minutes (don't just feel the bowl, check the mixture itself to be sure it has cooled!).
- Reduce the speed to low and add the butter, mixing until it is thoroughly incorporated. Increase the speed to medium-high to make the frosting light and fluffy.
- Add the vanilla and the espresso (or coffee extract) to taste.
To assemble the cake
- Trim the cake layers so that they are flat and levelled.
- Place one cake layer in the center of a serving plate. Place parchment strips to cover the exposed plate and catch any buttercream/ganache drips.
- Top the first layer with 1 ¼ cups buttercream. Place the second layer over the buttercream, and repeat with another 1 ¼ cup of buttercream and the third layer.
- Frost the top and sides of the cake with what's left of buttercream. Place the cake in the fridge while you make the chocolate glaze.
To make the chocolate glaze
- Place the chocolate, butter, and corn syrup in the top of a double boiler.
- Stir the mixture with a small spatula until the ingredients have melted and the glaze is smooth.
- Take the pan off the heat, and stir for a few minutes to allow the glaze to cool and thicken a little.
Finishing touches
- Slowly pour the glaze over the top of the cake, pushing tiny droplets down the sides.
- Let the glaze set for a few minutes before decorating the cake with a few chocolate pearls.
- Refrigerate the cake for 20 minutes to set the glaze. The cake should be served at room temperature.
Notes
- This recipe calls for Diamond Crystal fine Kosher salt. If using regular table salt, add half the amount or the recipe may be too salty!
Nutrition
Nutrition information is automatically calculated and should only be used as an approximation.
S Chippendale says
Stunning cake. It looks sophisticated and mouthwatering.
Anonymous says
fabulous looking!
mayssam @ Will Travel for Food says
I hadn't seen this post until now! Thanks so much again for making this cake for my birthday! It was indeed a showstopper and so delicious!
Anonymous says
Yes, all you bakings were HUGELY enjoyed by not only your immediate labmates, but also us honorary lab members from down the hall, and definitely not just because they were free. (But because they were always DELICIOUS. 🙂
Emily says
Oh man this looks delicious. Nothing can beat a good piece of layer cake. Fabulous photos!
Kiri W. says
ooh, that's one gorgeous cake! Look at the ganache drip 🙂 I could dig in any second!
Culinarian says
Gorgeous!
Torviewtoronto says
beautiful looking cake
mividaenundulce says
This layer cake looks spectacular. The chocolate makes it more delicious.
Cucina49 says
That is a truly stunning cake--sending you some buzz!