
Learn how to make perfect butter tarts with this no-fail recipe. Find everything you need to know about making butter tart pastry dough from scratch, whether to grease the muffin pan or not, some tips for baking butter tarts to ensure the crust is properly baked, why the filling may crystallize and how to avoid it, and of course, recipes for the all-butter pastry crust and butter tart filling without corn syrup.
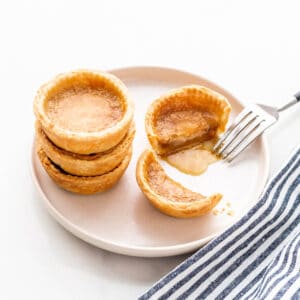
Like most Canadians, I love butter tarts! The filling is great: it's sweet with brown sugar, with a thin, dribbly syrup layer tucked under the sugary crust that forms as it bakes. And then, there's the all-butter crust. It's flaky like a good pie crust should be.
Butter tarts are a quintessential Canadian treat, just like Nanaimo bars. The downside to baking butter tarts from scratch is that they can be a little tricky to get right, though they are such a popular dessert. There are many, many recipes to choose from, but after much tweaking, I think I have perfected the technique with this no-fail butter tarts recipe:
- The baking method ensures the tart shells are baked through and never raw or gummy, or greasy on the bottom
- The filling doesn't overflow as it bakes, so the tarts have a neater appearance
- The tarts are easy to get out of the pan because the filling doesn't bubble over, so the butter tarts never stick to the pan!
- The filling doesn't rely on corn syrup, yet is still a little gooey
Jump to:
What You Need To Make Canadian Butter Tarts

Some people will add vinegar to the dough. This is to prevent gluten from forming and to make a less tough, more tender pastry shell. I don't think it's necessary but if you are concerned or have found your pie doughs are tough, try adding a teaspoon of vinegar when you add the water.
Getting the butter tart filling just right
Canadians will debate on whether they want a runny, gooey filling, or whether they want a more set filling, and that's a matter of personal preference. And don't get them started on raisin versus no raisin butter tarts, or whether you can add dried currants or coconut to them.
Filling recipes vary greatly and may include extra ingredients to prevent the caramel filling from crystallizing:
- Some butter tart filling recipes have corn syrup: this is a method to reduce crystallization in the filling so ensure a silky smooth, gooey butter tart filling. The corn syrup introduces another sugar, other than sucrose, which reduces the likelihood that the filling will crystallize.
- Some have white vinegar: this is another method to reduce crystallization of the caramel filling. The acidity of the vinegar will break down some of the sucrose, leading to a smoother filling. Another acid I've seen in butter tart fillings is lemon juice.
- Some have maple syrup: maple syrup will not prevent crystallization but it adds a lot of flavour. If you'd like to use it to make your butter tart filling, by all means, do! Remember that with maple syrup, the baking substitution is to replace up to 70 grams (⅓ cup) of brown sugar with 83 mL (⅓ cup) of maple syrup. This will lead to a more runny, fluid middle that is less set. You can even do half brown sugar and half maple syrup, but again, the filling may be more runny. It all depends what you want!
- Dark versus light brown sugar: you can use either dark or light brown sugar to make the filling for butter tarts. I prefer the mild flavour of light brown sugar, but either will work.
How To Make Perfect Butter Tarts
I like to make the all-butter crust for butter tarts by hand. Follow this recipe for pie crust by hand to see the technique if you've never done it before. Alternatively, you can make the crust in a food processor if you prefer, or even this stand mixer pie crust technique works.

Step 1-I like to shape the dough into two logs to make dividing the dough and rolling it out much easier (image 1). I use a French rolling pin to roll each piece of dough to a large, thin disk, and I use a round cookie cutter to trim and neaten the edges (image 2).
Note: I now consistently roll the dough to about 3/16". That's almost a quarter inch, but not quite. The crust is still thick enough that the filling doesn't seep through, but it's not so thick that it doesn't cook. At this thickness, I like the ratio of sweet filling to buttery crust. Some butter tarts have a very thick crust and are all dough. I believe this version is better!

Step 2-Fit each disk of dough into the cup of a regular muffin pan (image 3) either using a wood tamper (image 3) or your fingertips (image 4). Either technique works best if the dough is still cold. Chill it if you have trouble at this step.
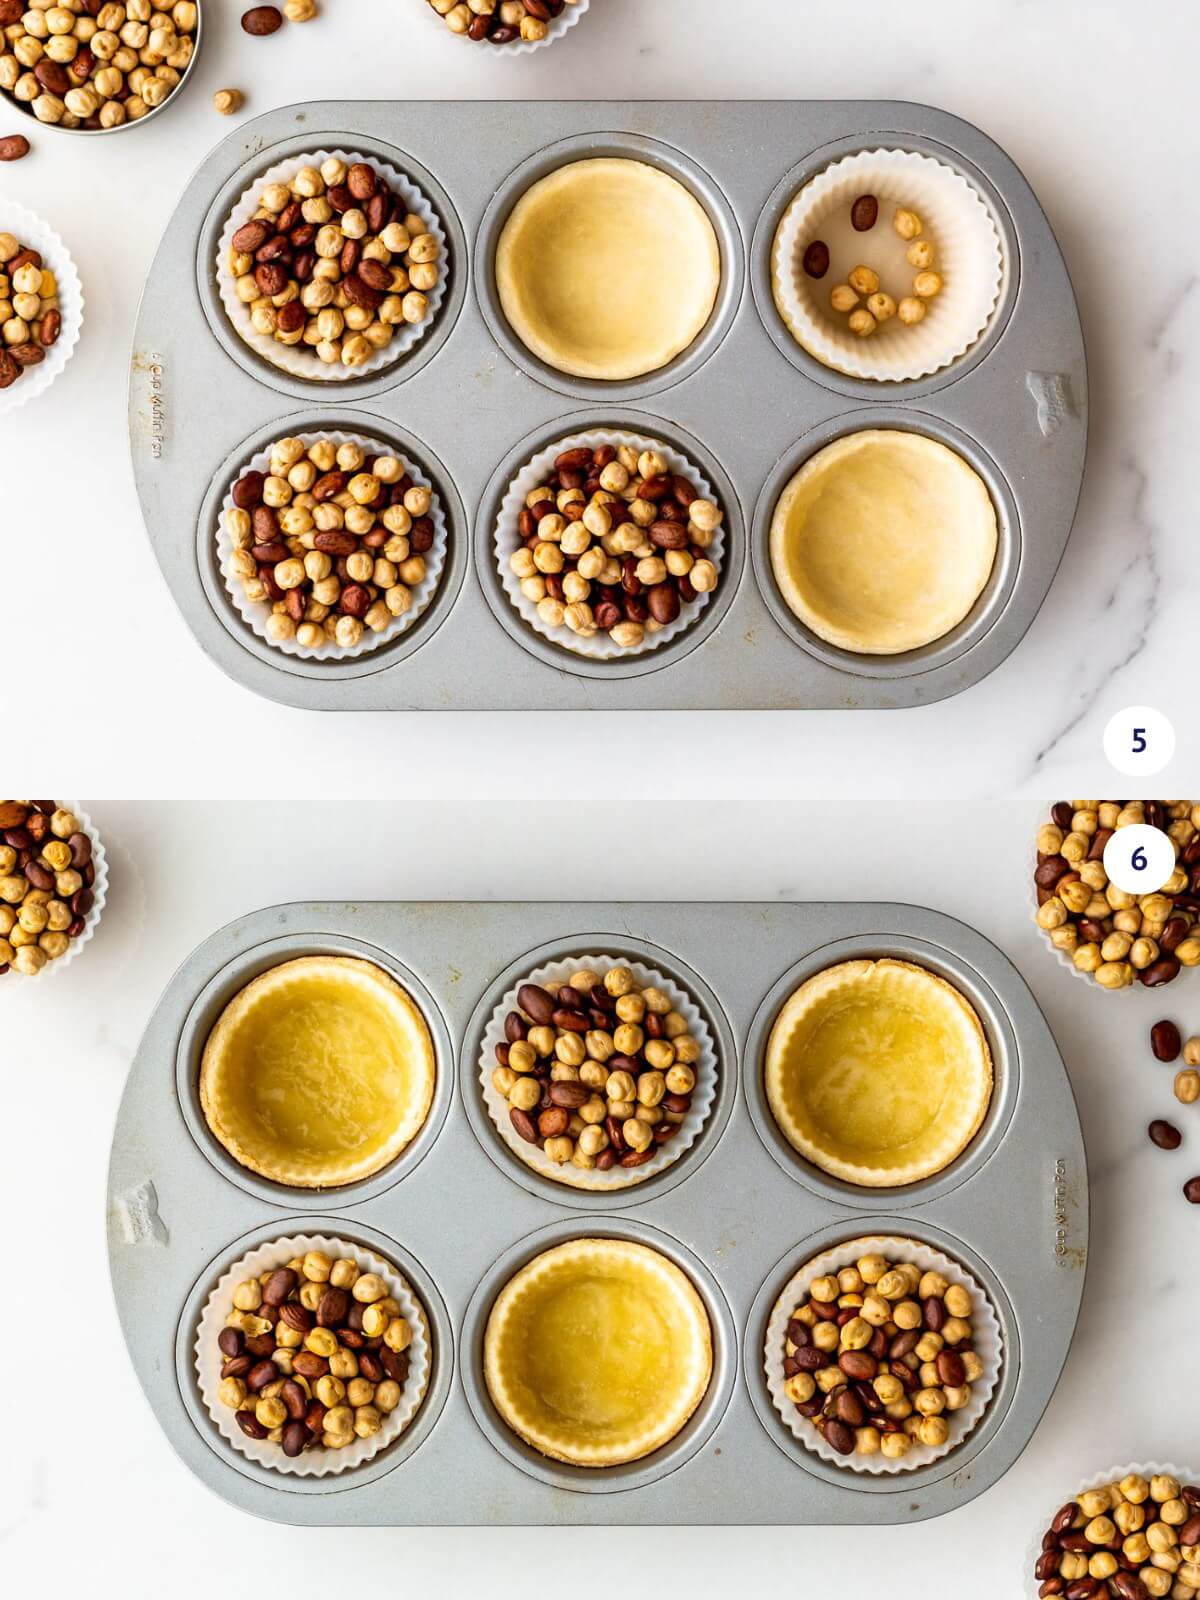
Step 3-I prefer to par-bake the crusts before filling them. I line each pastry shell with a silicone muffin cup and fill with dry beans or pie weights (image 6) and bake until dry (image 6).
Tip: Bake butter tarts on the bottom rack of the oven ! This ensures that your tarts will bake on the bottom, and not just the tops. This has worked really well for me and the bottoms even begin to turn golden brown this way.

Step 4-While the tart shells cool down, combine the ingredients for the filling in a medium bowl (image 7) and whisk them until smooth (image 8).

Step 5-I use a ¾ ounce scoop to divide the filling equally between all the par-baked tart shells (image 9) and bake until the filling has started to bubble up but doesn't overflow (image 10).
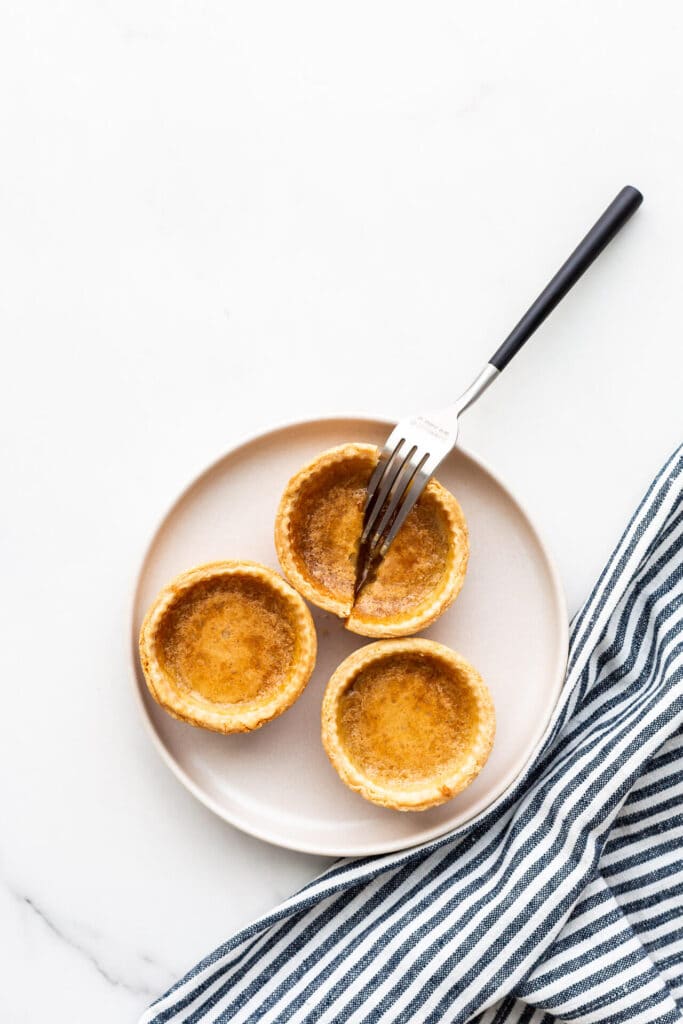
Top Butter Tart Baking Tip
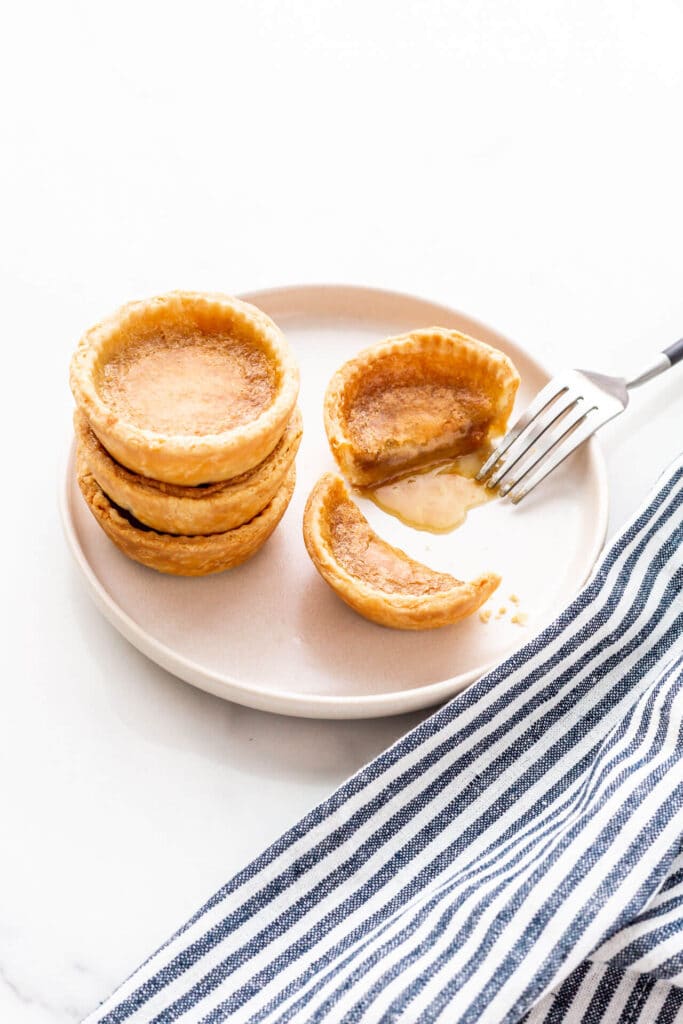
When the tarts are baked, do not unmould them until they are completely cooled. Give the tarts a gentle twist 5 minutes after coming out of the oven to ensure the pastry isn't stuck. If you try to unmould butter tarts when they are warm, or worse, straight out of the oven, you will likely break them. Don't hurry the cooling process. Just walk away, let them cool, and then you can start to unmould. Slide the tip of a thin palette or pairing knife between the crust and the pan, and use your finger on the other side of the crust to pull upwards (kinda like tweezers where one end is a knife and the other is a finger).
Butter Tart FAQs
The filling for butter tarts contains a lot of sugar and sugar is sucrose, which wants to crystallize. If you find your filling is too crystallized, try adding in a little corn syrup (just a tablespoon even) or add a teaspoon of vinegar or lemon juice. The acidity will help break down some of the sucrose into glucose and fructose, and these invert sugars will help keep the filling more fluid.
Another suggestion: don't over-bake the filling. I prefer to pre-bake the crusts empty, then fill and briefly bake the final tarts to avoid the filling boiling, which helps keep the filling runny.
Getting butter tarts out of the pan is the most stressful part of making them at home. First, when they come out of the oven, let them cool for about 5 minutes to firm up a little. Then you can use your fingertips to gently twist them in the pan to loosen the sides.
Once completely cooled, you can pull them out of the muffin pan one by one using your fingertips. You can also use a pairing knife or an offset spatula to help you lift them out.
For tarts in tart pans, you don't have to grease the tart pans and the tarts will unmould just fine. I've tested baking the tarts in greased and ungreased muffin pans, and also with and without a small parchment round at the bottom of each. After many tests, I now realize that greasing the muffin pan for butter tarts wasn't helpful. The parchment didn't make much of a difference, but I feel that the greasing might actually have made the unmoulding more difficult.
When I make a batch of 12 butter tarts, I usually store half at room temperature to be enjoyed in the next few days and half in the freezer, for future cravings. I don't store them in the fridge. I don't store pie in the fridge either.
Butter tarts store well at room temperature for several days. Just let them cool completely before transferring them to a container. For longer storage, you can freeze them and they freeze very well. In fact, many Canadians enjoy eating cold butter tarts straight from the freezer!
To store butter tarts in the freezer, let them cool completely on a wire rack then transfer them to a parchment-lined sheet pan to freeze solid. Once frozen, you can throw them in an airtight freezer bag.
I defrost frozen butter tarts on a large plate (or on a sheet pan), set in a cool, dry place. It takes an hour or two if you defrost them at room temperature.
Here's a recipe for both the all-butter butter tart crust and the classic filling without corn syrup. This butter tart recipe makes 12 butter tarts in muffin pans.
📖 Recipe
Butter Tarts with All-Butter Crust
Ingredients
All-butter crust recipe for butter tarts
- 280 grams bleached all-purpose flour
- 10 mL granulated sugar
- 5 mL Diamond Crystal fine kosher salt
- 155 grams unsalted butter very cold, cut into small cubes
- 85 mL cold water
Butter tart filling recipe
- 80 grams unsalted butter melted
- 200 grams light brown sugar
- 30 mL whipping cream (35 % fat)
- 5 mL pure vanilla extract
- 1.25 mL Diamond Crystal fine kosher salt
- 1 large egg(s)
Instructions
How to make all-butter pastry shells for butter tarts
- In a large bowl, whisk together the flour, salt, and sugar.
- Add the cubed cold butter to the bowl and toss it in the flour to coat it.
- Working quickly with your palms and fingertips, rub handfuls of flour and butter together to work the butter into the flour until you get a mixture that has a coarse, sandy texture, with pieces of butter no larger than a chickpea. The mixture will have a golden yellow colour when you are done.
- Sprinkle the mixture with the water. Work the liquid ingredients into the sandy mixture, whisking it in with the fork.
- Clean the fork with your hands and switch to working the dough with your hands, quickly kneading it all together until you get a smooth dough.
- Split the dough into two; roll each into a log, wrap in plastic wrap and chill for at least 1 hour.
- When you are ready to roll the dough, simply divide each log into 6 pieces, rolling each piece into a 4 inch circle roughly, using a rolling pini. Carefully work each disk into the well of a 12 cup muffin pan.
- Chill the tart shells in the fridge for at least 15 minutes while you preheat the oven to 400 ºF.
- When the tart shells are very cold and firm and the oven is preheated, line each tart shell with a silicone muffin cup and fill with dried beans or pie weights.
- Place the muffin pans on the bottom rack of the oven and bake them for 20 minutes, the edges will begin to dry out and turn golden when they have baked sufficiently.
- Take them out of the oven when they are blind-baked, and let them cool slightly so that you can remove the silicone liners and pie weights.
How to make butter tart filling
- Drop the oven to 375 ºF (190 °C).
- In a medium bowl, stir together the melted butter, the brown sugar, the cream, the vanilla, the salt, and the egg,. Stir well.
- If you want to make tarts with raisins or nuts, scatter a few at the bottom of each crust (see notes).
- Divide the filling among the blind-baked tart shells. You'll place roughly 30 grams of filling per tart.
- Bake the tarts on the middle rack of the oven for another 15 minutes. The edges of the crust should be golden and the filling will be puffed and golden, but will not be boiling yet. If it's boiling, the filling will be overcooked and sink.
- Remove the muffin pans from the oven. Let the tarts cool for about 5 minute until they are firm, then gently twist them to make sure they will unmould when cooled.
- Once cooled, unmold the tarts with the help of an offset spatula.
Notes
- This recipe calls for Diamond Crystal fine Kosher salt. If using regular table salt, add half the amount or the recipe may be too salty!
- Ask a Canadian about butter tarts and whether they should contain raisins, dried currants, or nuts, and you will probably get a very passionate response. I prefer them without, but feel free to add up to ½ cup total of raisins or dried currants or toasted nuts, or a combination of these (adding up to ½ cup).
Nutrition
Nutrition information is automatically calculated and should only be used as an approximation.
Fran says
I forgot the whipping cream will they still work
Janice says
Hi! They should work alright without it. Let me know how they turn out!
Tanya Reed says
Okay I blew it! Tried a warm tart, couldn’t wait and it completely crumbled. While I was eating my disaster I reread the recipe and comments. Let the rest cool and had no trouble getting them out. Absolutely delicious Canadian classic! Mmmmm. Perfect recipe! Exactly what I was looking for! Thank you!
D says
My filling rose up past the edges of the pastry. As soon as I removed the pan from the oven I used a small offset spatula to separate the filling from the muffin pan and turned each butter tart. No problems removing later.
lena says
Silicone muffin pans....you will never have a butter tart stick to the pan...ever!!! Even if the bottom is cracked or boils over the edge, they pop out like a charm. Game changer 😊