
If you want to make homemade preserves, but aren't sure how to seal the jars, here's a run-down of canning kits that will get you started on your journey to making more homemade jam! Home canning can come with a few challenges without the right tools or equipment so you will find what you need to get started below.
As an Amazon Associate I earn from qualifying purchases.

Common canning problems
#1 a pot big enough to seal/process the jars in
I have a pot large enough to make a decent-sized batch of jam in. But, if I'm making a batch of jam (yielding 5 or 6 jars of jam), my one big pot has jam in it, so it is obviously unavailable for heating a large amount of water and processing the jars. Over the years, I have tried using my smaller pots for this step, splitting the jars among them, but really, it's a mess (and sometimes, I can only fit 1 to 2 jars per pot). The small pots overflow because in order to have the jars immersed in the hot water bath, the pots have to be filled to the rim, and boiling. My "typical setup" just doesn't work well.
#2 a rack to fit the bottom of the pot
I don't like the jars of jam to be rattling directly on the bottom of the pot for the processing step. It honestly makes me nervous. Every year, I come up with a different, creative solution to this problem. One time, I lined the bottom with blue kitchen towels. Apparently, the towel dye was more attached to the boiling water than the towel (oops!), so my towels lost most of their lovely blue hue. Another time, I used extra jar lid rings to line the bottom of the pot, creating a DIY rack of sorts. This also worked, but this trick assumes that you have extra lids lying around, which is rare, at best.
With these problems in mind, I asked Bernardin if I could test out their Home Canning Starter Kit. It's basically a larger more complete tool kit for canning. You can order this full canning kit on Amazon.
Home canning tools
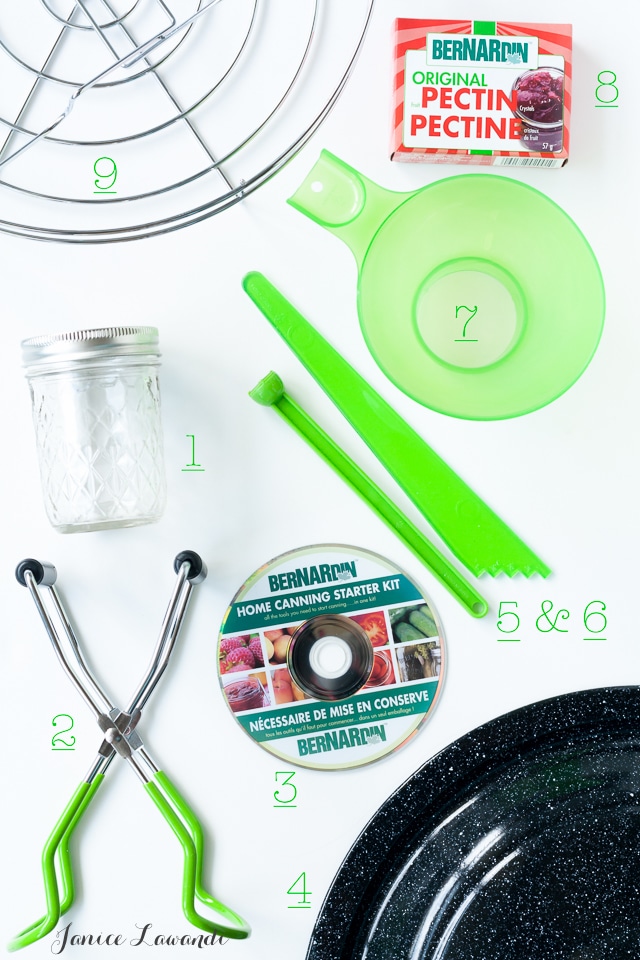
Canning Starter Kit from Bernardin
A starter canning kit comes with all the tools you need to make homemade jams and preserves and is the solution to the above-mentioned problems. The tools are not absolutely necessary but they will make your life a lot easier. The fact is that he canning process is so much less stressful with a canning kit and the right tools. Here's what you get in a standard home canning kit like the Bernardin kit on Amazon:
1. Set of 4 decorative 250 mL mason jars-I remember my mom using this exact style of jars when she made preserves when I was younger. In fact, I used one of those diamond-patterned jars in an art project as a child, and I transformed the jar into a stained glass votive candle holder. I much prefer this style of jar to those with embossed fruits.
2. Jar lifter with rubberized grip so that you can lift jars out of the canning water bath without them slipping.
3. Instructional DVD to get you started with your kit
4. Giant canning pot with lid so you can process a batch of home preserves (especially useful if you only have one big pot at home!)
5. & 6. Magnetic lid lifter and air bubble remover/headspace gauge
7. Non-reactive wide-mouth funnel so that you can cleanly transfer preserves to the jars without making a mess
8. Pectin, which is helpful in many cases for achieving better-set jams, especially from fruits with less pectin
9. Canning rack that fits perfectly into the canning pot, with handles so that you can easily drop down the lot of jars into the canning pot.
This kit is great, not only for those starting out with home canning, but also for those who already make preserves, and wanting to simplify the process. The starter kit has all the helpful (and I'd say even essential) tools for home canning plus a giant pot and rack, which definitely solve my two major home canning problems. The only important thing to note about the kit is the pot is HUGE, meaning it takes a long time to boil such a large volume of water (almost an hour on my stove to boil enough water for processing the jars). This is not the pot size you'd use if you want to seal two small jars of jam. This is better for processing a batch of 5 or 6 jars, and even larger jars.
With this home canning kit, you can easily make marmalades (like classic orange marmalade, three fruit marmalade, grapefruit marmalade, lime marmalade) or jams (like plum jam, rhubarb jam (no pectin), spicy jalapeño jam, and even spiced apple jam). Your life will be so much easier!

Alternatives to a full canning kit
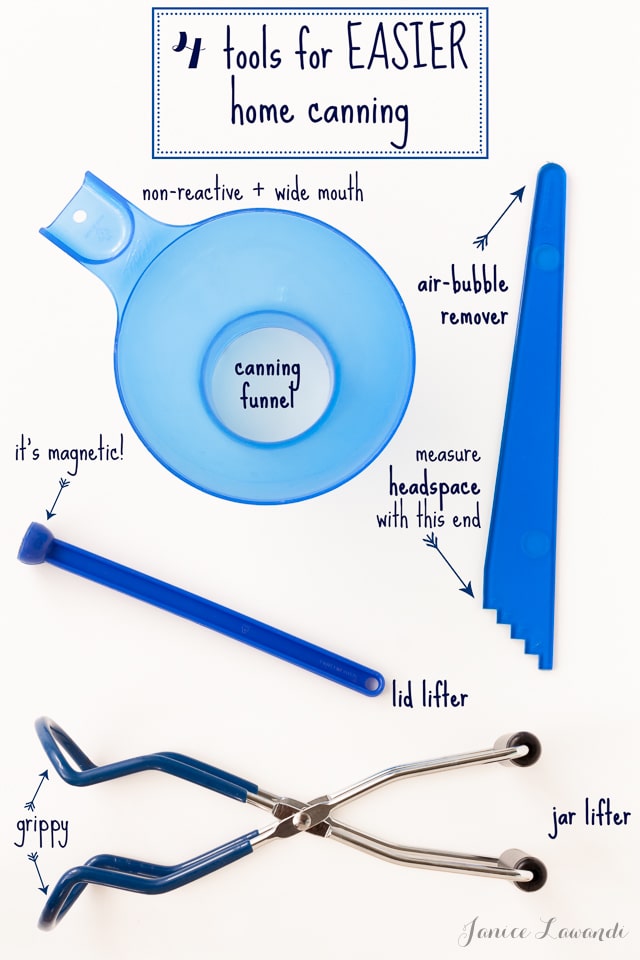
If you don't want to invest in the full starter canning kit, your other option is the smaller kit. Actually, I think it's the most useful kit I've ever purchased, which is why I wanted to share it with you. I am in love with this tool kit because it's simple but takes all the worries and the headaches out of canning and preserving. Here's what you get with the smaller kit:
- Wide-mouth funnel: This funnel is designed to fit most mason jars, allowing you to cleanly divvy up your homemade jams and pickles, without making a mess. The funnel is made from a non-reactive plastic (unlike older canning funnels made of metal, and sometimes reactive aluminum) so it won't mess with the flavour or the quality of your preserves.
- Bubble remover/headspace gauge: Air bubbles are a big no-no in canning, and this plastic stirrer is excellent for helping you swirl and push out any of those pesky air pockets that might have formed as you filled your jars. The opposite end is a handy measuring tool allowing you to properly verify the headspace over your preserves to make sure you have enough, but not too much air space in your jars.
- Magnetic wand: I think this might be my favourite part of the kit because I used to have a hell of a time trying to get the sterilized snap lids out of their water bath without scratching the seal strip with my tongs (or even worse, a fork). It's important not to scratch that seal strip on the underside of the snap lids, and this magnetic wand allows you to literally pick up the lids, one at a time, easily and without any risk of scratching. Plus, magnets are cool.
- Jar lifter: When I first started making jams at home, by far the worst, most daunting part of the process was trying to get the sterilized, processed, boiling hot jars out of the big pot of water. My tongs are too flimsy and slippery for this task, so oftentimes, I used to have to plunge my hands, protected by a pair of kitchen gloves, into the hot water bath trying to get the jars out. It was ridiculously dangerous. Let me tell you, the jar lifter is a much more appropriate tool for this task.
- Big pot with lid: many home canning kits come with a giant pot and lid, equipped with a rack with handles that make boiling large jars of homemade preserves so much easier. If you don't have a canning pot, you can use your largest pot (like a pot that you might use to boil whole lobster in). A stock pot will also work. Fit a rack at the bottom of the pot to make sure the jars are not sitting on the bottom of the pot directly on the heat source.
If you just want the tools, try the smaller canning tool kit, which is very simple, but each piece serves a purpose and I can vouch for how useful this kit is and how much easier it makes life to have it on hand.
You can easily purchase the canning starter kit (Amazon), as well as the smaller tool kit I featured previously (Amazon), and mason jars (Amazon). They are all well worth it. Good luck and happy canning!
Step-by-step process
Follow these steps to can your jars of jam, marmalade, and homemade preserves:
- Clean your jars and lids: Wash jars and lids with hot soapy water.
- Warm empty jars: Set the jars on a rimmed sheet pan and heat them in the oven at 121 °C (250 °F) for at least 15 minutes. I put them in the oven before I start cooking my batch of jam so that the jars are ready when the jam is ready.
- Prepare your canning pot with water: Heat a canning pot with a rack half to three-quarters full with water. The water should be boiling by the time you are ready to process your jars of jam.
- Prepare your marmalade (or jam) recipe, boiling to the jam setting point to ensure the perfect set (or the marmalade setting point for marmalade).
- Fill hot jars: Take the warm jars out of the oven. Using a ladle and a funnel, fill the hot jars with the hot jam to 0.5 cm from the rim (¼ inch). This is what home canners call the "headspace."
- Remove air bubbles, adjusting the fill of each jar as needed.
- Wipe the rims with a damp paper towel to remove any drips from the rim. These drips will prevent the lid from sealing properly!
- Close the jars: Centre the lid on the rim and screw the band until fingertip tight or finger tight (don't overtighten the lids!).
- Transfer closed jars to pot: Drop the jars onto the rack in the pot of boiling water using a jar lifter. Adjust the height of the water to make sure the jars are covered with at least 2.5 cm (1 in) of water.
- Place the lid on the pot and bring the pot of water up to a full, rolling boil.
- Process the jars according to your recipe. For most jams and marmalades on this site, you have to boil the jars for a full 10 minutes (counted after the water bath comes to a full boil).
- Retrieve jars from the canner and let them rest for 24 hours: Set the jars on a rack without disturbing them. Don't retighten the bands or play with the lids. Just leave them as is on the rack. You will likely hear a pop sound when the seal forms.
- Check the seal after 24 hours: the centre of the lid will curve downward if they are sealed properly. They will not bounce or move when pressed.
- Store sealed jars in a cool dry place, away from the light.
The steps are basically the same, whether you are making jam or marmalade. These are the steps I follow for pickles too! Depending on the recipe you are canning, you may need a larger headspace (the gap between the surface of the preserve and the rim of the jar). The jars may have to boil in the canner for longer too.
And while a home canning kit is not essential to making jars of jam and marmalade, it definitely will make the task much easier. These kits include the tools you need to accomplish almost every step of the process.
Get the home canning kit on Amazon.
Disclosure: Bernardin sent me the home canning starter kit to try out. I chose to feature it.

Felisha Corbeil says
The large pot with lid. I don't have to many large pots that would boil my preserves so the pot is the most useful help tool, other then the cannot jars!
Birdiebee says
The rack would be the most helpful to me to lift the jars out of the water.
Solducky says
The canning rack!
Kate says
Jar lifter! Those jars be mighty hot!
Claire says
The funnel!
TaraO says
The funnel would be so handy!
cteeobrien {at} cox [dot] net
amelia says
EVERYTHING! I need new canning supplies!